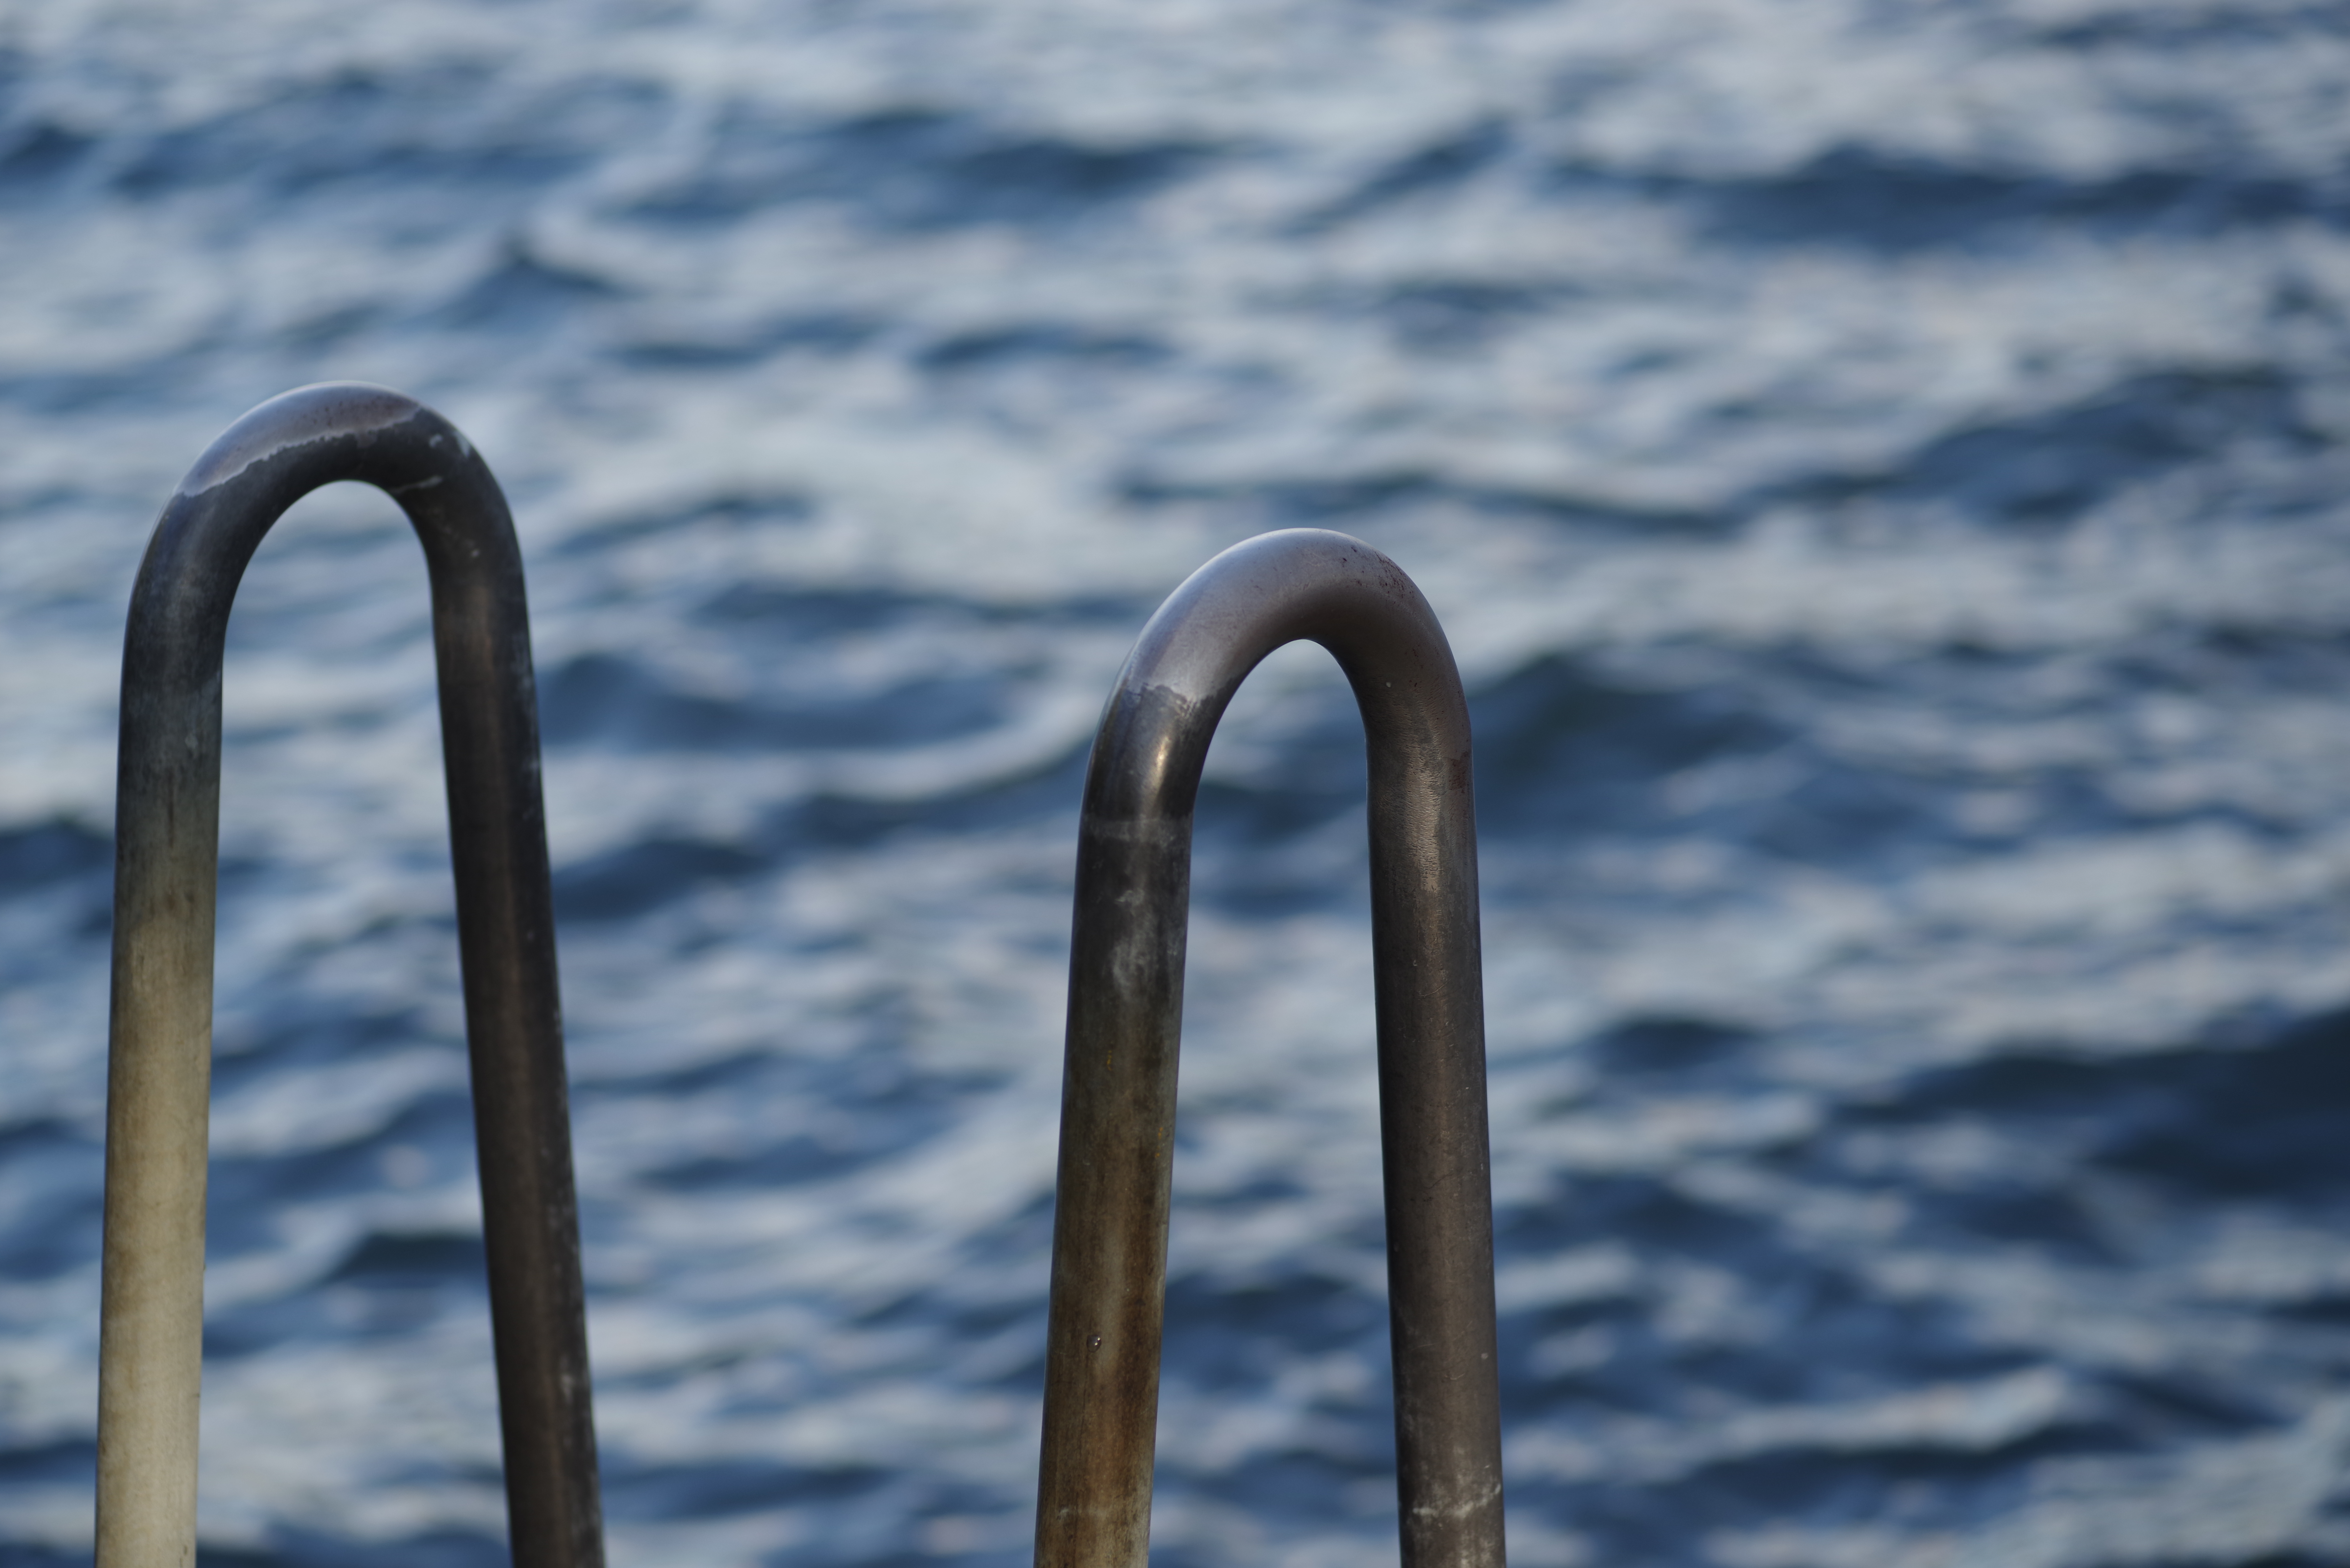
I did a main photo walk during this Hunt that yielded me 5 pictures – which is a great score 😉 Water was actually one that I expected to get, considering where I was going, but I had no strong idea about what I wanted to do. I found the top arches of a ladder going into the lake and decided to play with it for a while. Of all the pictures that I took, this was my favorite under the SOOC constraint.
I have a fondness for images that imply the word by their absence, or that obviously fit the word without making it obvious, or that make the word central but still subtle, if that makes any sense. And because of that, I’m actually very fond of that image, even if it may have fit another theme better (but I think I would have liked it less for the other theme 🙂 ).
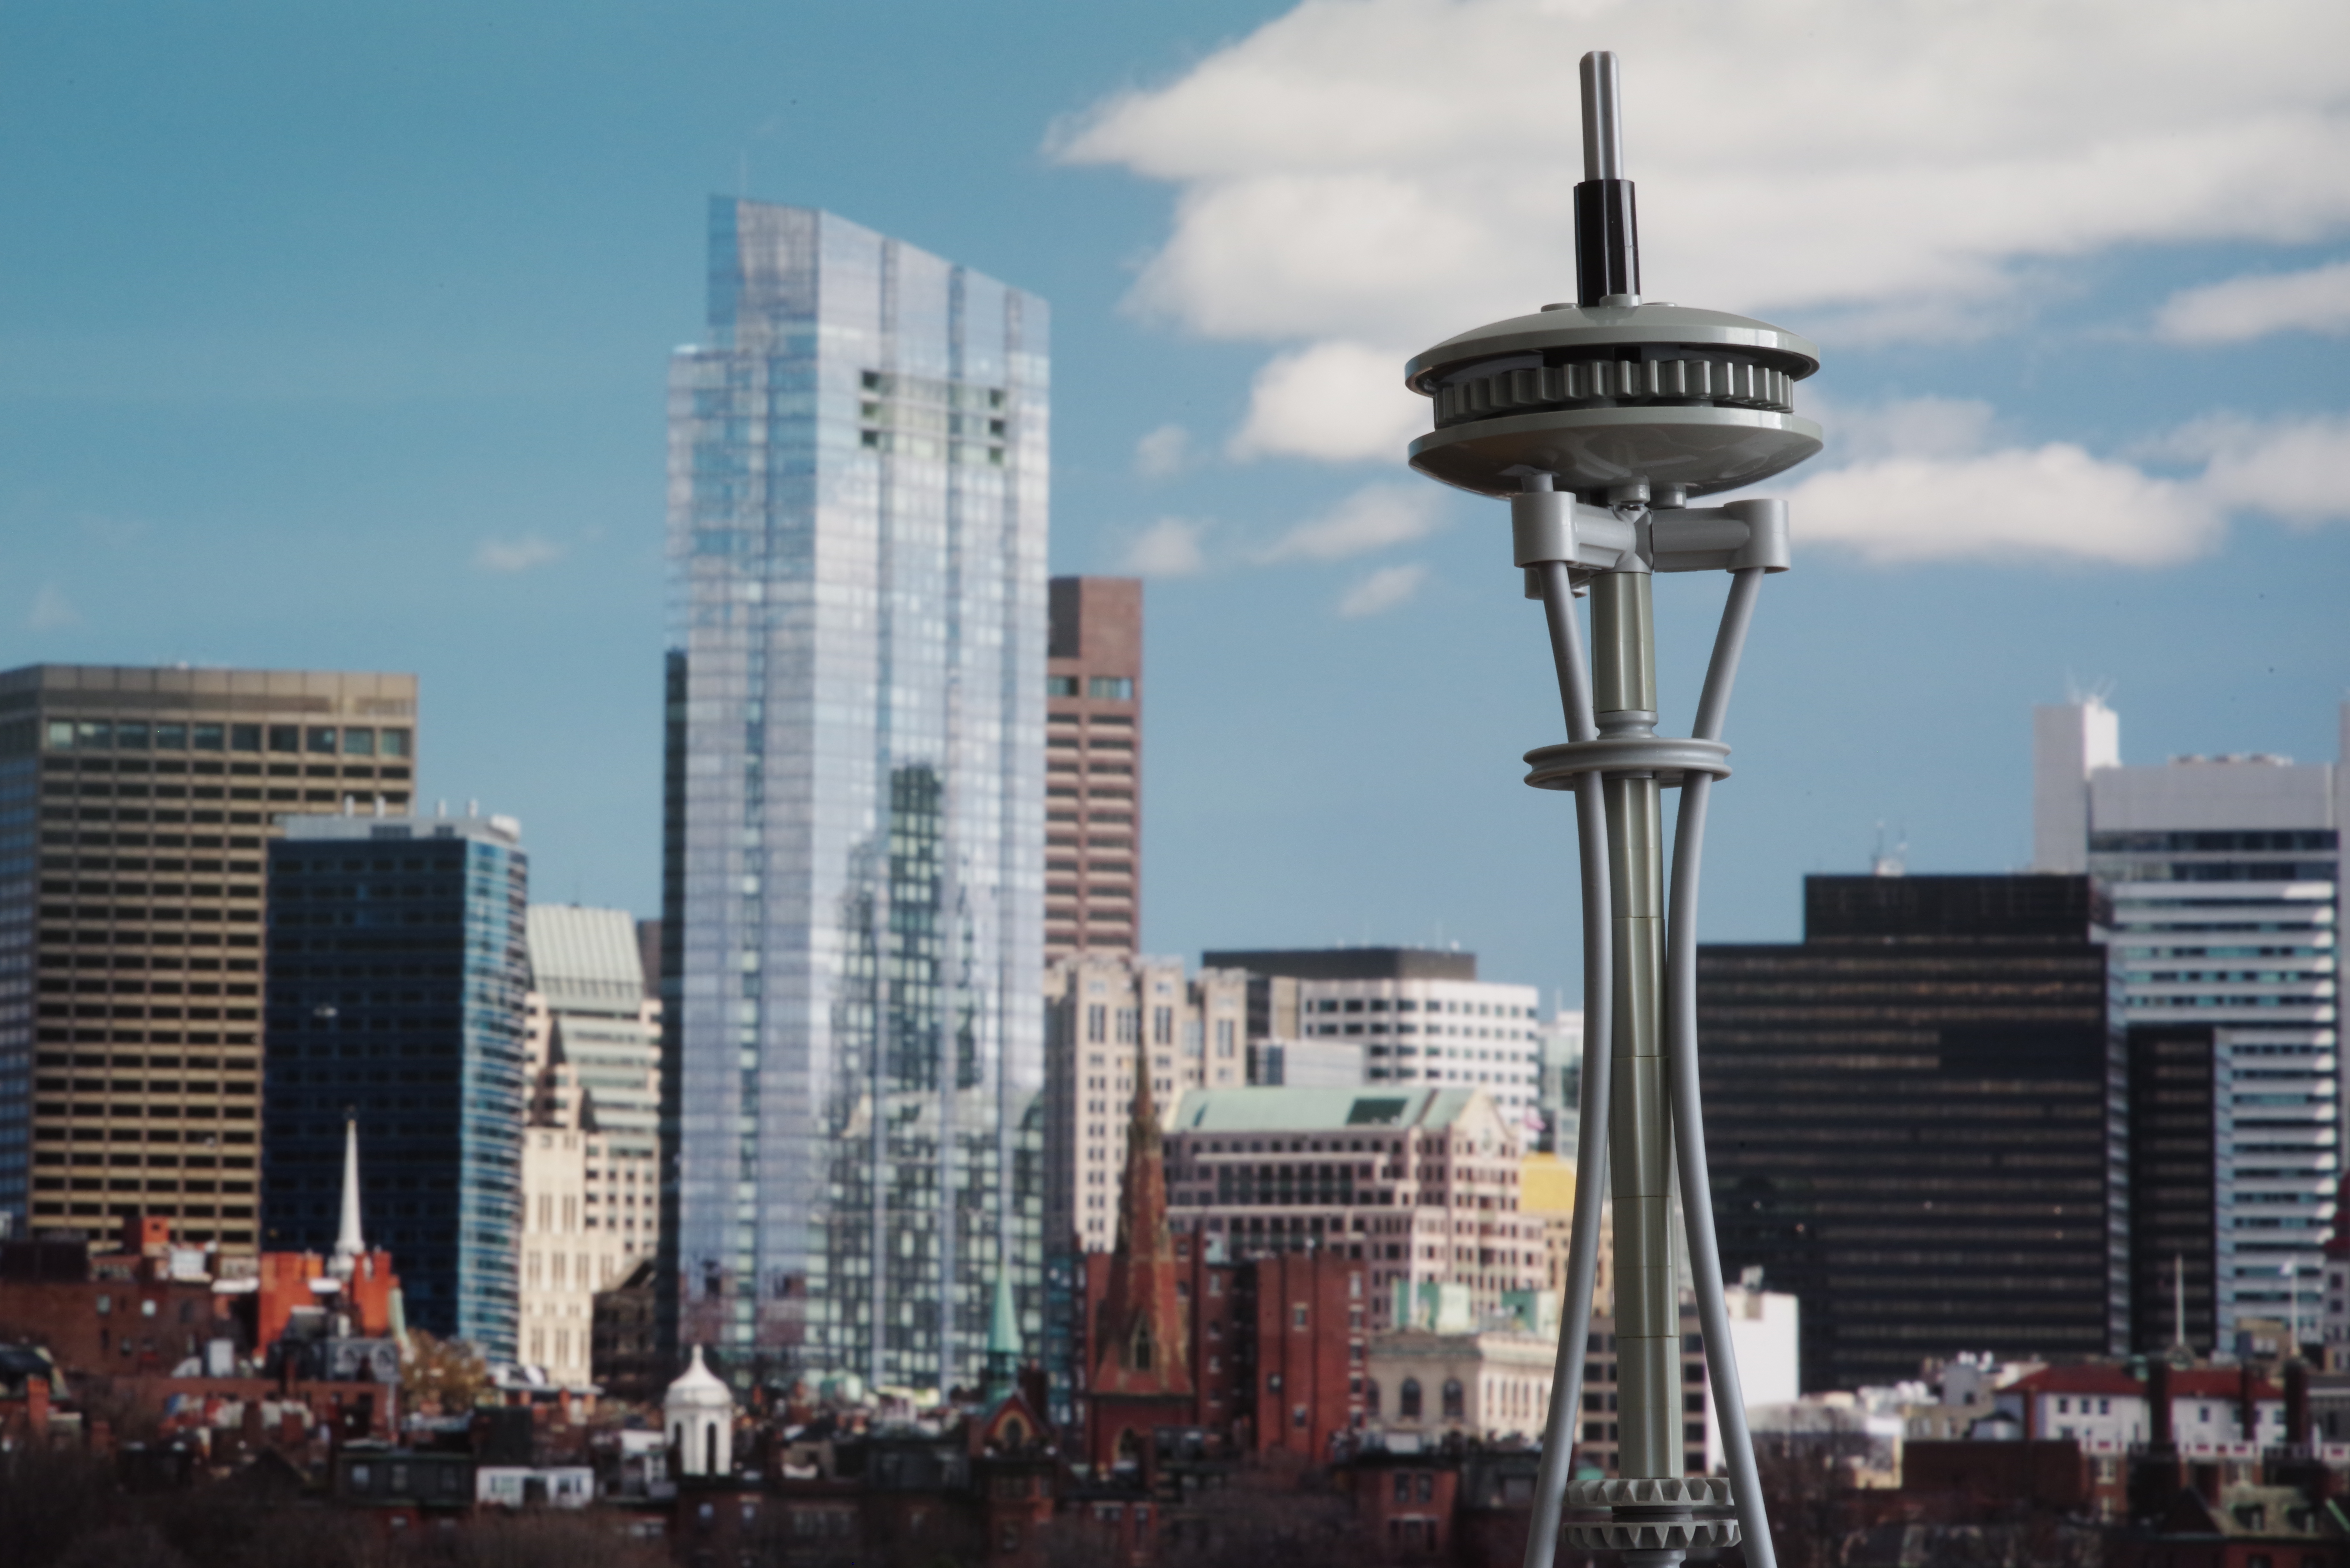
Okay, this was FUN. It took me a little while to remember that we had a LEGO model of the Seattle Space Needle somewhere – so that gave me a direction. (It missed the top part, so I hadto rummage into my LEGO collection to find a way to fix it, that also took a little while, but I think it works.)
Then came the “okay, how do I set this up” question. I wanted some kind of skyline behind it, because it felt right – if only to give the “city” context that may help with the “Seattle” context (because otherwise the whole “Needle” part may be hard to see!). It turns out that Zürich is not exactly rich in skylines view. I might have been able to pull it off somehow, buuuut. If it hadn’t been a SOOC challenge, I might have gone for a composite of some kind… but, well, SOOC means no composite.
Unless…….
A few months ago, I had seen a video about the filming of The Mandalorian: the green screen had been replaced by huge screens and… pretty much used as it was filmed. I suppose it popped back in my mind when I went “waaaait. I could have that skyline displayed on my monitor, that… should work, right?”. I never went to Seattle, but I do have skylines pictures – get a bit of Boston, as seen from Cambridge 😉 I actually quite like using the skyline from another city: it’s my kind of cheeky, I guess. Here’s what the setup looked like:
You’ll note the creativity in the pile of stuff that I put under the Space Needle 😉
Then came the second guessing – was that… cheating? The Boston picture has definitely been taken a long time ago (and outside of the Scavenger Hunt dates, obviously), and that one HAD been processed. But, hey, it’s an original picture that uses practical special effects to achieve a SOOC picture within the theme 😉 And, as a nice bonus surprise, the reflection in the tower in the back works pretty well with the Needle in the front
Now, I’m not COMPLETELY happy with that image – in particular, the Needle is a bit crooked, which is unfortunate. I had images with a better verticality, but the border of the screen was visible… which I only saw after I had put everything back in its place 😦 Still, that’s… very much the same concept, with a tiny bit of cropping and cleaning up.
And for the album of my fellow Scavengers: Needle (careful, some of these are scary 😀 )
The “In-camera motion blur” item of the list was the topic of some pretty entertaining debates about what constitutes “in-camera”, what constitutes “motion blur”, and what constitutes “in-camera motion blur”. And technically, my first idea of the word was to go take pictures of moving trains, which would have been motion blur, but not in the way it was meant 😉 My final interpretation of the word ended up being “A picture where the camera is intentionally moved during exposure”, and that’s what I did.
I had noticed this long walking tunnel a few months ago as “a place where there’s probably a way to play with a camera”, and I was thinking about it for another word. And then I started playing indeed, wondered if I could do something with the motion blur, spent a fair amount of time looking weird taking pictures of a tunnel while moving, zooming, and generally speaking trying to get some interesting picture. I liked this one most because of the faint presence of the woman walking – I thought it added a bit of interest (although she’s not necessarily that visible on first glance.)
This may be the one where I regretted the SOOC constraint most, because as it is, it lacks some contrast, I think; but I’m writing that sentence before I try editing it, so let’s see what I can do with it now!
And you know what? I kind of like it. It’s very different from what I’d usually go for – hell, it may be the first time I ADD grain to an image, but I think it actually works as an image.
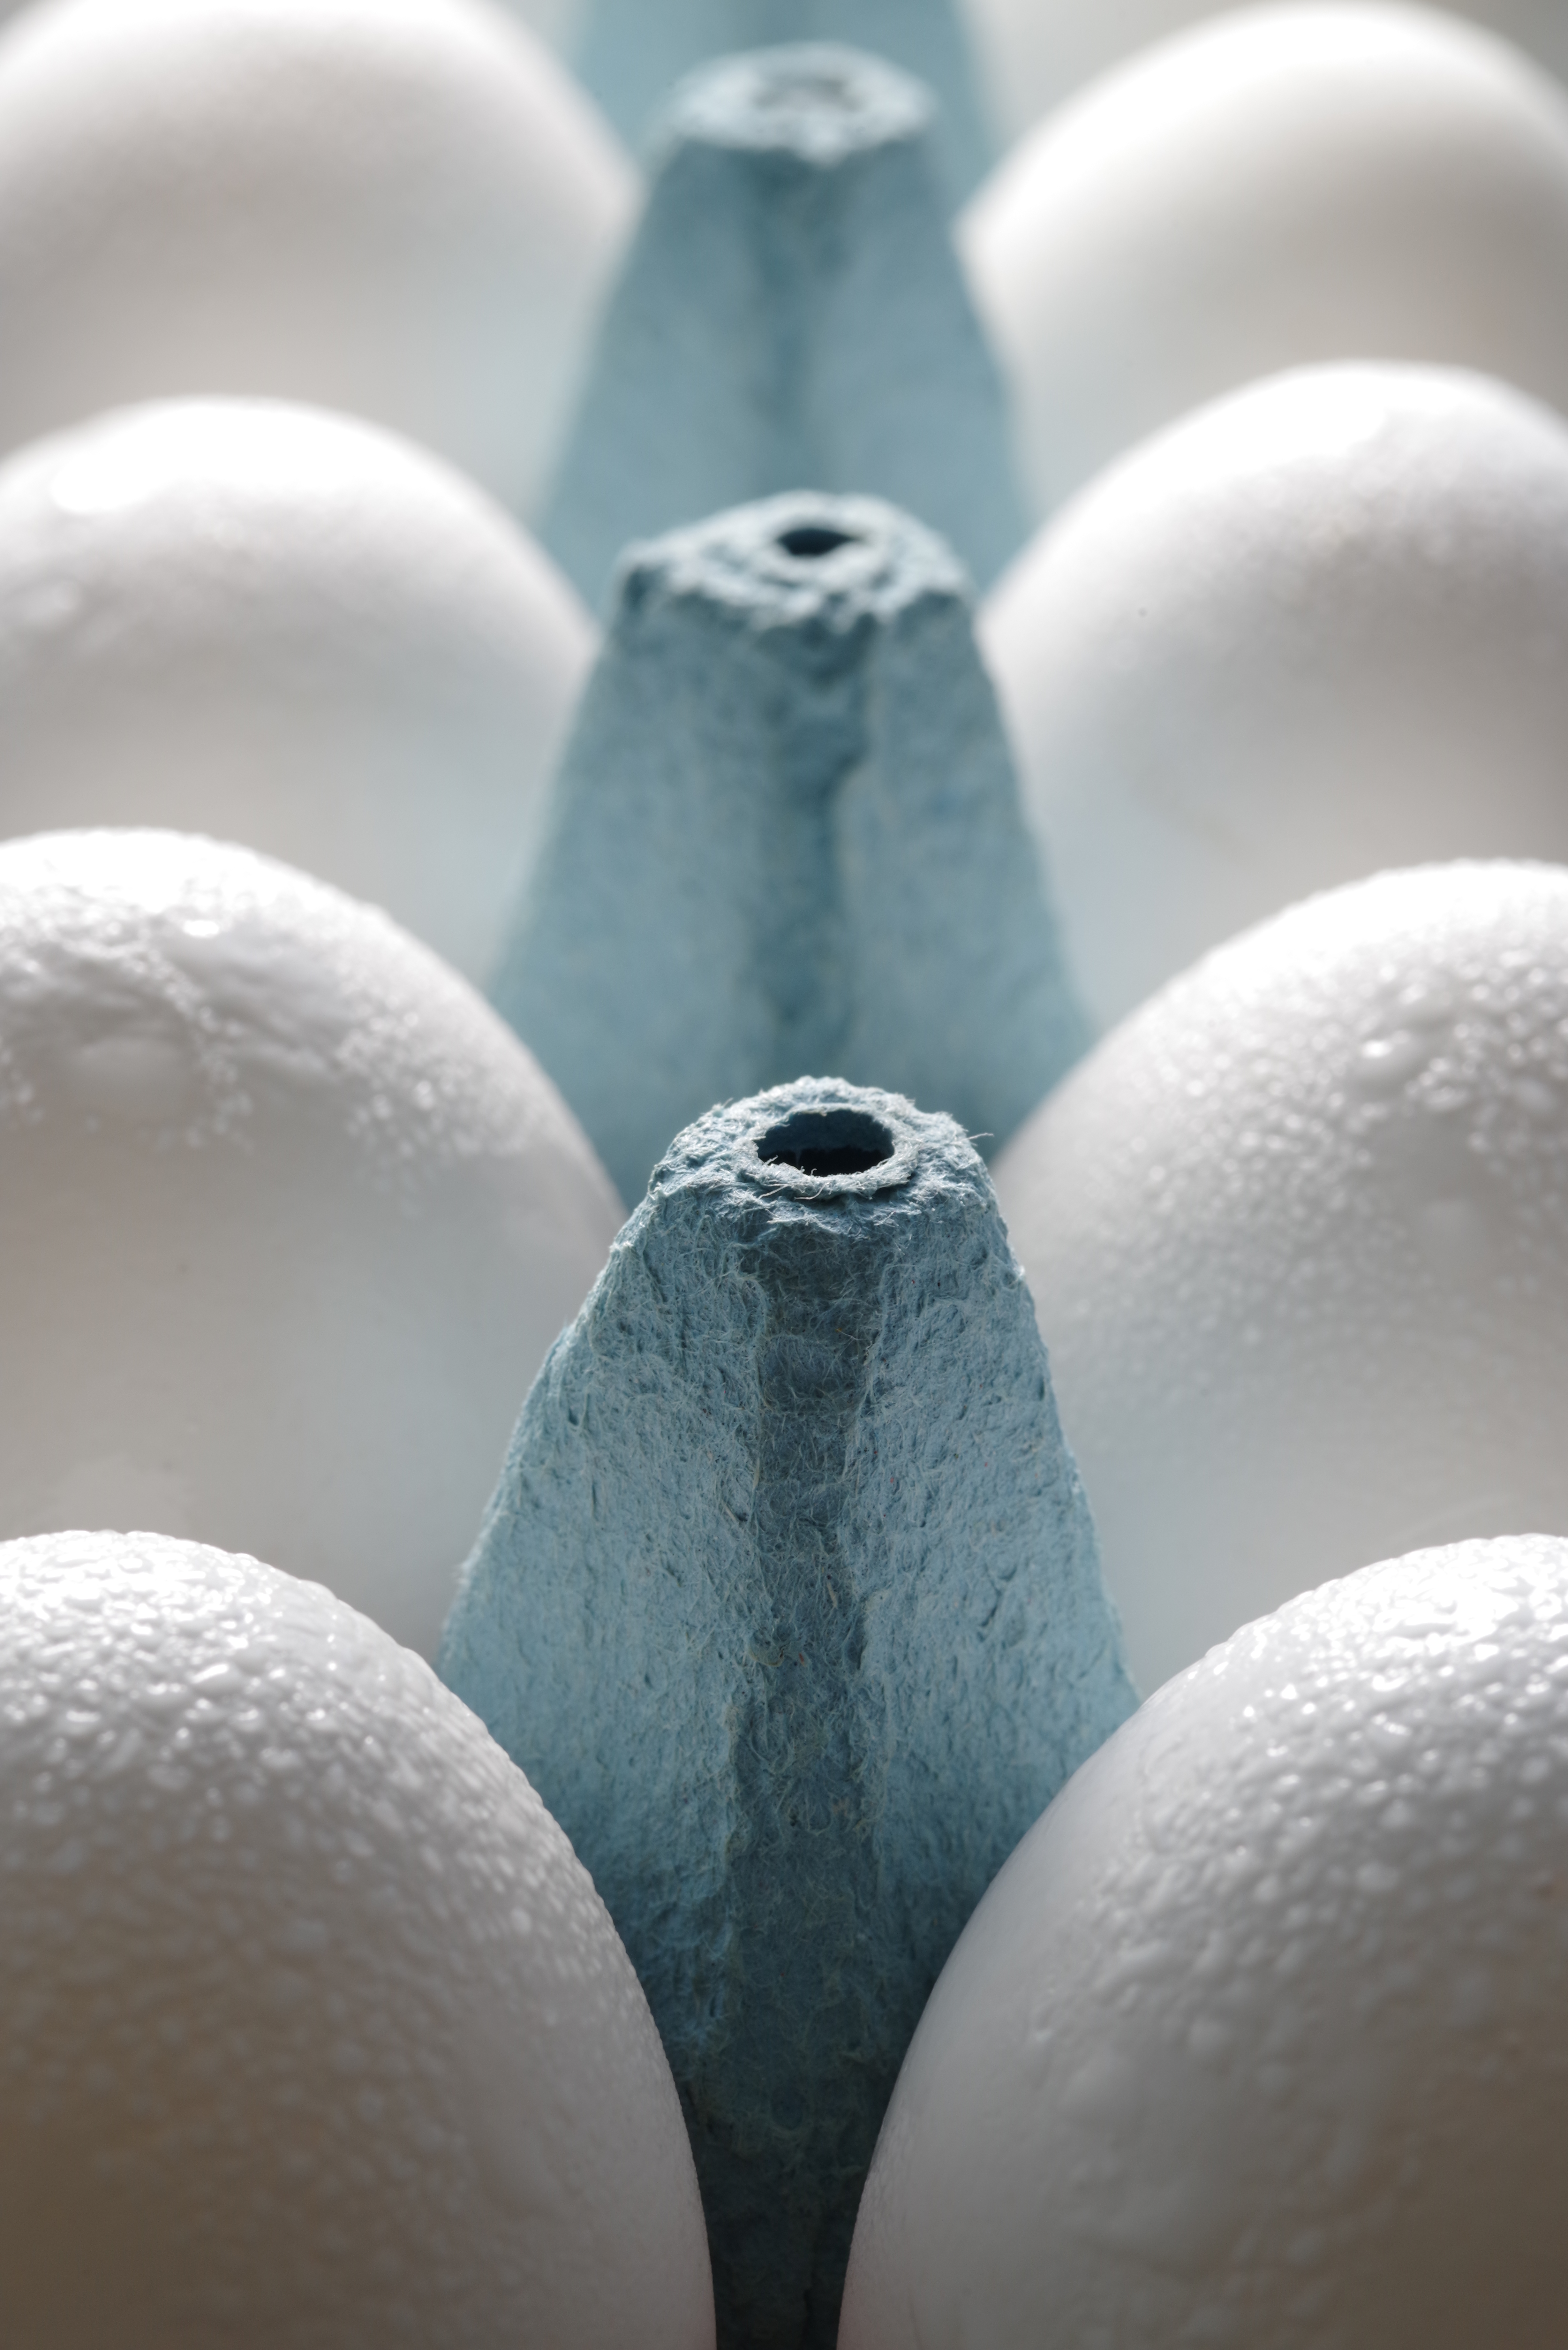
For a theme as “concrete” as “Egg”, I like to try to extract a somewhat “abstract” interpretation of the image. Macro/close-up is an easy way to do that, and that’s how my Eggs turned out. I basically took the box of eggs out of the fridge, set up a tripod, played with lights, and started shooting. Condensation started to appear pretty quickly, and I thought it added an interesting texture on the eggs – although it took me a few tries to get the light right. The egg carton also gave an interesting texture – I was happy to manage to focus reasonably on it.
I think that without the SOOC constraint I would probably have handled this one in B&W. From the same set of pictures, I think I would have submitted this one:
I think the light was slightly better, but I’ve had to fix the angles and crop before getting this one. And I also fixed a couple of imperfections that I’m probably the only one seeing 😉 I’m pretty sure I would have convinced myself that B&W was the right choice to emphasize the abstract, buuut I think I like the color one better now!
And the album with all the pictures of my Scavenger Hunt fellows is here: Egg.
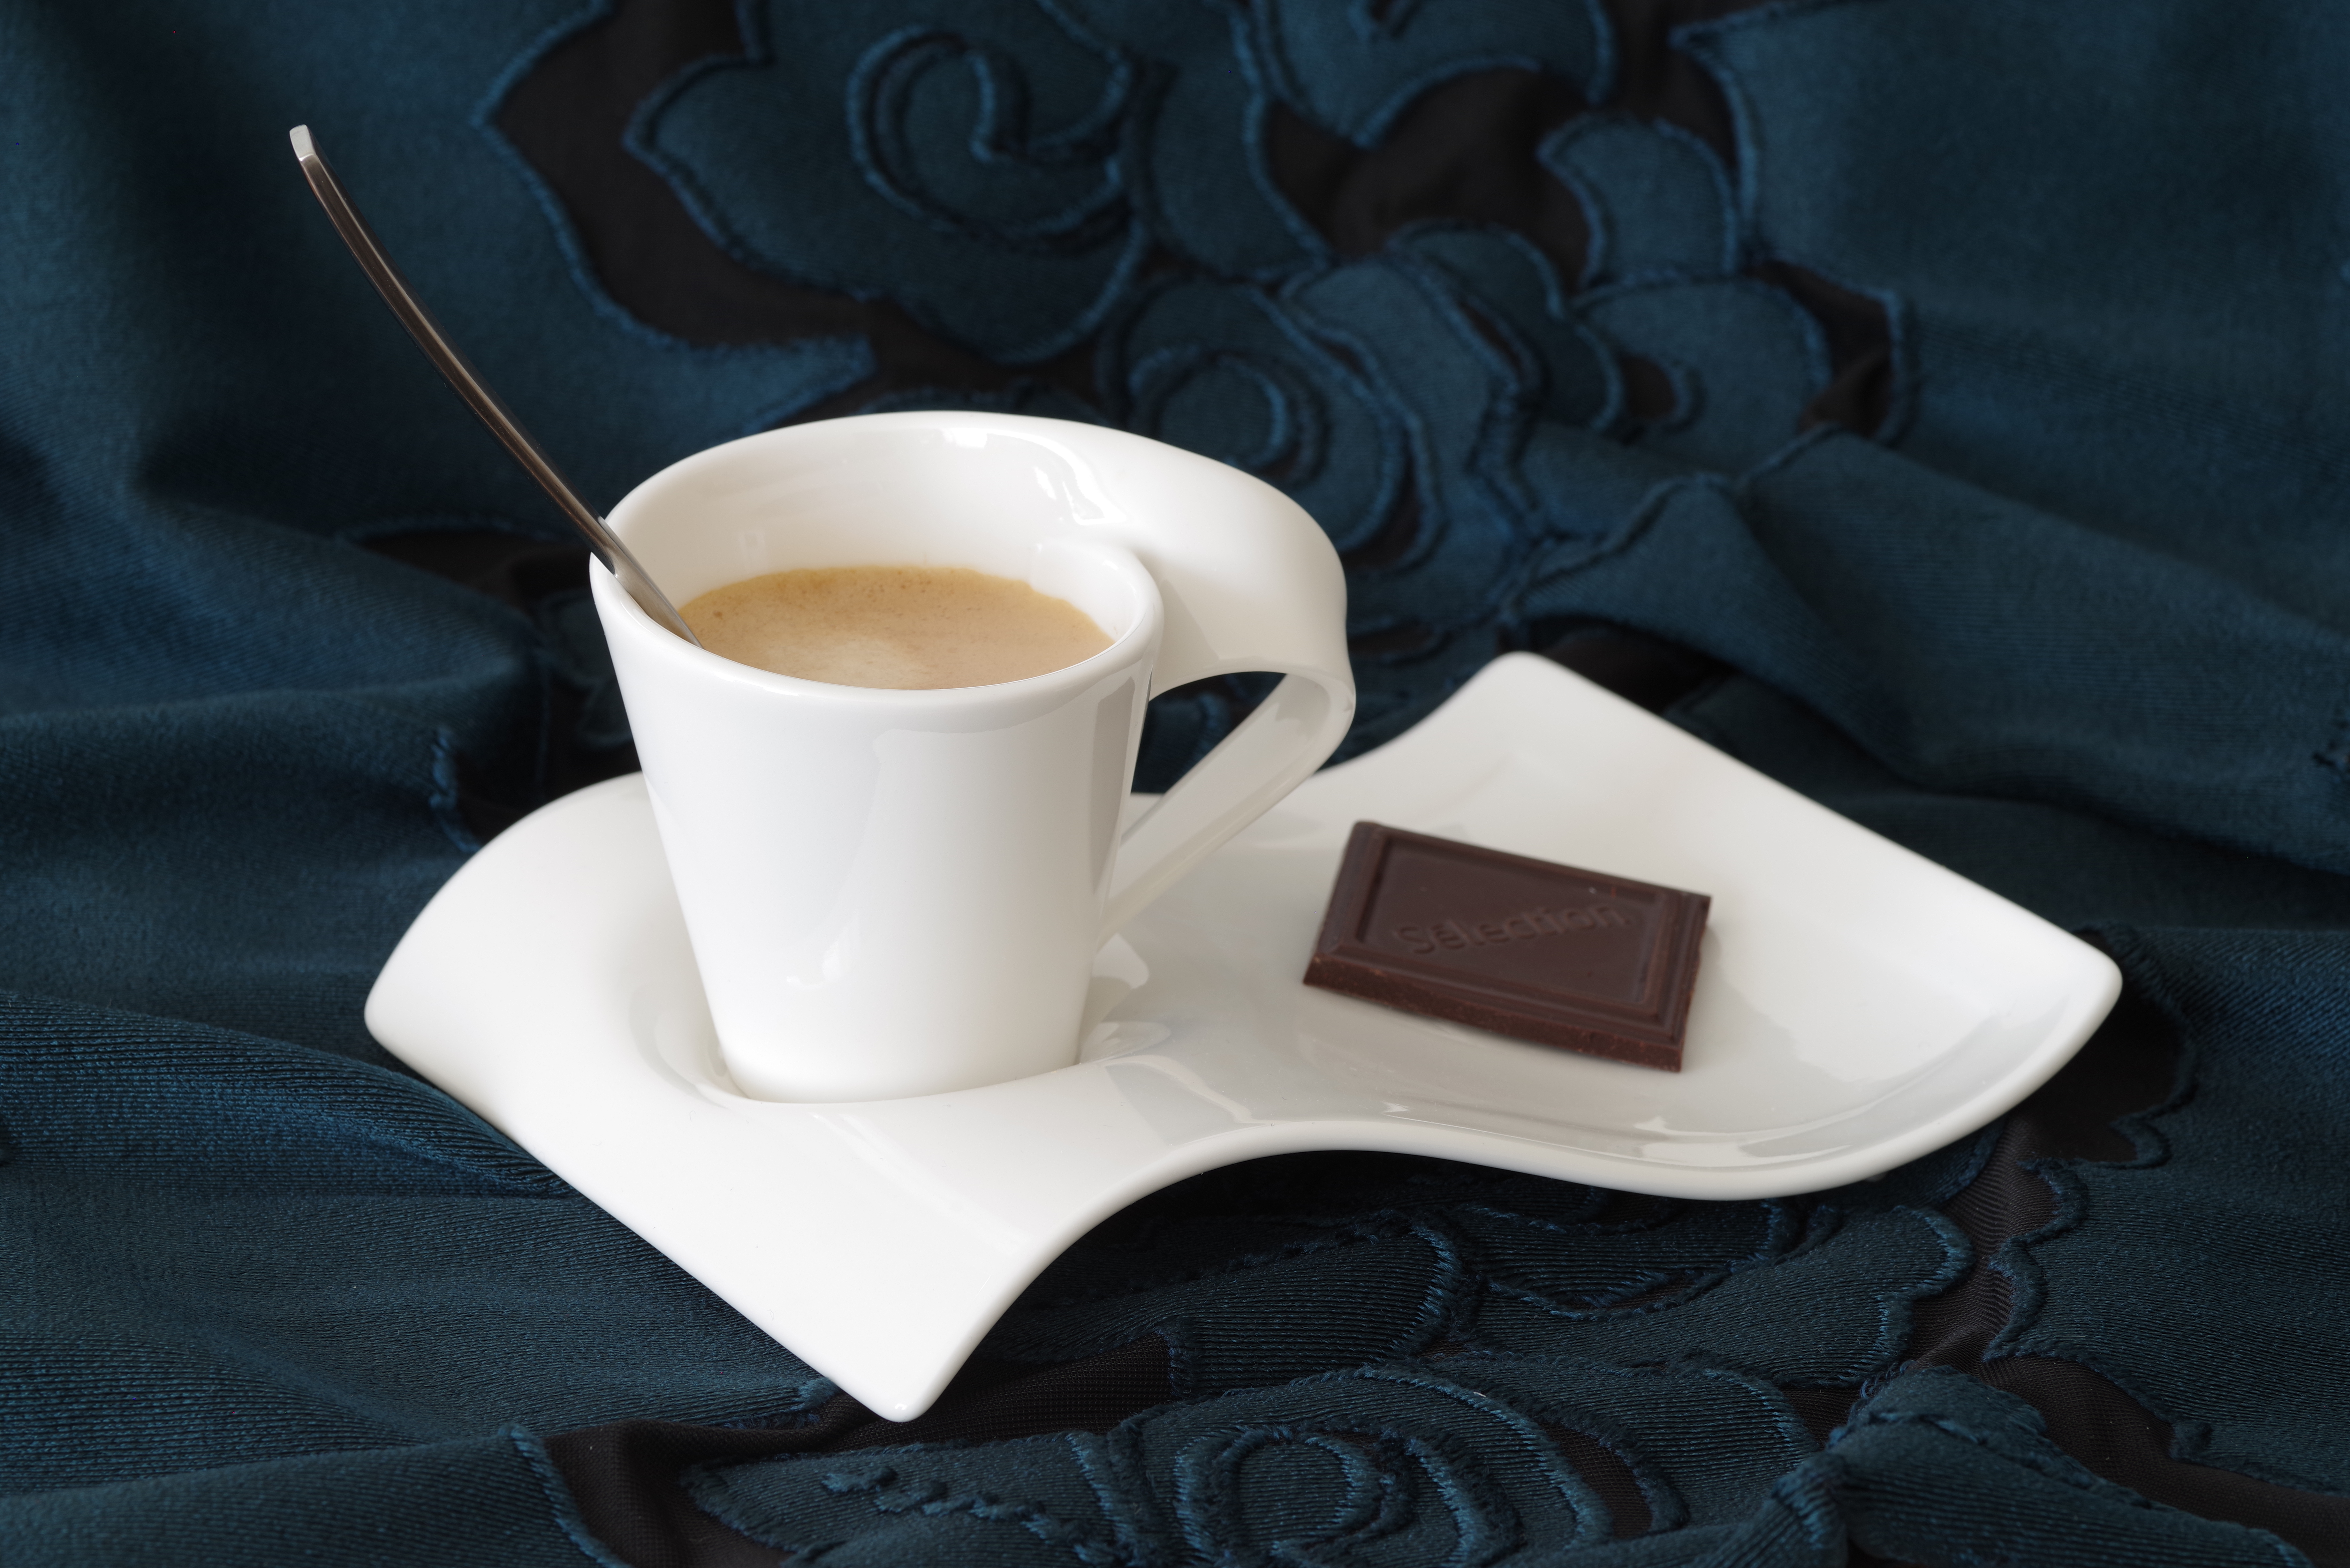
Coffee was the first shot that I got for the Hunt, just after I got the 100mm macro lens (which, by the way, I love to bits.) It took A LOT of takes before getting something I was satisfied with – and even here, the fact that the chocolate is not fully in focus is a bit sad, I think.
The major hurdle with shooting liquids is that they tend to splatter – especially when dropped from some height, as it is on my coffee machine; it took a fair amount of careful cleaning to get the espresso foam line reasonably clean without destroying it. My first shots also didn’t have a spoon; it took a while to get the spoon in at the right angle for the picture. All the things that I could have fixed in postprocessing were obviously to be fixed in camera for a SOOC challenge!
But eventually, the stars aligned enough that I decided that it was good enough; this felt like a fairly long picture session, but I like the final image!
The edited version of the same concept would be something like this:
(And yes, the chocolate got composited from a picture where it was sharper 😉 )
And the full album of my Scavenger fellows is here: Coffee.
The time for the 29th Scavenger Hunt reveals is almost upon us – so I prepared 10 posts (11 if I include this one) to present what I did – with a bit of context, behind the scenes, etc etc 🙂
This round, dubbed “Back to Basics”, had a very specific rule: no edits. No crop, no color fixing, no fixing of That Pesky Fleck Of Dust That I’ve Been Removing In Postproc For Months Now, nothing. Straight Out Of the Camera – SOOC. Granted, the interpretation of “SOOC” has been interesting, especially since there’s a bunch of smart-asses in the Scavengers community (as a card-bearing smart-ass, I would know 😉 ), and the “is this and that and possibly that allowed and what constitutes an edit?” started flying in the minutes following the announcement of the SOOC rule.
The “somewhat-agreed-upon” interpretation of the rule has been “whatever your camera, whatever it is, dumps as a JPG if you don’t apply creative filters on it”. Setting the white balance was fair game; setting the camera as B&W was not 🙂 So I setup my camera back in RAW+JPG for the duration of the Hunt (I had been shooting “only RAW” for a few months, finally realizing that… I never used the JPG in practice), and there we go.
This has been an interesting hunt. I spent far more time shooting the “studio” shots to get them Just Right – I definitely summoned my inner perfectionist (she’s hiding somewhere, I promise!) The thing is – since I had taken the habit in the past few hunts of showing a small “before/after”, well – this doesn’t work as well this time around. There are still a couple of non-trivial shots in there where the “behind the scenes” is somewhat justified; and for all of them, I went for “This is what I submitted / This is what I would have submitted otherwise”.
So… ready for the reveals? As I’m typing this, the pictures in the top image are blurred and the list of words is empty; I intend to come back to this post and update it as I go. But if you see this in its first iteration… well, you’ll have to wait a bit!
The Paper Abstract theme got significantly easier when I remembered I had a fair amount of origami paper somewhere in a drawer. I had started trying to organize them along the rainbow, but the colors I had were not exactly right for that.
Then I built some color wheel type of thing, and it worked somewhat better, because I could work by what “felt” close more than what “should be” close in the context of the rainbow. And then came the assembly. I didn’t know at this time where I was going or what I was doing – the “circular” thing appealed to me, and initially I was going for some kind of wheel or half-wheel kind of picture. So for the assembly, well, I worked around accordion shapes by folding each color and using the folds to carry my structure.
The first images were made with only the folds holding the structure; at some point I got tired of swearing every time it broke, so I added a drop of glue between every pair of sheets of paper to hold them in place. Less creative flexibility, better mood 😉
And then, basically, I played with my accordion of colors and with some lights and my camera. I ended up liking a few details of a particular picture, namely the light reflection and the curve of the tiny hole at the base of the image, and that became my submission for this theme. This is the original picture, with only minor RAW development operations:
Camera
Pentax K-1 II
Lens
smc PENTAX-D FA 50mm F2.8 Macro
Focal length
50mm
F-Number
F/9.0
Exposure time
1/80 s
ISO
320
Since this was an abstract, I started playing with different orientations of the picture – and liked the one I submitted best. Edits apart from that were pretty straightforward and more “RAW developing” than “real” edits in my view.
“White” is the first word I shot for this Hunt. I knew early on that I really wanted a fully white picture, textured in some way; I just didn’t know which texture would be interesting and fun to shoot. It was literally a matter of “shower thoughts” – I washed my hair and saw the shampoo form a thick white foam at the bottom of the shower, and went “ooooh”. A few days later, I spent some time in my bathroom with more clothes and more camera gear, and I started experimenting with a variety of foam pictures. I lit everything with a Lume cube in one hand (and/or sitting on the border of the shower) and the camera in the other (no tripod was involved in this picture :P), shot a bunch of pictures and decided afterwards which would yield the best results once cropped and processed.
This is the original picture, with only minor RAW development operations:
Camera
Pentax K-1 II
Lens
HD PENTAX-D FA 24-70mm F2.8 ED SDM WR
Focal length
58mm
F-Number
F5.6
Exposure time
1/50 s
ISO
320
As it is, it took a fair amount of rotating and cropping and editing to get a proper white foam picture, especially since I wanted to avoid the very large hot spot on the left (which was still the light that allowed me to get reasonably contrasted bubbles).
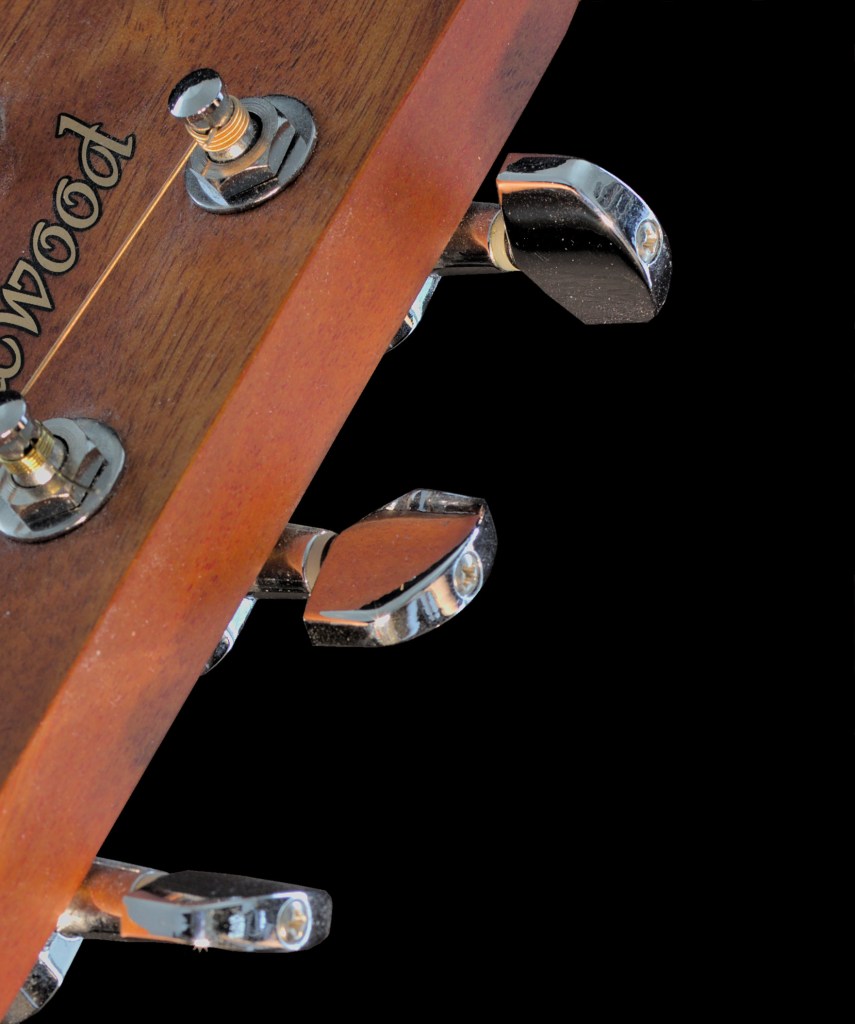
For Keys, I wanted to avoid taking pictures of my home keys, because that was boring and possibly somewhat dangerous to put on the Internet 😛 I also happen to have an Allen key on my keychain, so that was an option; then I thought about piano (I don’t have a piano), keyboard (I do have a lot of keyboards, but no fun idea with them), sheet music keys…. guitar keys!
Once the idea was there, the realization was fairly straightforward – guitar, Lume cube, dark background, SHIP IT!
Camera
Pentax K-1 II
Lens
smc PENTAX-D FA 50mm F2.8 Macro
Focal length
50mm
F-Number
F/10
Exposure time
1 s
ISO
250
I did a first pass on Darktable to develop the raw to my liking:
Then there’s been some long and painful edit to get rid of the textured background, which I kind of liked per se, but which was distracting in the context of the picture. Keeping the small star of reflection a the bottom of the bottom key was also a large pain.
I’m not super happy with the fact that the bottom key is out of the depth of field (focus stacking may have helped, because I was already at F/10…), but apart from that, I don’t hate the image.
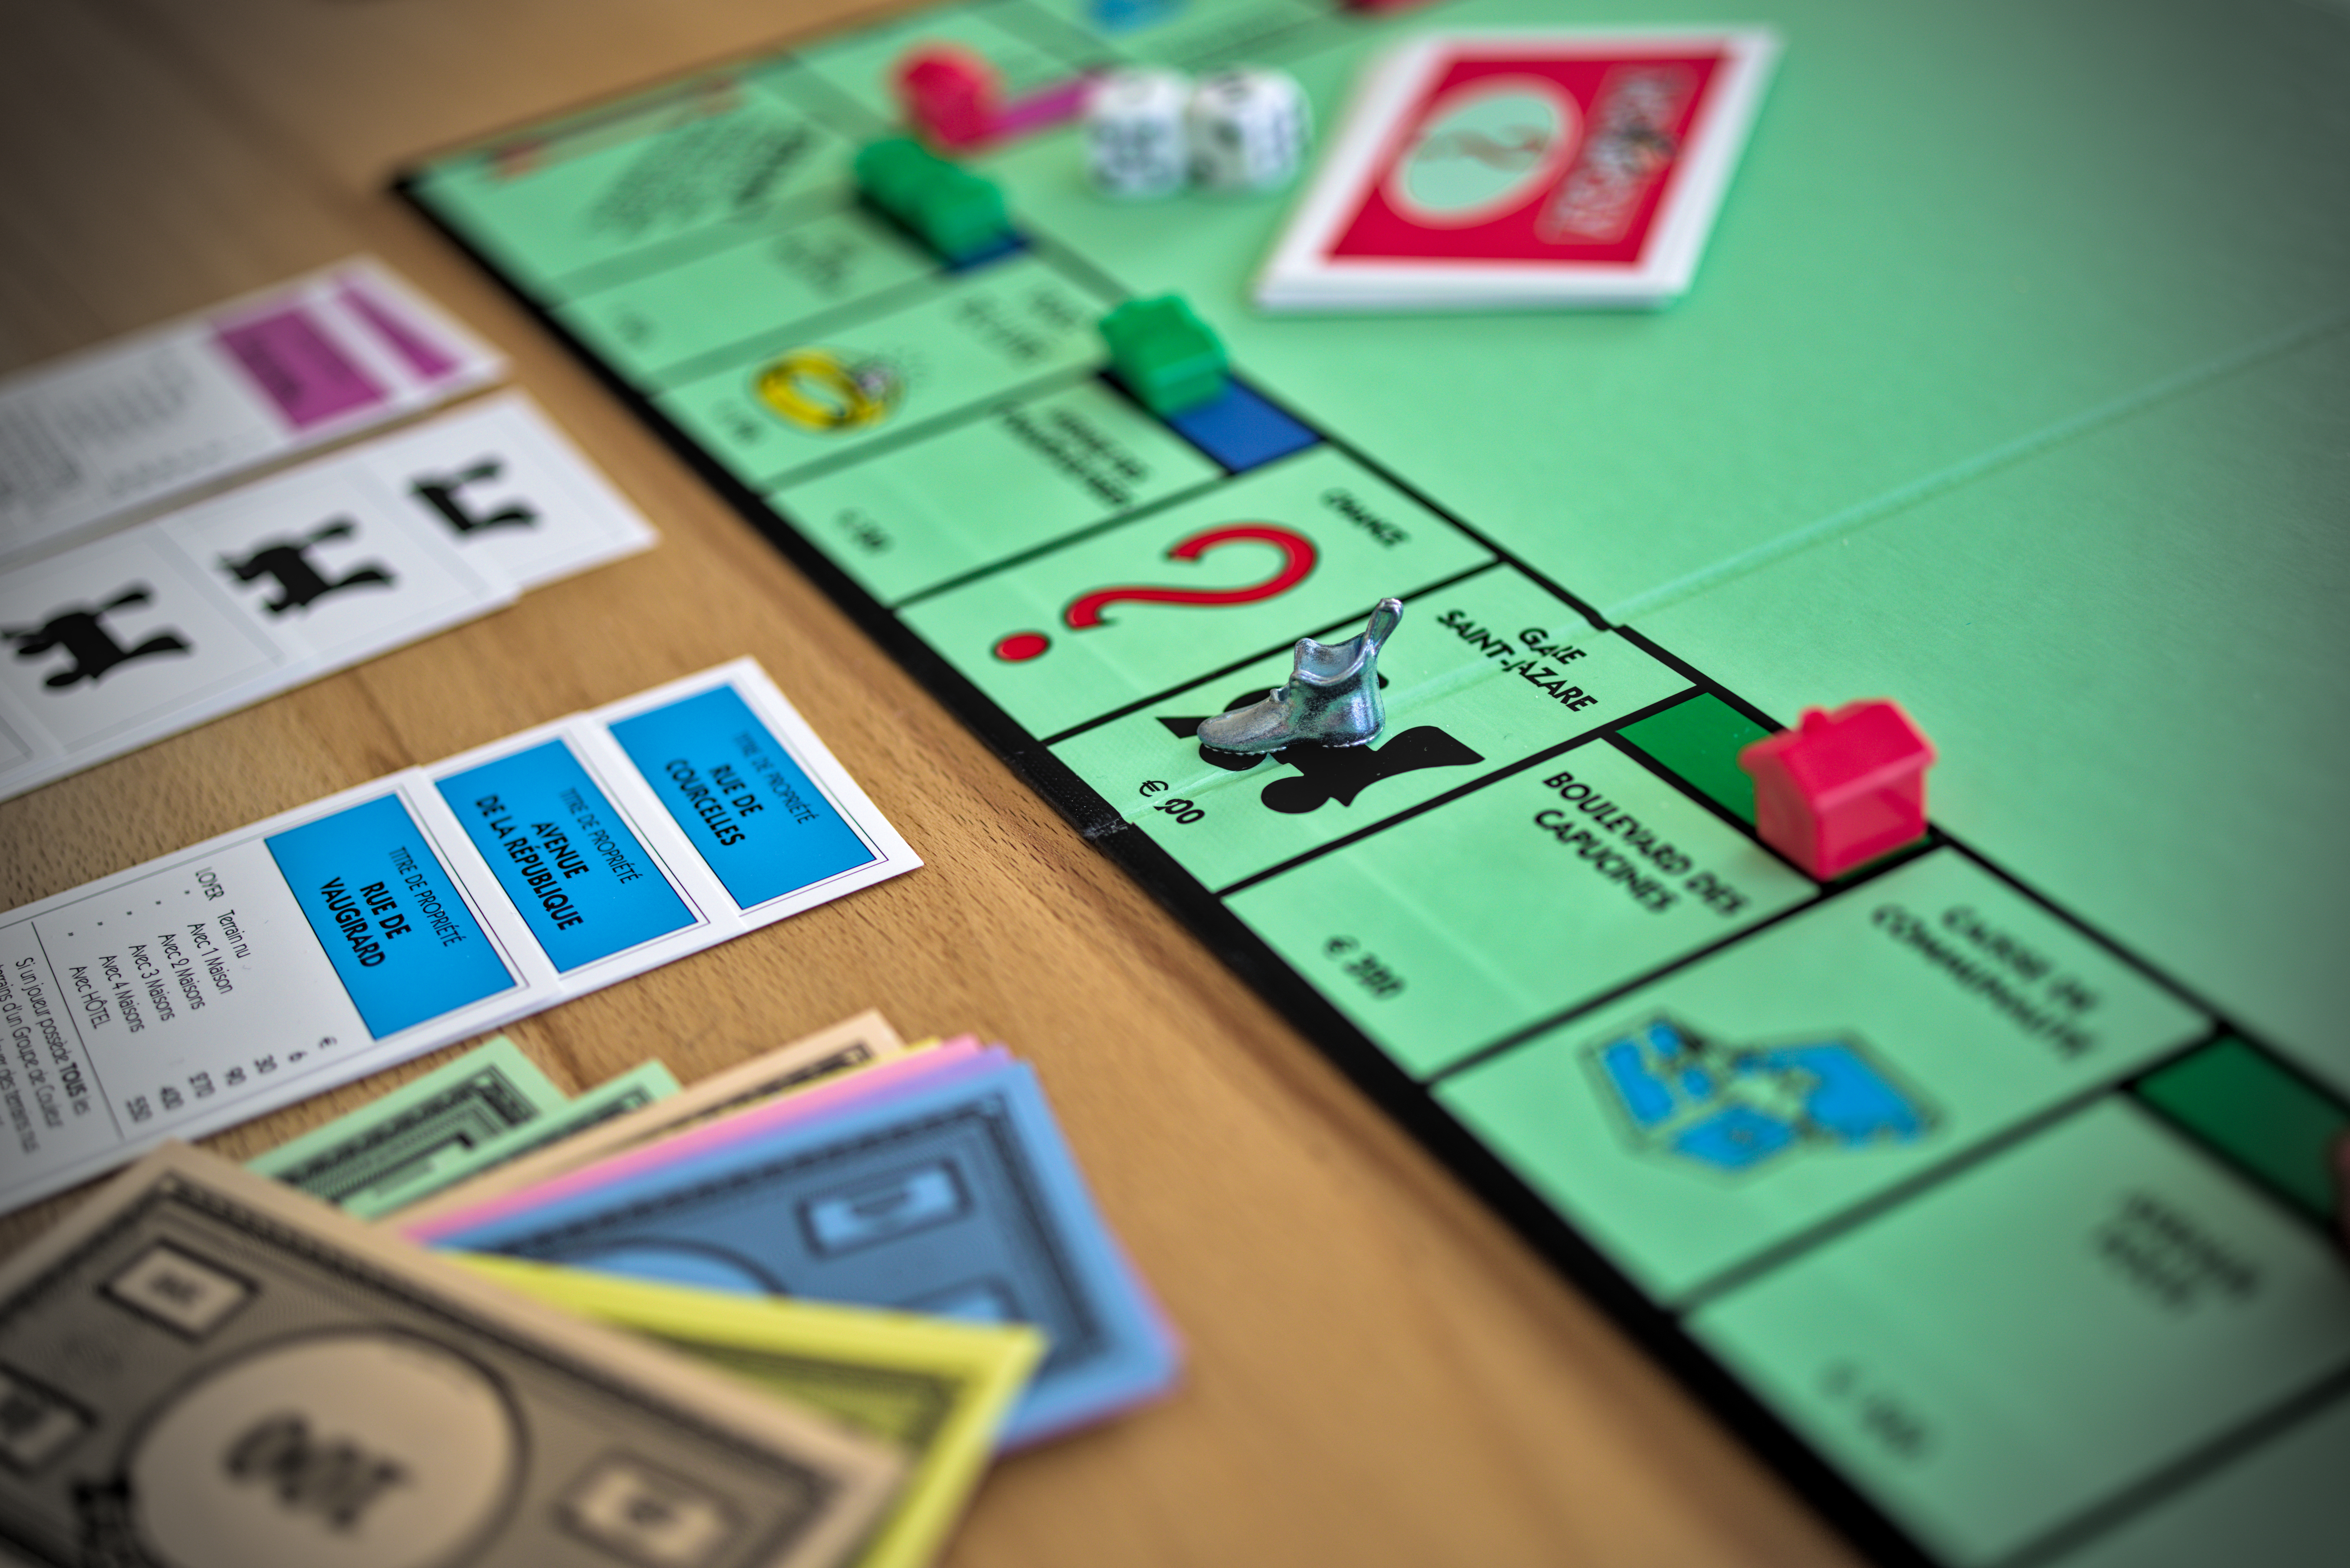
This was the last word for which I got ANY inspiration in this Hunt – although I did re-shoot another one after this one. Talk about uninspiring: I’m profoundly not a shoes person, I don’t own anything remotely interesting in this area, and this is not an area of interest. I vaguely thought about the hot shoe camera mount, but again, nothing came after that. And then I did remember that there IS a shoe token in Monopoly, and that I DO own a copy of Monopoly. So I setup a board, I even re-read the rules quickly to make sure that whatever I was putting on that board was remotely believable, and I got my shoe shot. This is the original picture, with only minor RAW development operations:
Camera
Pentax K-1 II
Lens
smc PENTAX-D FA 50mm F2.8 Macro
Focal length
50mm
F-Number
F/2.8
Exposure time
1/80 s
ISO
125
Veeery straightforward edit/development – I didn’t even crop anything (which is very rare) – I did add vignetting, though, because it made sense for me for the mood I wanted to give to the image.