The 39th Scavenger Hunt had an overarching theme, Rose, and 10 other words to associate to it. I went for a very literal interpretation of that, got myself a rose bouquet (on discount because they were starting to fade quite a bit) and managed the whole Hunt in one (long) afternoon.
This was my entry for the word “Fill the Frame”, where I wanted to get a single rose to, well, fill the frame. I went for the B&W processing to distinguish a bit from another picture in the Hunt that may have been a bit closer otherwise.
This was the original picture. I was working without a tripod, and I wanted to avoid both shaking the camera and dealing with a large amount of noise, while keeping some depth of field, so it’s fairly underexposed!
Camera
Pentax K-1 II
Lens
smc PENTAX-D FA MACRO 100mm F2.8 WR
Focal length
100 mm
F-Number
F/1.8
Exposure time
1/100 s
ISO
111
Other pictures from my fellow Scavengers: Fill the Frame
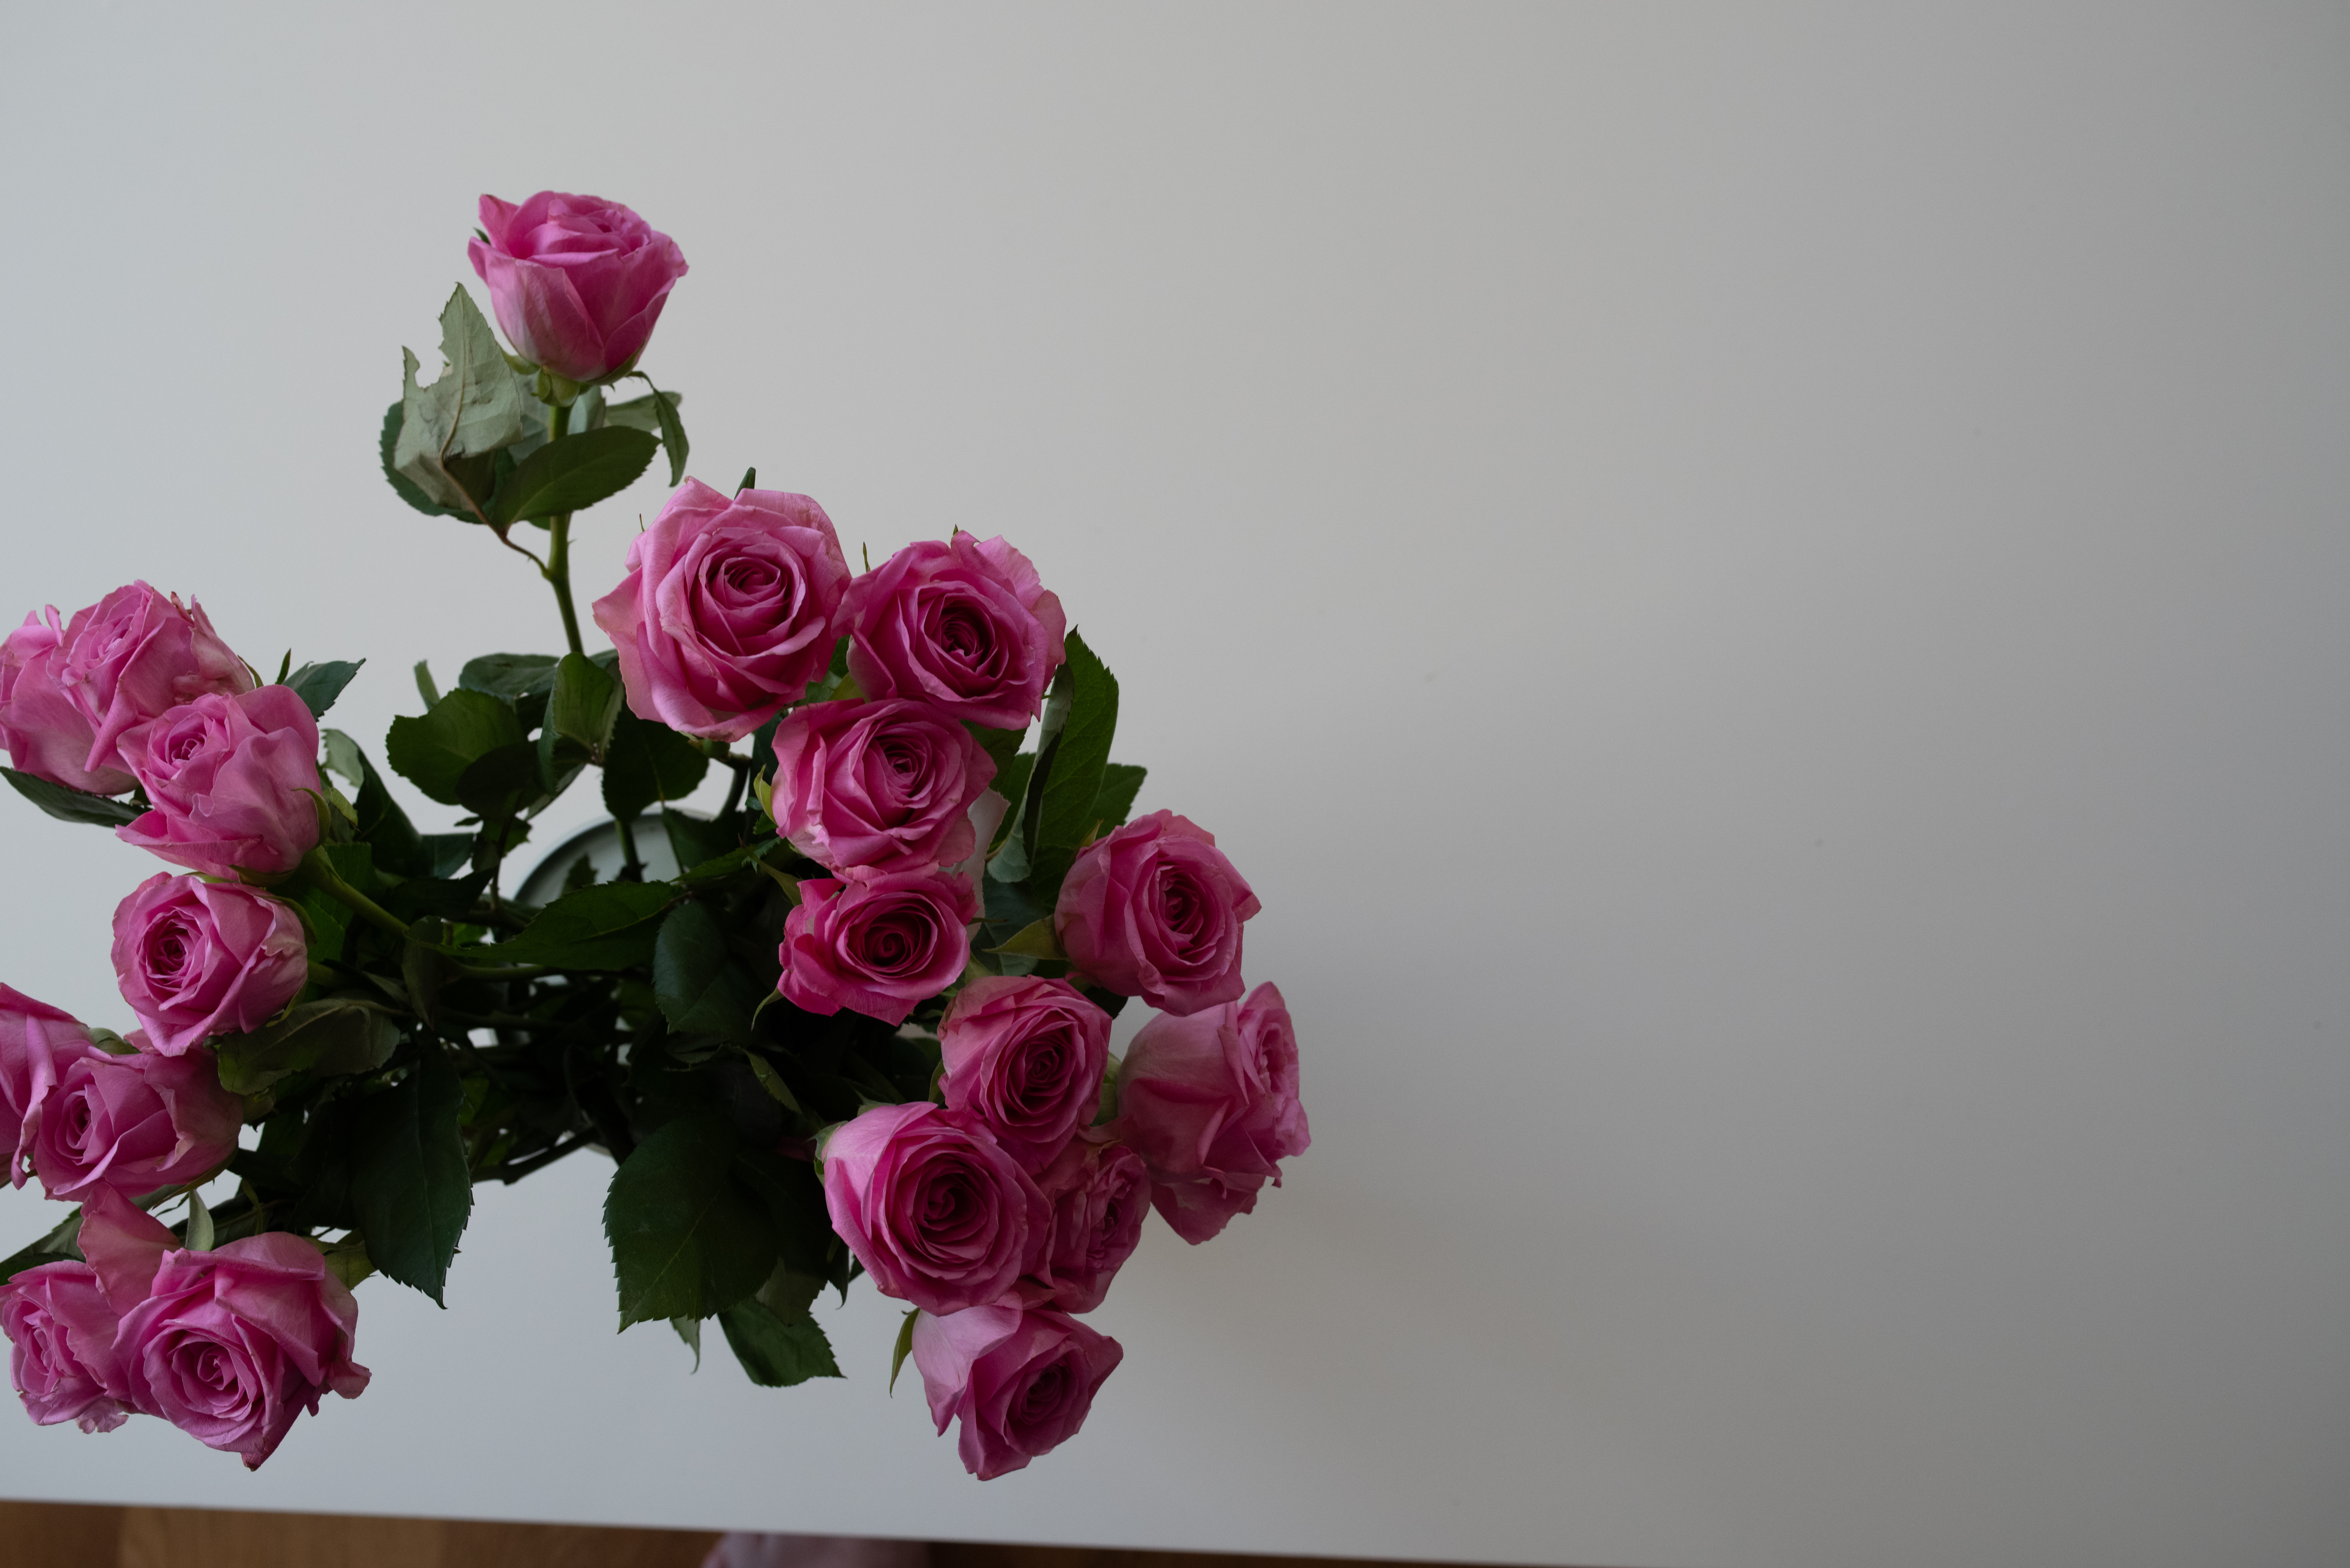
The 39th Scavenger Hunt had an overarching theme, Rose, and 10 other words to associate to it. I went for a very literal interpretation of that, got myself a rose bouquet (on discount because they were starting to fade quite a bit) and managed the whole Hunt in one (long) afternoon.
This was my entry for the word “Negative Space”.
The original had a few more roses on the left of the image – I chose to frame the image that way to give a bit more mystery about the exact angle (it could almost be turn 90° and seen as a shot from the side rather than the top!).
Camera
Pentax K-1 II
Lens
smc PENTAX-D FA 50mm F2.8 Macro
Focal length
50mm
F-Number
F/6.3
Exposure time
1/100 s
ISO
1250
Other pictures from my fellow Scavengers: Negative Space
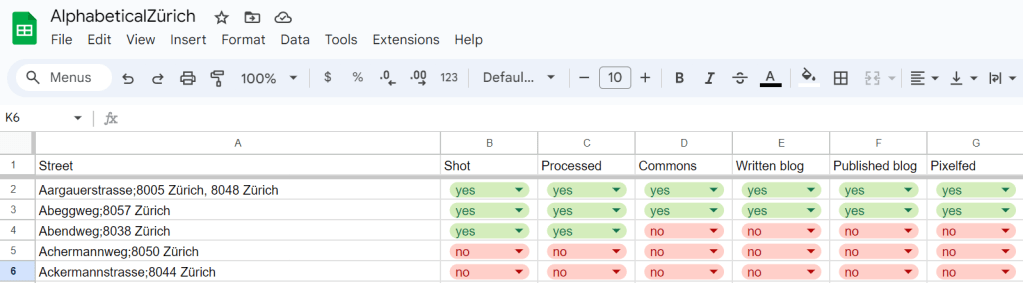
I recently ran into a Mastodon post of someone who started photographing all the streets of Paris, in alphabetical order: MonParisAlphabétique. I thought that it was a GREAT idea, worth pursuing for other cities, and, since I live in Zürich, I recently started AlphabeticalZurich, which I’m hosting on WordPress and Pixelfed. So if you’re only interested in the pictures and the photography side of things, you can stop reading here and go there (WordPress) or there (Pixelfed; sorted by collections/streets here).
But, there’s a few gritty details that belong to this blog rather than the other one 😉 I prefer to start projects with a tiny bit of logistics, and in particular establishing the list of streets and how to traverse it sounded like a reasonable idea. Here comes the rambling blog post about what I tried, what I played with, and what’s the current status of said logistics.
in which I’m interested in the second and third field. There’s a bit more subtlety, the third field is sometimes a multi-valued field separated by commas (when a street spans several zipcodes or even several cities).
and we have a list. Now, that list contains 2425 entries, so I’m going to need to do a bit more than one street a week if I want to have a chance of finishing this. Since I know myself, I need to optimize “a bit, but not too much”. So if I’m in a street starting with A, and there’s another one in the vicinity, I may want to go shoot it while I’m at it, even if it’s technically not the next one on the list. My first idea was to use zip codes as a heuristic for “places that are in the same vicinity”. So the algorithm would look a bit like this:
pick the first non-photographed street on the alphabetical list
pick all the streets starting with the same letter in the same zipcode, in order
take pictures of all these streets, mark them as photographed
Okay, this starts to be too complicated for my one-liner Bash (I tried. I really did.), so let’s get some Python instead (I did wonder if I wanted to write some ugly PHP or some ugly Python, so you’re getting some ugly Python.) I also added a bit of output to get a query for overpass turbo.
f = open('zuri_sorted.txt', 'r' )
currLett = '0'
zipStr = {}
zipList = []

for line in f.readlines():
    line = line.strip()
    if (not line.startswith(currLett)):
        for zip in zipList:
            print(zip)
            print(', '.join(zipStr[zip]))
            print('====')
            print( '(' )
            for street in zipStr[zip]:
                print( 'way["name" = "', street, '"]({{bbox}});', sep='')
            print(');', "out body;", ">;", "out qt;", sep="\n")
            print('====')

        currLett = line[0]
        zipStr = {}
        zipList = []

    toks = line.split(';')
    street = toks[0]
    zips = toks[1].split(',')

    visited = False
    for zip in zips:
        if (zip in zipStr):
            zipStr[zip].append(street)
            visited = True
            break

    if not visited:
        zipStr[zips[0]] = [street]
        zipList.append(zips[0])
My output for a given letter and a given zip code now looks like this:
I quickly realized that this was not necessarily the best approach because a/ zipcode areas are actually quite large b/ stopping at the boundary of zipcodes is actually fairly arbitrary. But, playing with these did bring overpass turbo to my attention, including the fact that it has an API that looked useful: Overpass API. I consequently modified my query to get “streets starting with the same letter within a radius of 500m1 of a starting point”, with the starting point defined as “the first street that I haven’t processed yet”. I actually have two overpass queries now. The first one displays the map:
[out:json];
(
  area[name="Zürich"][place="city"];
  way(area)["name"="Aargauerstrasse"]->.a;
  way(area)(around.a:500)["name" ~ "^A"][highway]({{bbox}});
);
out body;
>;
out skel qt;
The second one tells me exactly which streets I’m visiting that day:
[out:csv("name";false)];
(
	area[name="Zürich"][place="city"];
	way(area)["name"="Aargauerstrasse"]->.a;
	way(area)(around.a:500)["name" ~ "^A"][highway]({{bbox}});
	for (t["name"])
	(
  		make x name=_.val;
  		out;
	);
);
Ideally I’d be able to get both in one query somehow, and in a way that doesn’t require editing both the name of the street and its first letter in two places; for now, let’s call that good enough. Compared to the zipcode approach, I’ll also have to manually track streets and feed the next one to the query; maybe I’ll do something fancier at some point, but for now, again, let’s start things and see where the pain points are before prematurely optimizing.
There – I am now READY to go exploring the streets of Zürich! I expect the process there to be: for each street, take a picture of the street sign (to have an idea of where pictures are taken!), take a general view picture of the street, try to find a few fun details, go home, process pictures. And then, publish pictures on Wikimedia Commons, on the blog, and on Pixelfed, rinse and repeat. Oh, and update the spreadsheet, too.
Let’s go!
Value decided by taking the first street and see what looks reasonable from there. Very scientific approach. Also, this seems to yield 2-3km paths for photo walks, which is pretty good, actually. ↩︎
I do not have much in terms of “behind the scenes” for the 38th Scavenger Hunt, because there’s no setup and barely any processing in there – so I decided to make a single post instead.
The List was heavily oriented towards a pirate/adventure/treasure theme, which I was quite happy to see, because I knew I was travelling to the Canary Islands during the Hunt time, and what better setting than an island for that kind of theme? So here are my pictures, in the order of the album reveals. There’s a mix of “seeing the scene and knowing it was a good fit for the Hunt” and “going through the pictures after the fact and finding things that may fit the theme”, but I did want to keep the set to “Canary Island pictures”, which I managed to do… although this may have been a stretch in some cases 😉 If you want the rest of the pictures for that trip, they’re there: Canaries – 2023. And I’m linking my fellow Scavenger albums along the way 🙂
Treasure
Treasure was definitely a “let me go through my pictures and find something appropriate”-type of picture. I thought going for the bee on the flower was maybe a bit of a stretch, but I wasn’t the only one with this idea in the album, so what do you know! 🙂 The processing of this picture was a bit annoying, because I couldn’t find a crop that completely worked. I finally settled on that one, but I’m not entirely satisfied with it.
Adventure
I honestly do not remember if I had “Adventure” in mind when I took this shot. I think I may have, but (as I didn’t know yet at the time) I was starting to come down with COVID, and my brain was apparently already busy fighting it, so I don’t have much memories there.
Flag
I giggled SO MUCH when I ran into this inflatable structure, set up of town festivities. It’s not often that you can get a shot that would work for not one, not two, but THREE words (treasure, skull and flag) on a list… and with a very literal interpretation at that! That shot almost made the cut for two themes (I was considering two different crops for Treasure and for Flag), but I eventually decided that, while funny, it wasn’t a shot worth two words, so I submitted it for Flag.
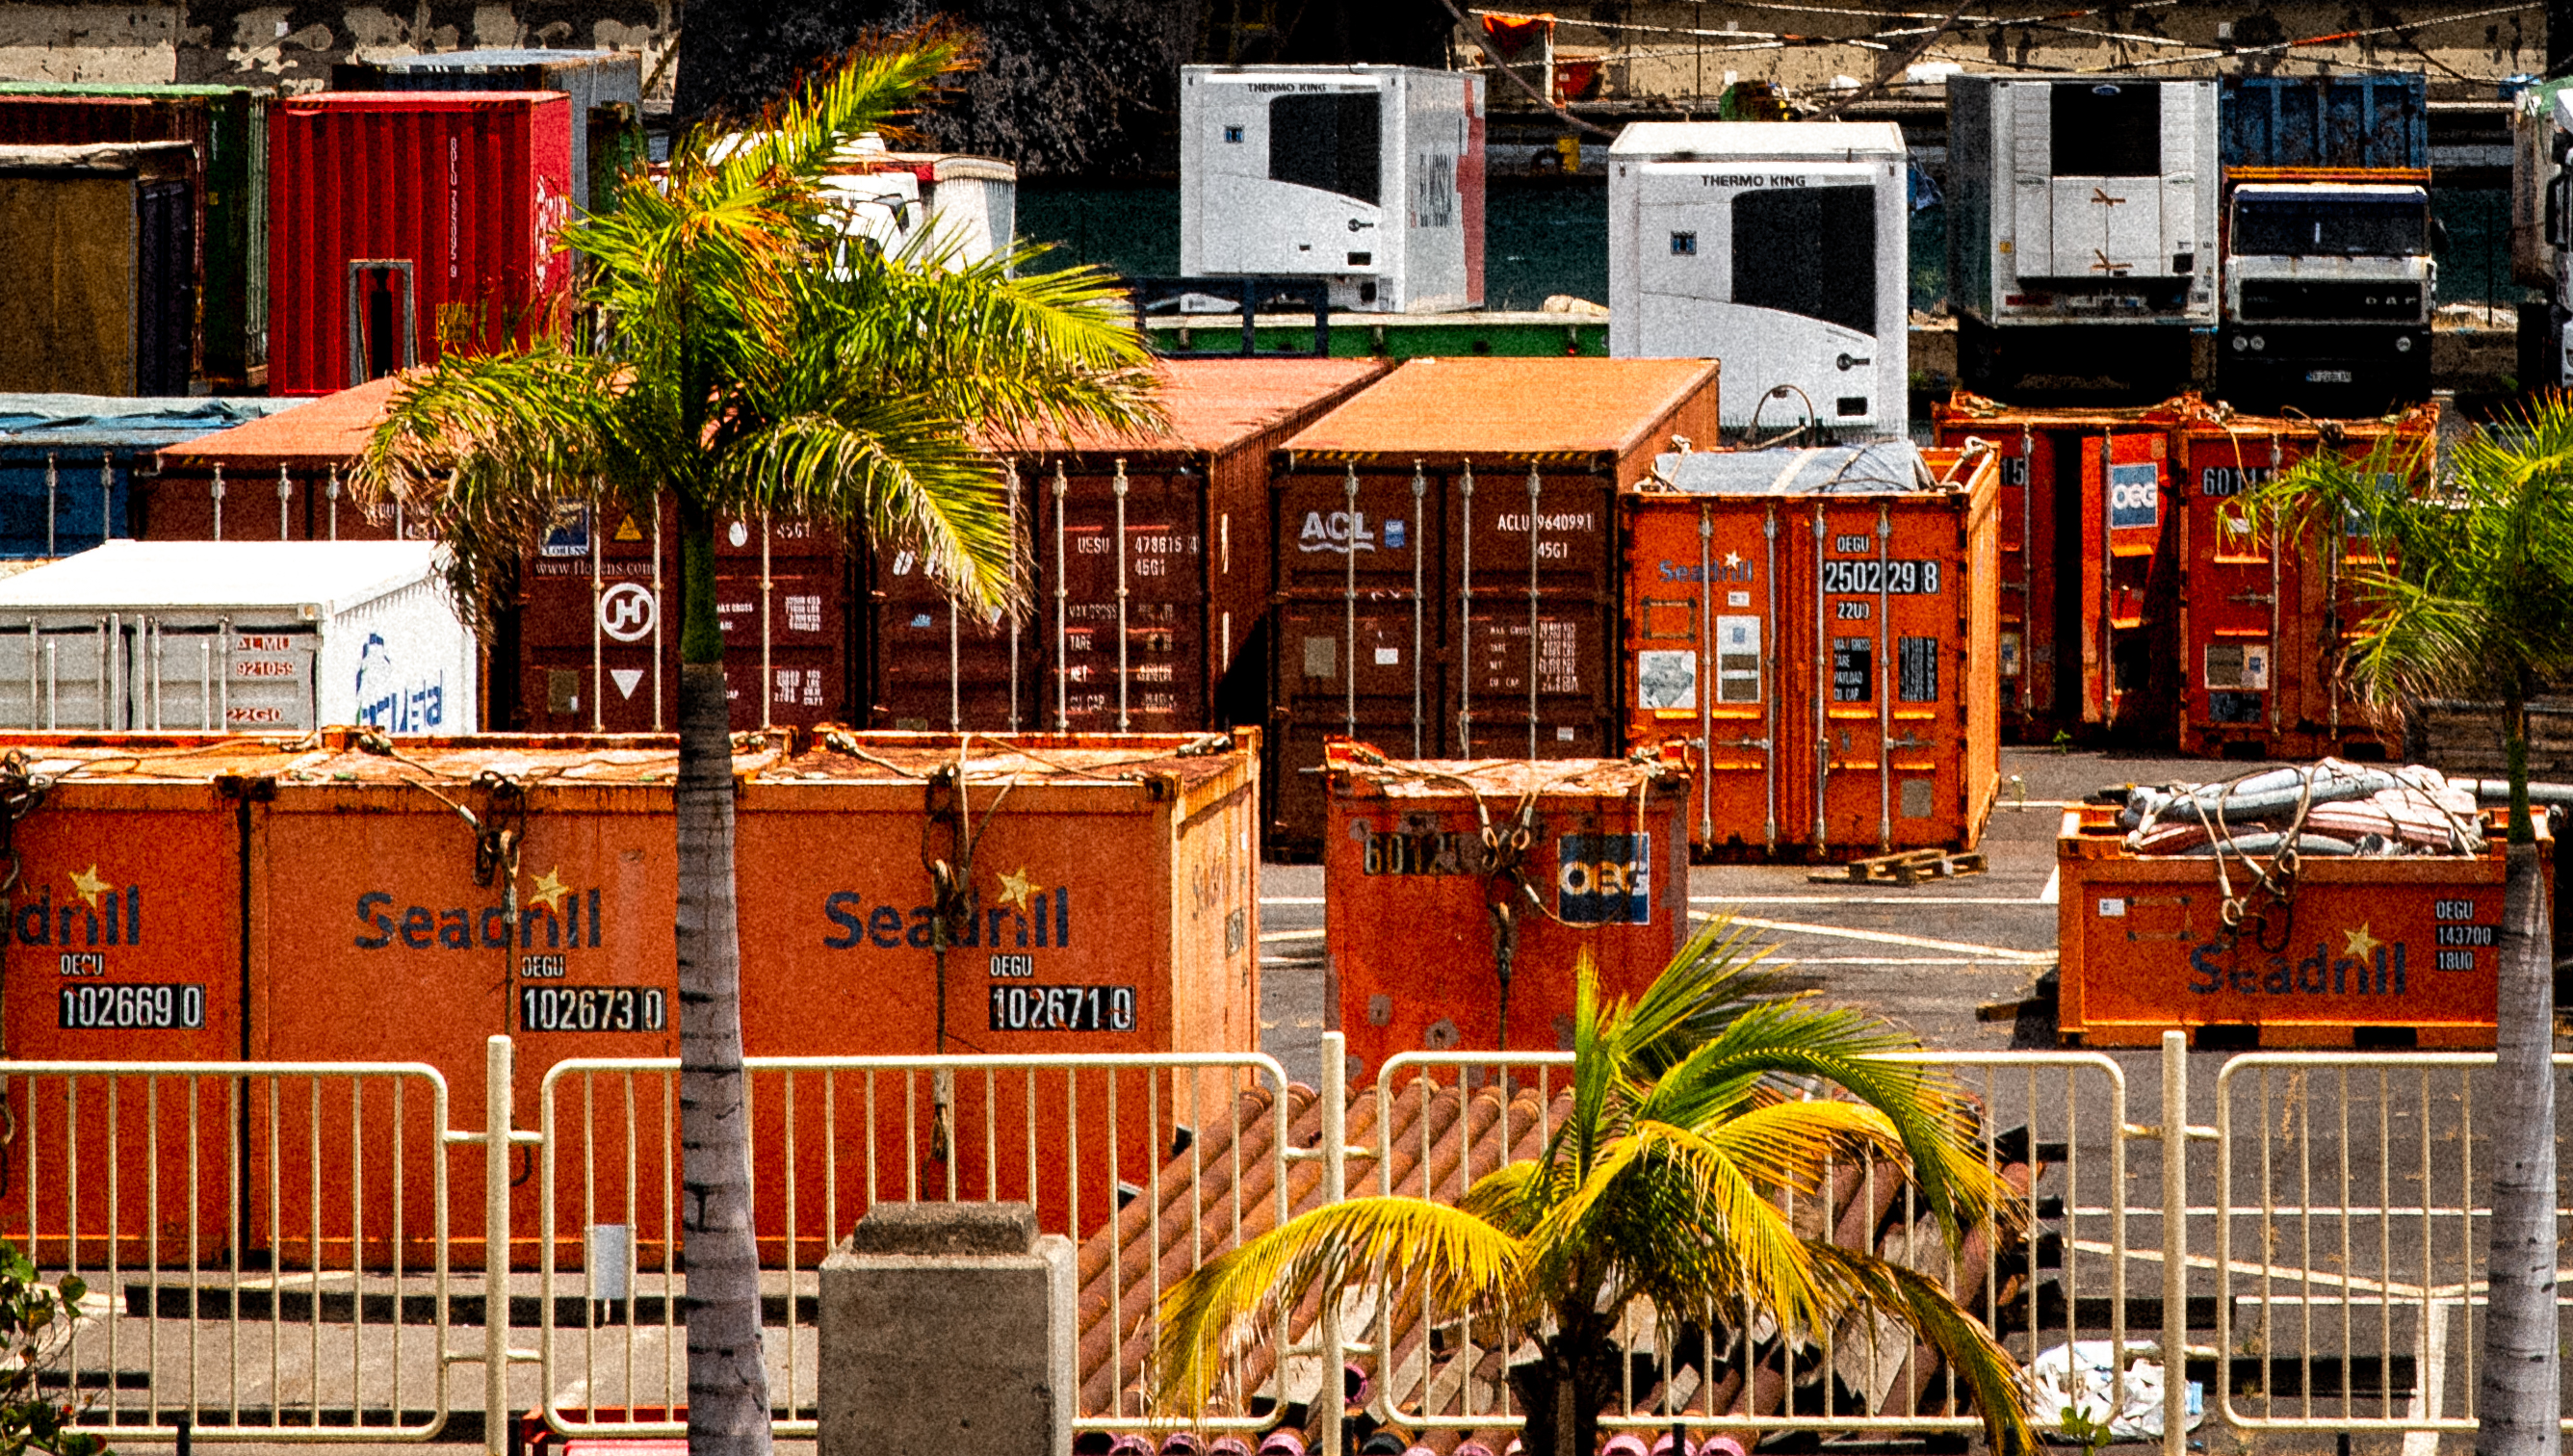
Code
“Code” was definitely a “let me see what I have in my pictures roll that might match” situation. I had taken a lot of pictures around the harbor in Santa Cruz de Tenerife, and I suddenly realized that I actually had a fairly decent fit for the theme around the container codes. I had to extract this from a much larger crop to make obvious what I wanted to convey; and I decided for a retro/film processing (with grain and slightly off color toning), because it felt right when I started playing with it.
Vessel
For Vessel, on the contrary, I had a wealth of images to choose from, and I had taken a lot of pictures of boats and ships (easy, on an island!) with that theme in mind. But that drakkar felt the funniest/nicest vessel I could find, and it also fit the connotation of the theme well (better than, say, a ferry.) The processing was kind of annoying, because I took that picture between two trees, but I still wanted to give a sense of open sea, rather than “something taken from my hotel room” (which… it was), so there’s been a significant amount of healing and cloning involved. I think it’s not too bad 🙂
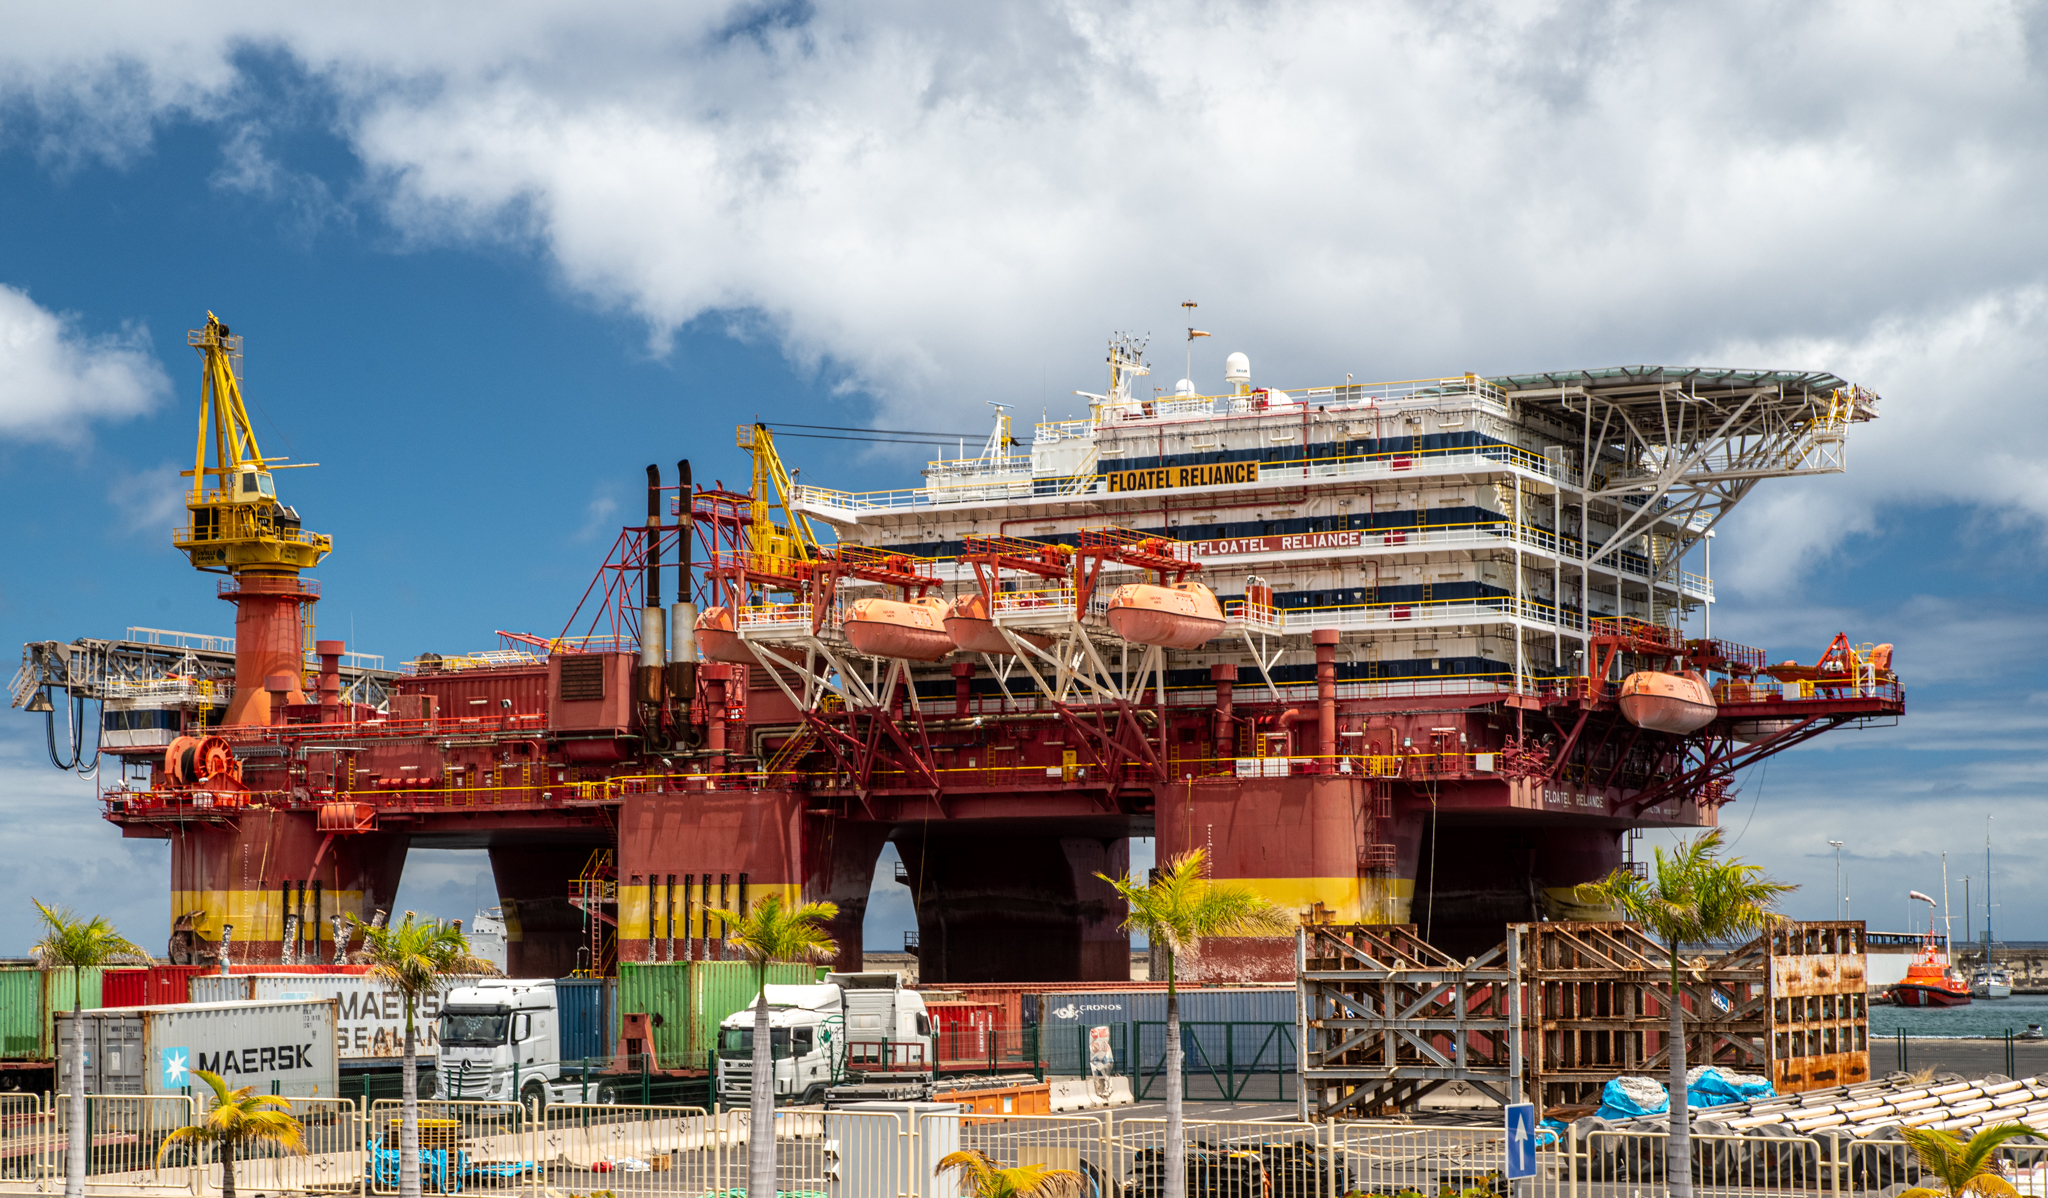
Monster
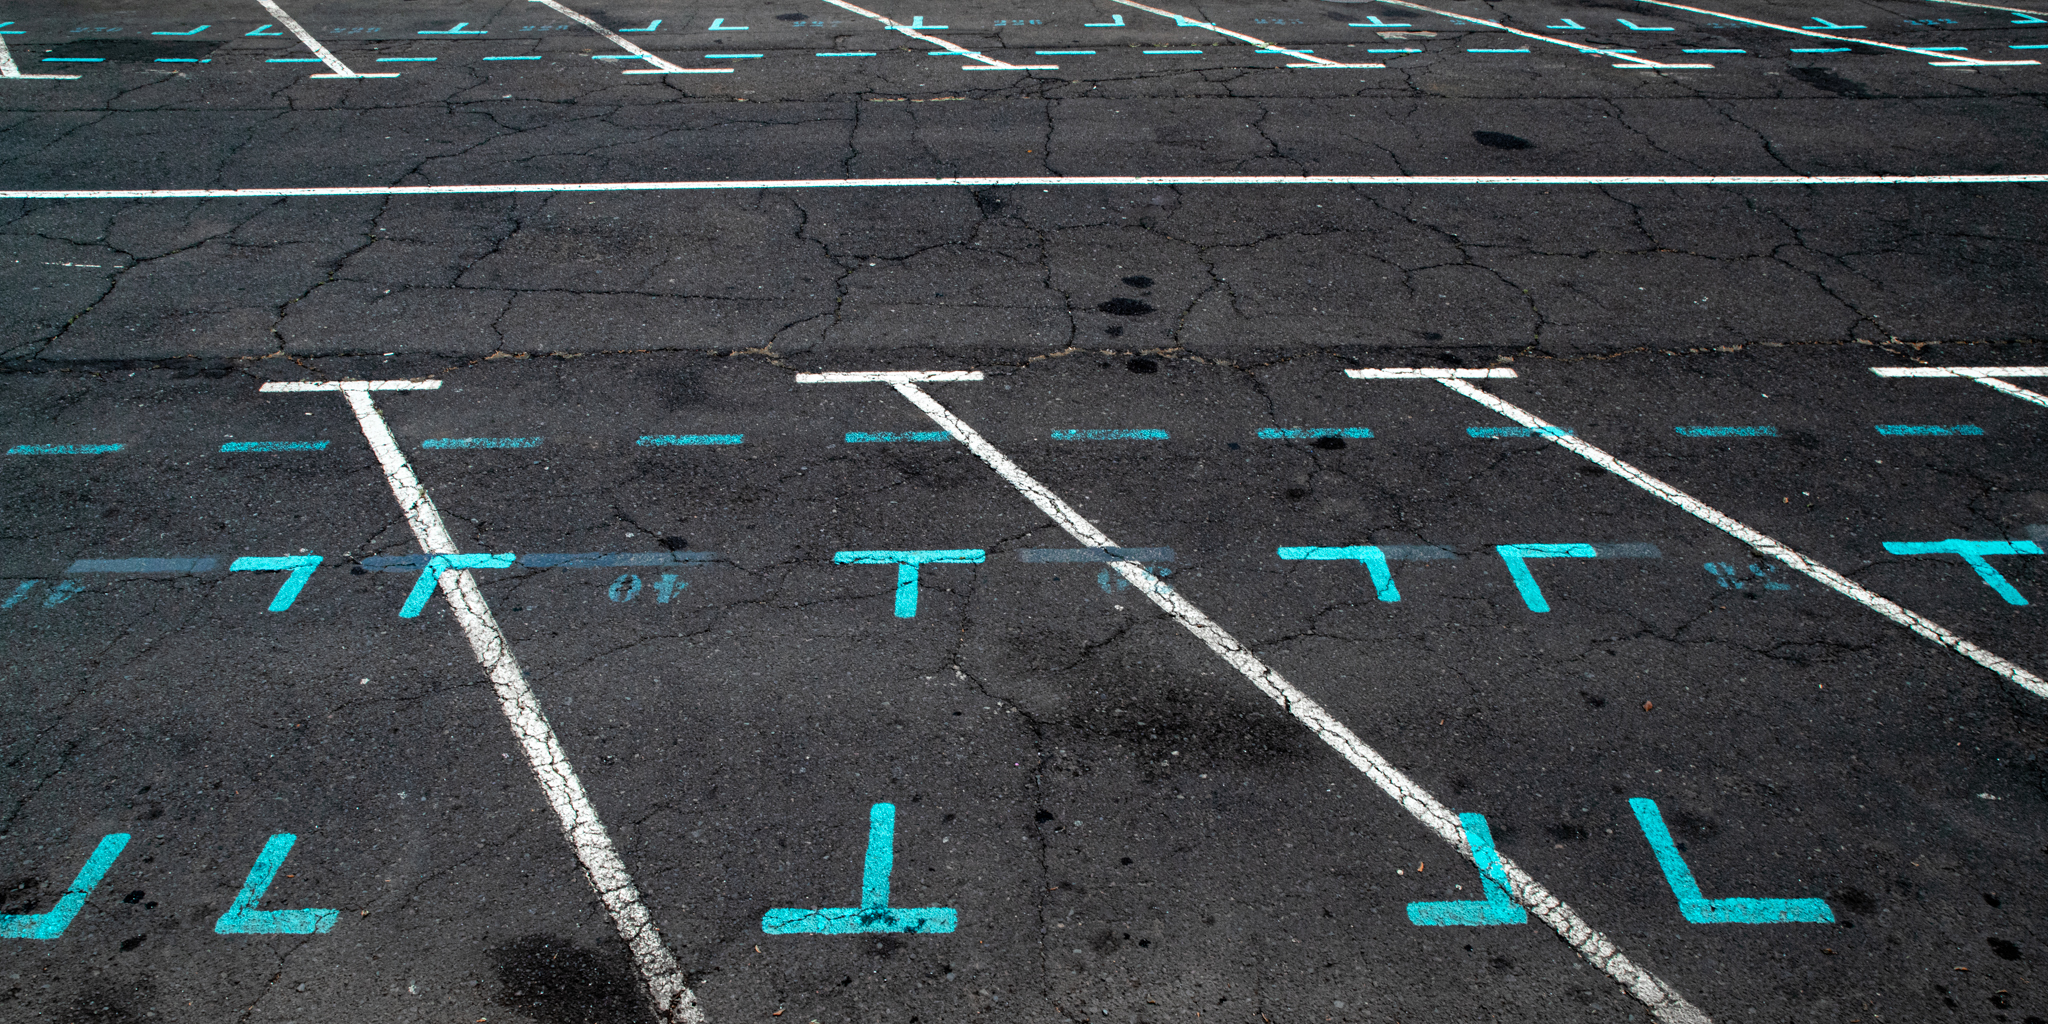
I must admit I didn’t think of Monster when I took pictures of this offshore barge, but it absolutely jumped at me when I was looking at my photo (digital) roll with the list in mind. Not only is it a very large “monster” structure, but with a bit of imagination, you can see six legs and a large head! I was afraid this would be a bit of a stretch, but the comments seem to agree that this is a good fit for the theme, so I’m happy.
Skull
We entered a mall that happened to have a pretty neat LEGO exhibition… including this cool diorama. I had taken the shot I used for “Flag” already, so I knew I had a “backup Skull” if needed, but I was still very happy to stumble upon this one. It’s also the only picture of this Hunt I didn’t take with my DSLR, but with my phone 🙂
Eight
I must admit that Eight needed a liiiittle bit of help to fit the theme, although I had taken that picture with the word in mind. Turns out, each of these cactus heads had 9 bulbs and not 8 – the one one the right had one hidden behind another, and the one on the left had one that was further away than the others. I called Photoshop to the rescue and, well, I did manage to submit not one, but two eights for that shot 😉
Aquamarine
There was a lot of opportunity for Aquamarine – taking pictures of shades of blue-green in waves was my first attempts at the shot, until I ran into these markings on the harbour near the Monster picture, and they just looked perfect for the theme. I was trying to go into the more abstract view of the picture, but I think I didn’t quite manage to get what I wanted there.
Sea / See / C
And the last picture of the set was a “bonus word”, with the theme “Sea/See/C” (choose one, two or all three!). I’ll admit I went the lazy way with that sunset, but it was a very nice sunset to watch, sitting on a sea wall… we were definitely not the only people there 😀
For the Scavenger Hunt #37, I revisited the theme I had used in Scavenger Hunt #32 – the wooden manikins are back!
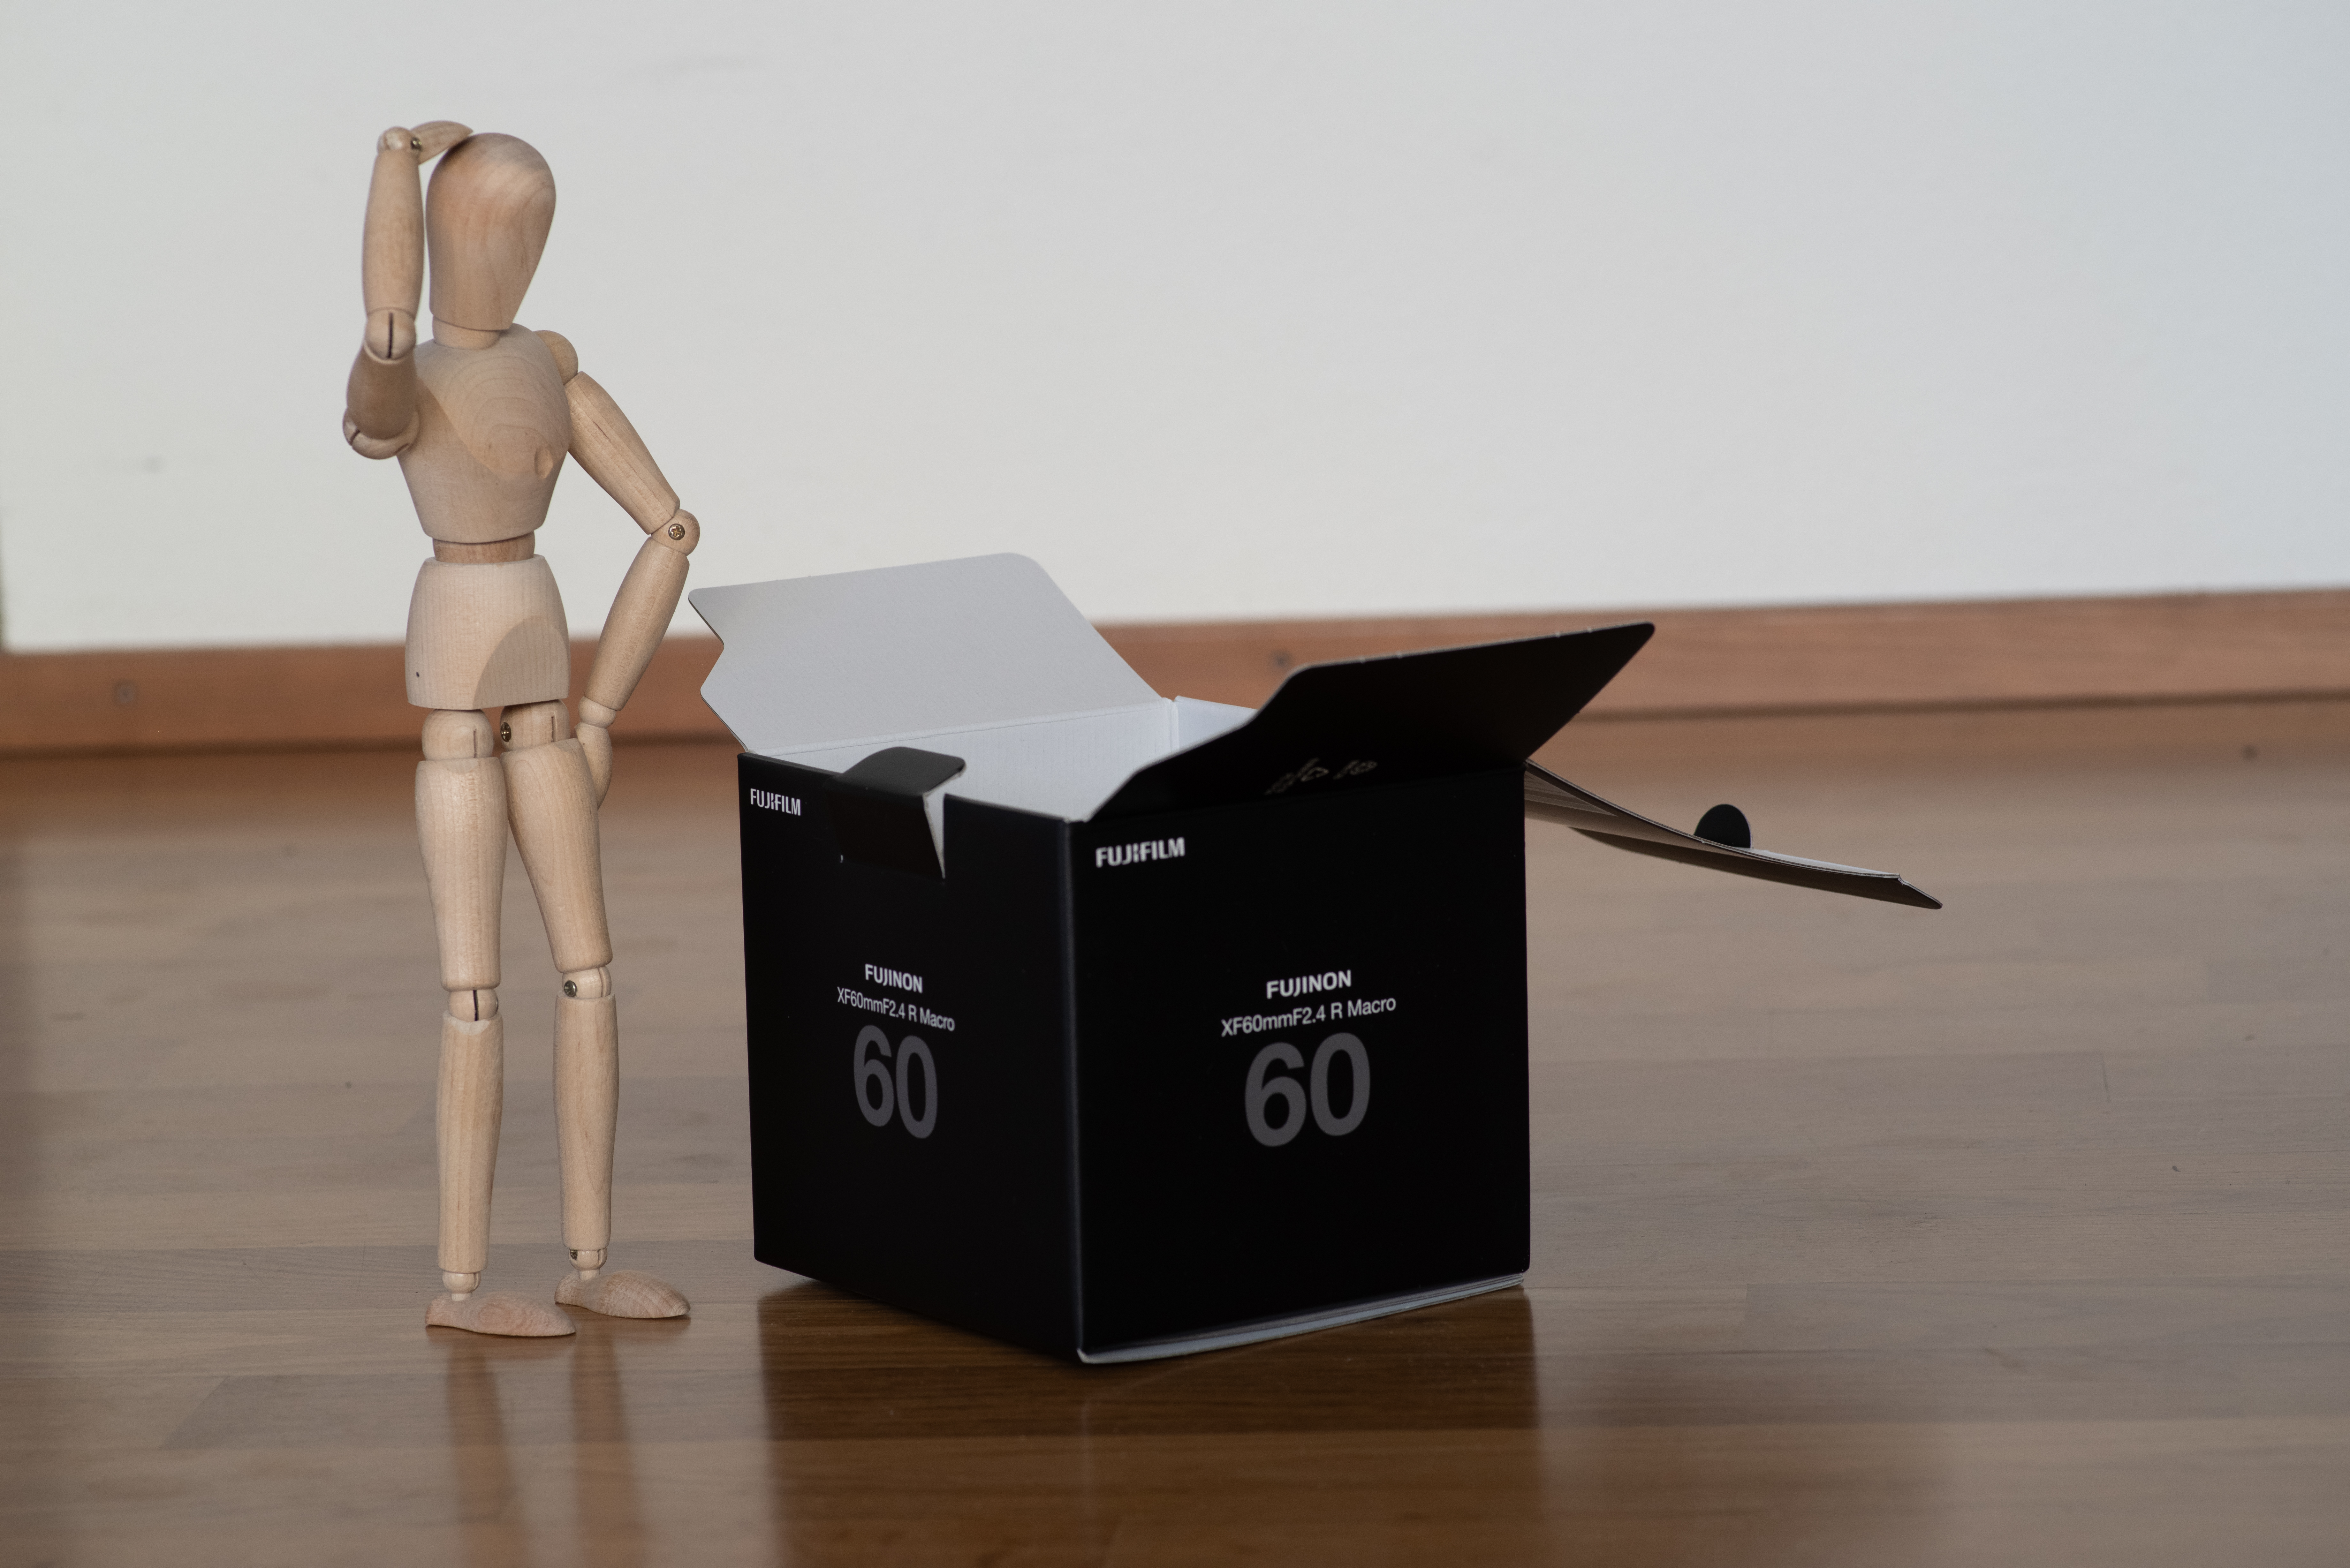
For “Box”, I wanted to go with a literal interpretation of “thinking outside the box” – so that’s exactly what I did. I was not sure I could find a box of the right size – until I got the idea of going for a lens box – of which I have kept at least the ones whose warranty is still running. The Fujifilm box is also kind of nice because it’s black – apart from the written stuff, that gets easily edited away.
Camera
Pentax K-1 II
Lens
smc PENTAX-D FA MACRO 100mm F2.8 WR
Focal length
100mm
F-Number
F/7.1
Exposure time
1/100 s
ISO
800
The pictures from my fellow Scavengers are here: Box.
For the Scavenger Hunt #37, I revisited the theme I had used in Scavenger Hunt #32 – the wooden manikins are back!
For “Keyhole”, I knew fairly early that I wanted to do something about looking through a keyhole. Before I committed to going for a manikin theme again, I was thinking of using a keyhole as a frame for something (not hugely original, but working with what I have). Instead, I went for the “spying” theme.
The challenge was to get the manikin at the “right” height with the “right” pose in front of the door – that took a bit of creative posing on top of a chair’s back, but eventually I managed to get a shot I could work with.
Camera
Pentax K-1 II
Lens
smc PENTAX-D FA MACRO 100mm F2.8 WR
Focal length
100mm
F-Number
F/8
Exposure time
1/80 s
ISO
800
I went for a “noir-themed” processing – cold tones, strong vignetting and grain – and I’m quite happy with the final picture.
The pictures from my fellow Scavengers are here: Keyhole.
For the Scavenger Hunt #37, I revisited the theme I had used in Scavenger Hunt #32 – the wooden manikins are back!
“Intentional Camera Movement” almost stumped me, because it didn’t feel obvious to make that work in a very static context such as manikins in a studio. Until I remembered that playing with the focal length of the lens while shooting was also intentional camera movement! I set up my camera on a Platypod and then experimented with multiple takes, some going from the smaller focal length to the longer, some trying to move as smoothly as possible, some making a few pauses during the course of the lens. I ended up choosing a continuous move from longer length to shorter length.
Camera
Pentax K-1 II
Lens
Pentax D FA 24-70mm F2.8
Focal length
70 to 28 mm, continuous
F-Number
F/22
Exposure time
3s
ISO
100
I edited the picture to play with the “super hero zooming into the scene” aesthetics, in particular in the way I chose to tilt the image. I also processed the image to emphasize the movement trails. And I think it’s one of my favorite pictures for this Hunt 🙂
For the Scavenger Hunt #37, I revisited the theme I had used in Scavenger Hunt #32 – the wooden manikins are back!
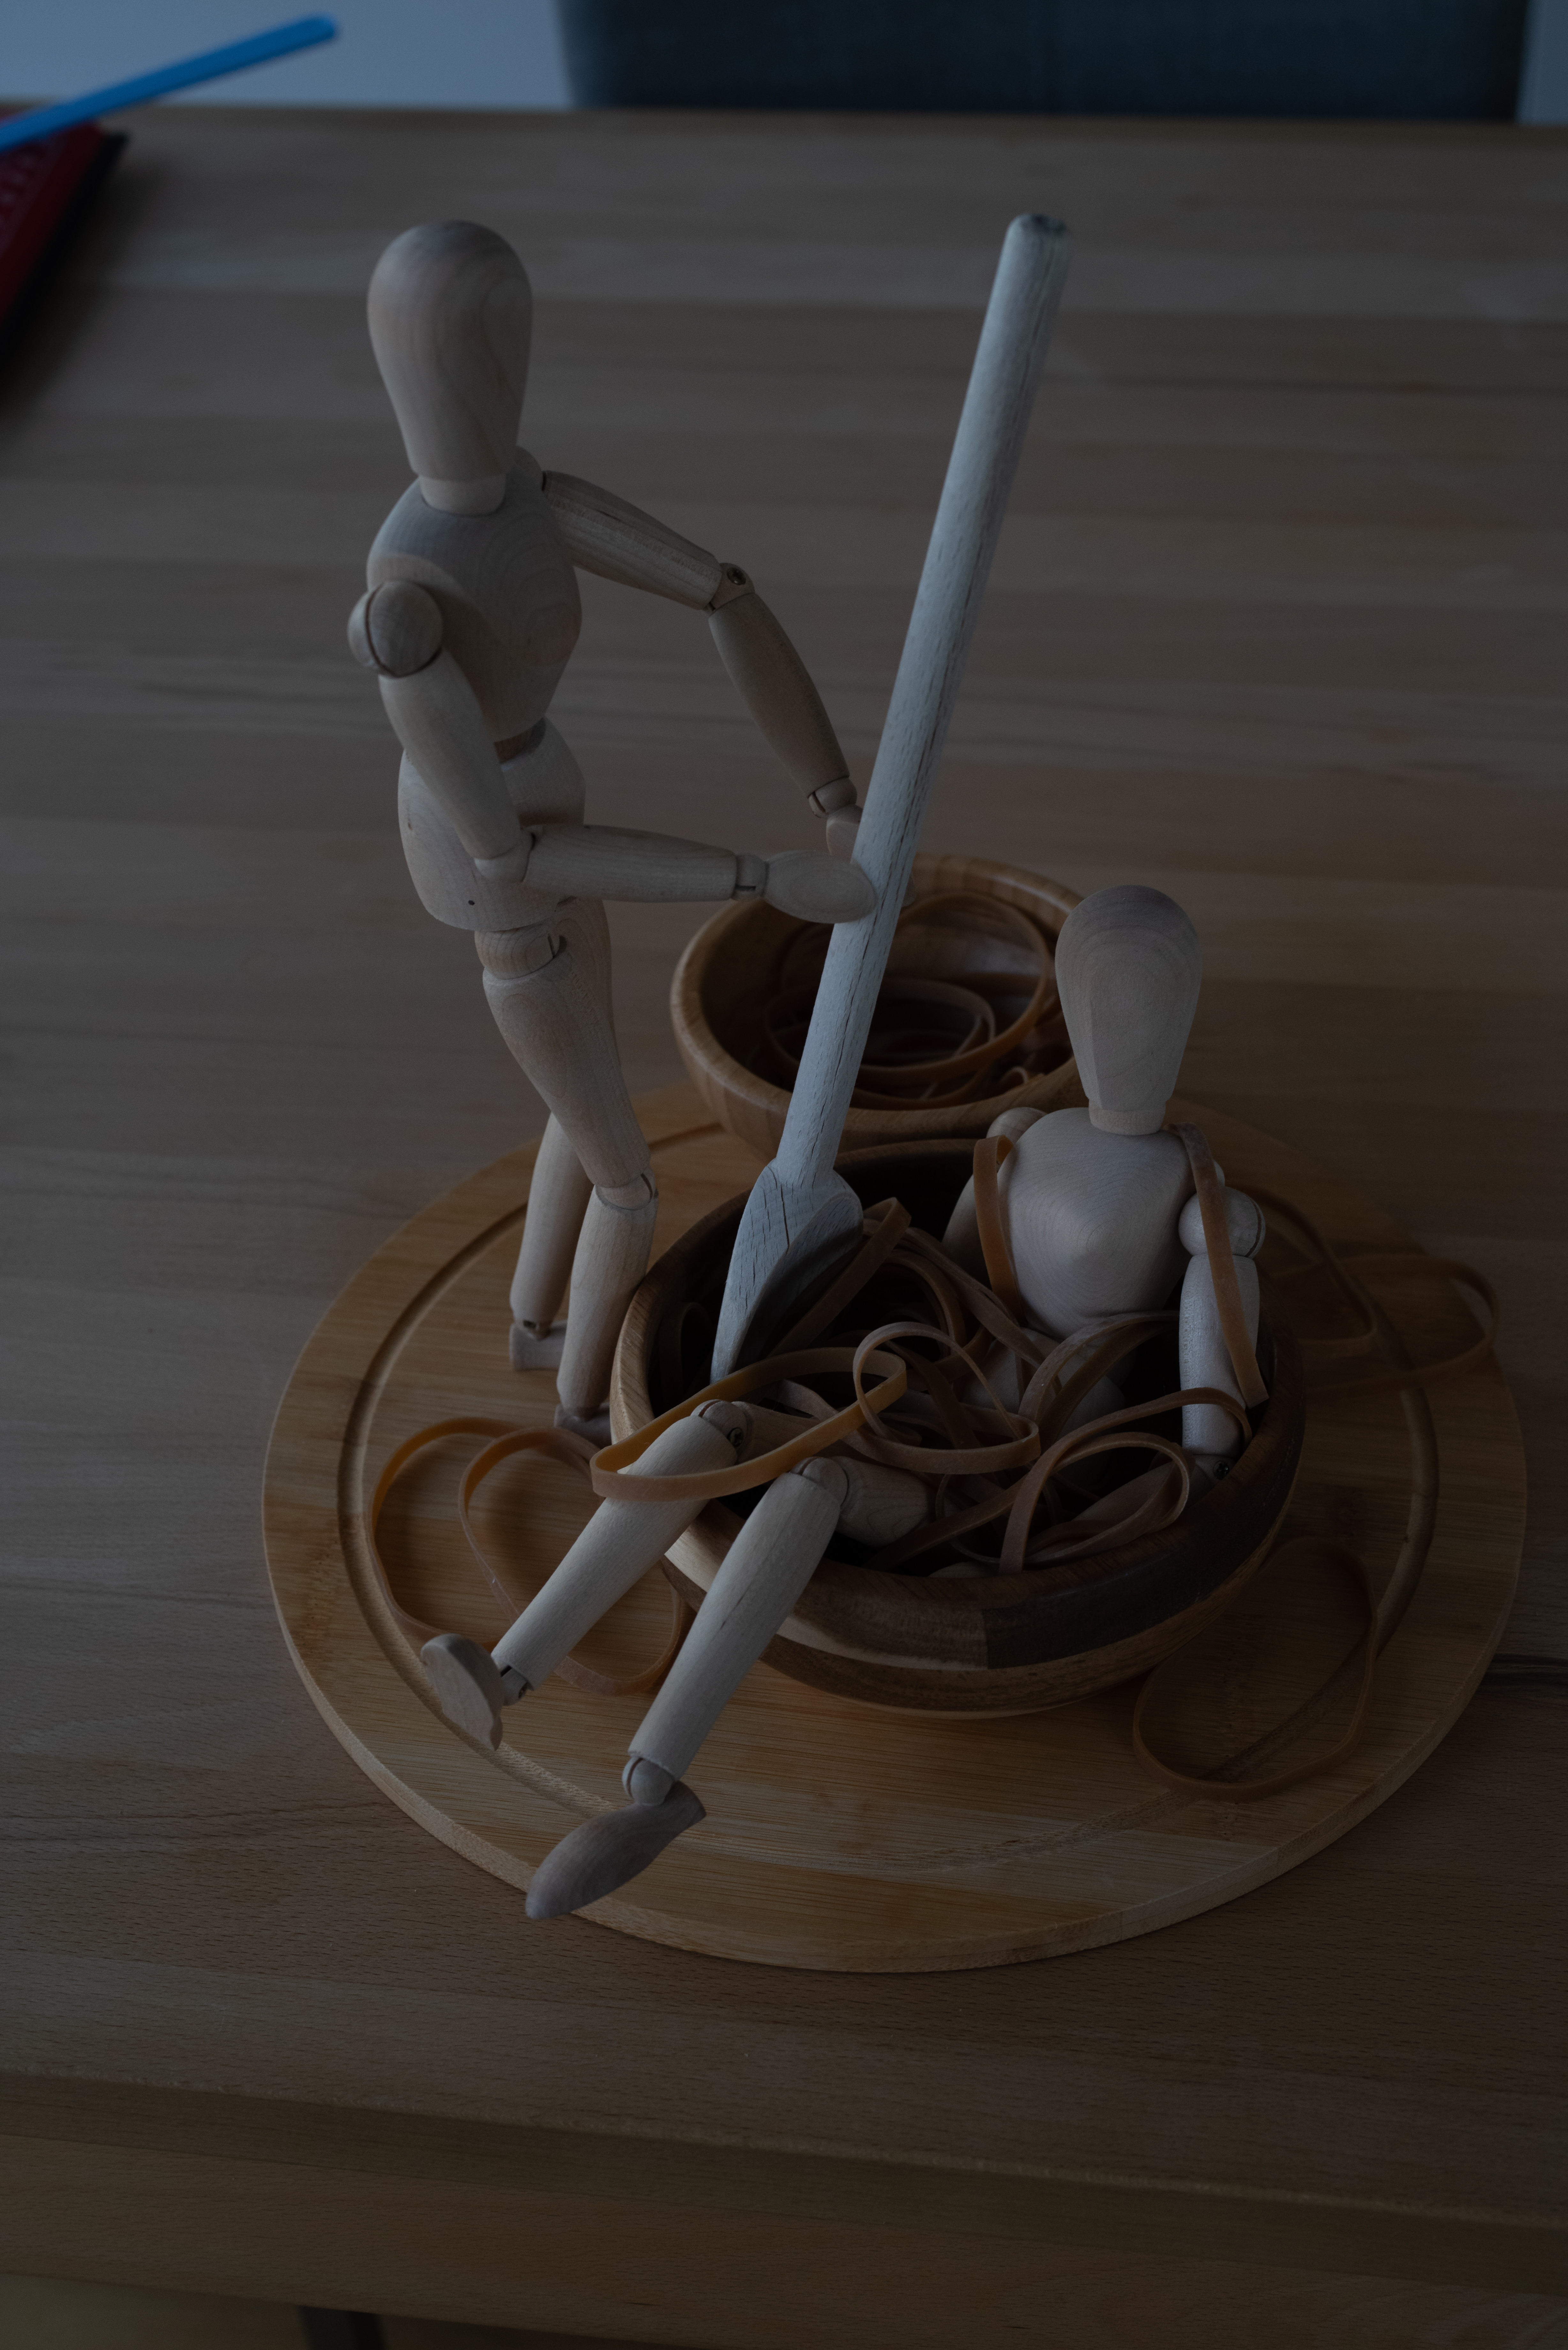
One of the words was “Monochrome”, with a specific “not black&white” constraint. Since I had a manikin theme, and my manikins are wooden, well, that gives me the palette for what I’m doing. So I started gathering everything that was vaguely wooden-colored in the apartment, and tried to assemble SOMETHING. My train of thoughts when building this image was “a manikin spa” – spas do have weird treatments going on, so why not an elastic-band based one for wooden manikins! I wanted to give the impression of relaxation for the one sitting, and of attending the other for the one standing. I’ve been told it could also look like the day after a student party – and I’m not disagreeing with that 🙂
Camera
Pentax K-1 II
Lens
Pentax D FA 24-70mm F2.8 smc PENTAX-D FA 50mm F2.8 Macro smc PENTAX-D FA MACRO 100mm F2.8 WR Pentax DA 18-55mm 1:3.5-5.6 AL
Focal length
63mm
F-Number
F/1.8
Exposure time
1/100 s
ISO
111
The pictures from my fellow Scavengers are here: Monochrome.
For the Scavenger Hunt #37, I revisited the theme I had used in Scavenger Hunt #32 – the wooden manikins are back!
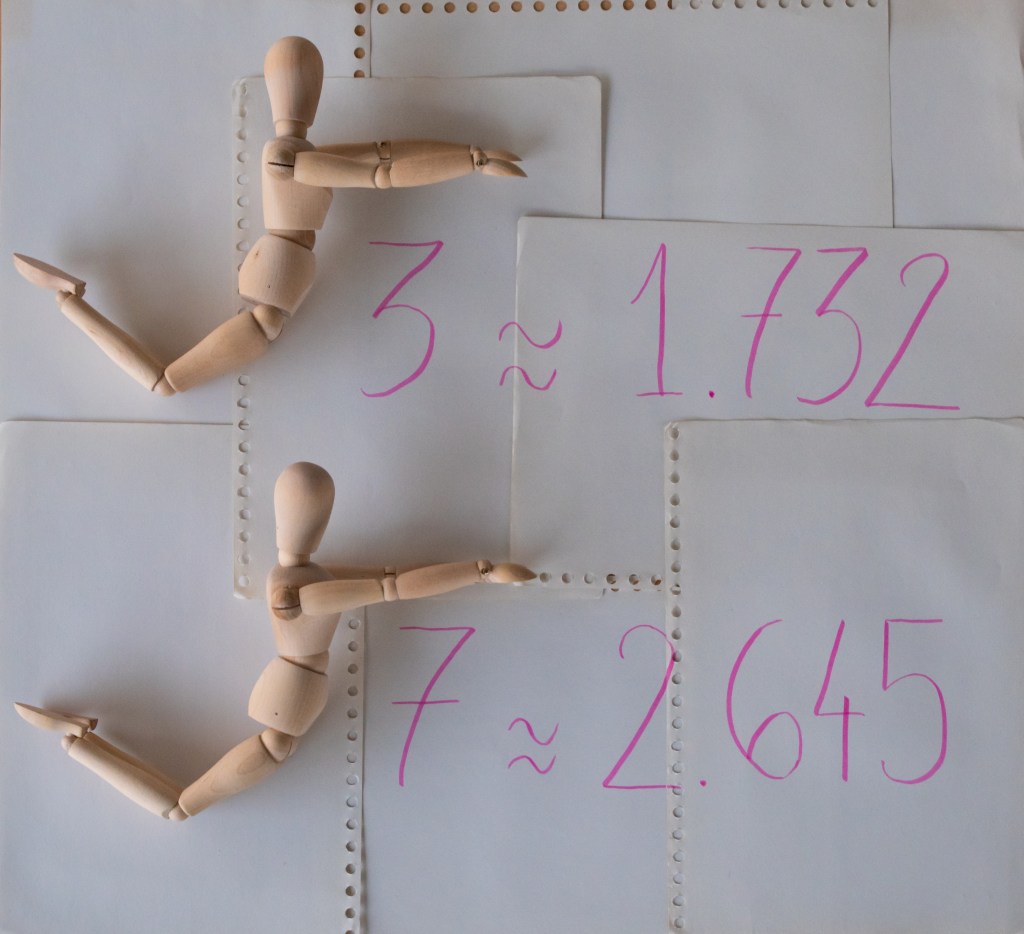
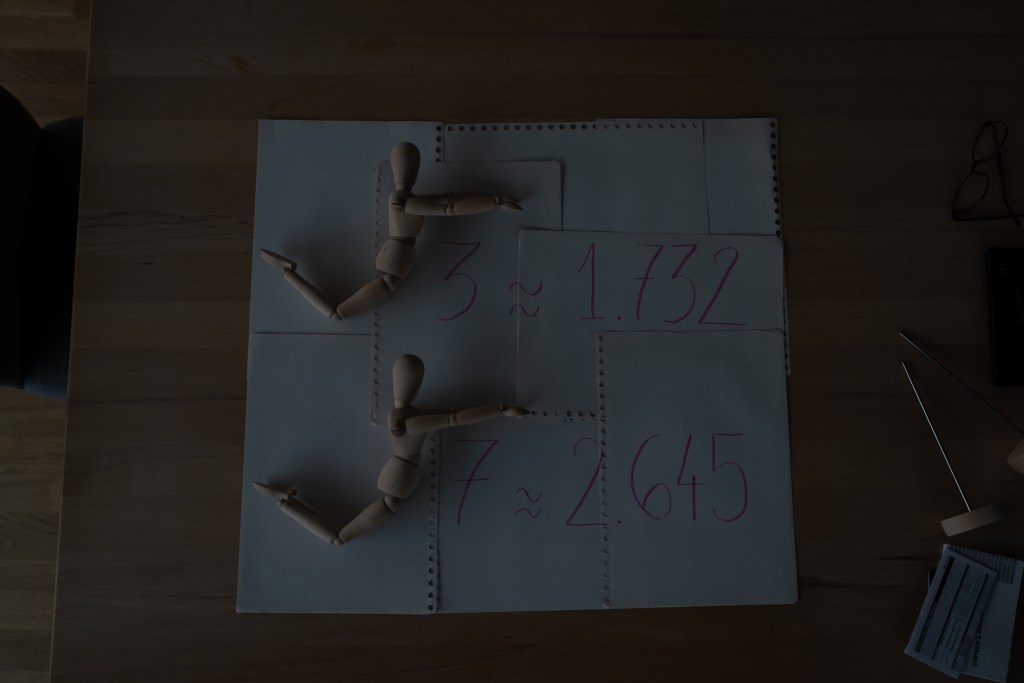
The “Roots” image is the one where I expect the most “… I don’t get it”. I considered tree roots, hair roots – I had a vague concept for tree roots but that would be hell to process in the very little time I had left, and hair roots felt difficult to pull off with bald manikins (I do NOT have fond memories of making Spaghetti behave long enough to take pictures!). And then… square roots. Well well well! I could work with that!
I first posed both manikins in “square-root” shapes (… as best as I could – these are NOT the most flexible models). I initially wanted to use a single sheet of paper to give the rest of the context, but I had a scale issue, so I embraced the multiple sheets and made them as visible as I could. And then, square root of 3 is roughly 1.372 and square root of 7 is roughly 2.645, so I picked my prettiest pink pen and made that happen.
Shooting from above was a bit of an ordeal (and involved climbing on a chair with my camera, which I normally try to avoid.)
Camera
Pentax K-1 II
Lens
Pentax D FA 24-70mm F2.8
Focal length
33mm
F-Number
F/6.3
Exposure time
1/60 s
ISO
800
Processing was mostly straightforward – make the sheet rectangular, crop, fix exposure, done.
The pictures from my fellow Scavengers are here: Roots.
For the Scavenger Hunt #37, I revisited the theme I had used in Scavenger Hunt #32 – the wooden manikins are back!
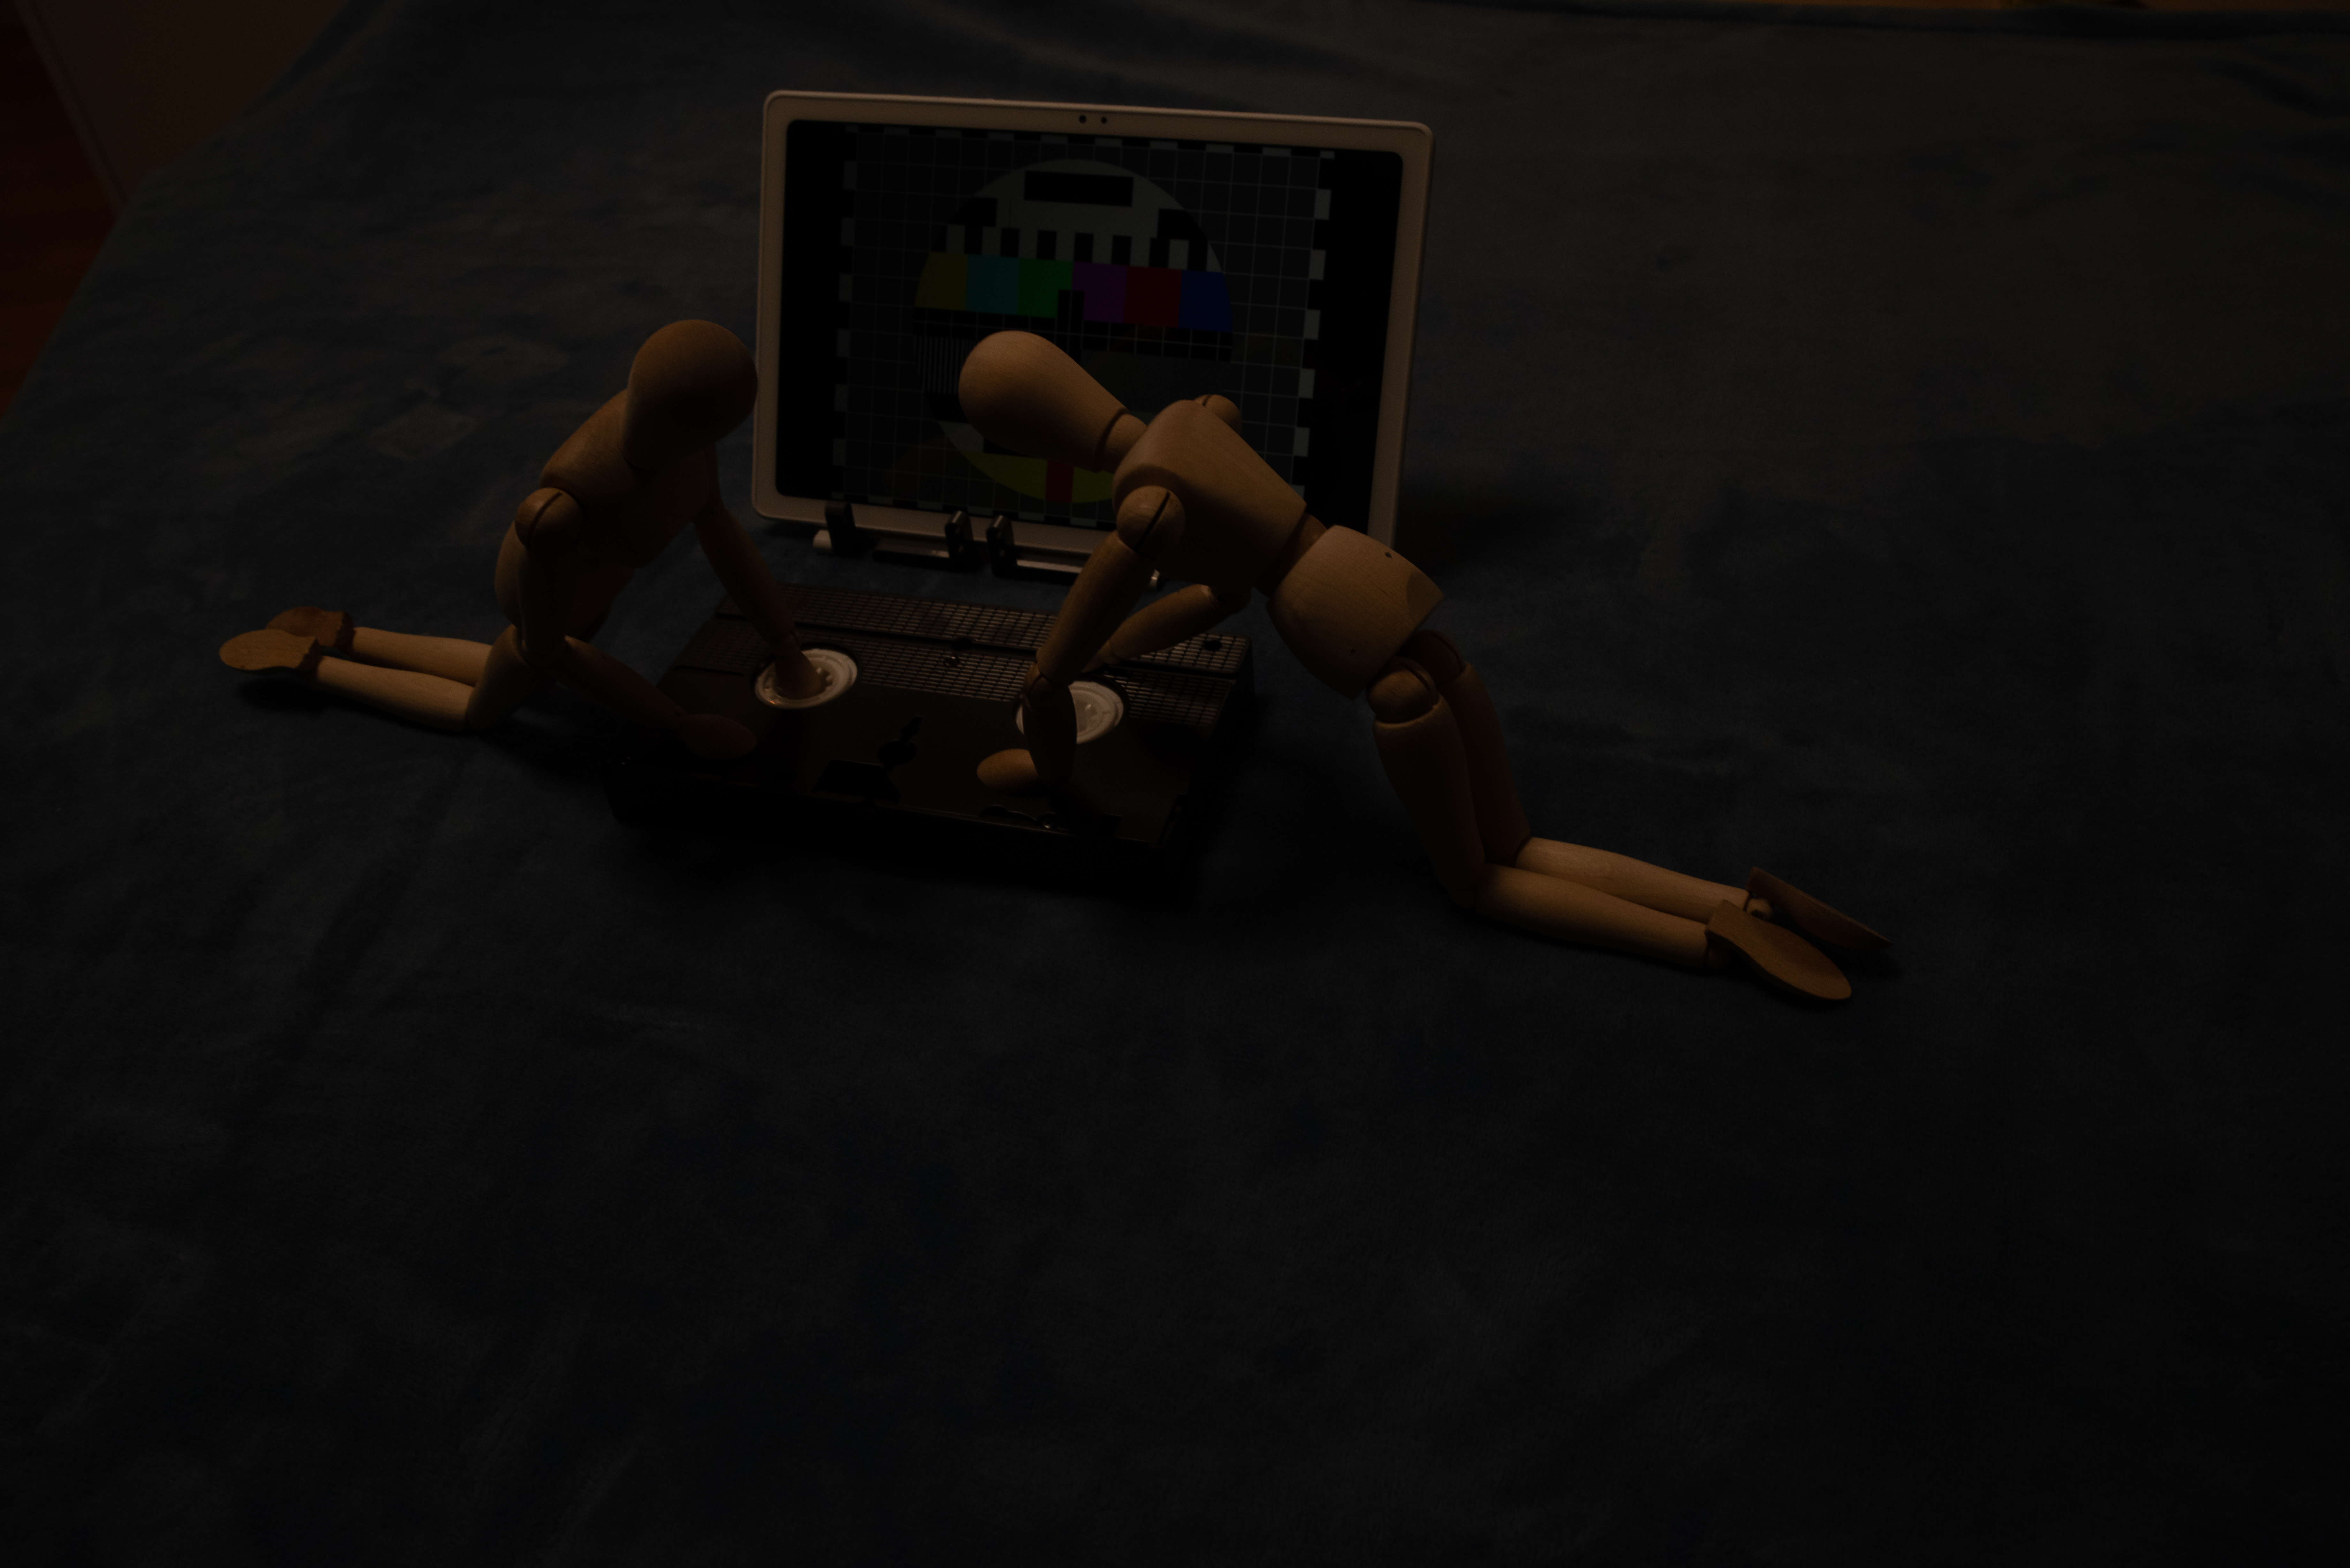
The word “Tape” is the one for which I went through the most different concepts over the timeframe of the Hunt. I started thinking about putting tape on a gift to close it; same thing with a moving box; I considered an audio tape (but I don’t think I have any in the apartment), I did A Lot of attempts at making a measuring tape work (either as “measuring furniture” or “tailor measurements”… nothing quite worked. And then, I remembered that I had a VHS tape somewhere!! (This tape is coming from 3D Construction Kit, for which we have a box… containing said intro video tape.)
I had the “rewinding” notion early on, but I added the blue blanket and the “end of programmes” image on the TV/tablet behind after a few first takes to help sell the “rewinding the video rental after having watched it” – how 90s of me.
Camera
Pentax K-1 II
Lens
Pentax D FA 24-70mm F2.8
Focal length
31mm
F-Number
F/11
Exposure time
1/40 s
ISO
800
The pictures from my fellow Scavengers are here: Tape.