My initial train of thought for the word “Connected” was to play with an “ET-like” image, with a finger and an Ethernet cable. And then, for the first “post-soft-lockdown” walk we did, I ran into (not literally) some power lines. Which means that I have a fair amount of power lines pictures in that roll 😉 I chose the one which was the most geometrically appealing to me. This is the original picture, with only minor RAW development operations:
Camera
Pentax K-1 II
Lens
HD PENTAX-D FA 24-70mm F2.8 ED SDM WR
Focal length
40mm
F-Number
F/9.0
Exposure time
1/80 s
ISO
200
The post-processing was a bit of crop&rotate, some exposure and contrast fixing, and obviously the B&W treatment. Nothing particularly fancy, but this is one of my favorite picture for this hunt 🙂
A friend of mine suggested I may have wanted to flip the image vertically, so that the triangles of the image would point up instead of down. This is not an option I had considered, and I’m happy he did for me 😉 I tested the image that way, and here’s how it looks:
I’m probably very biased because I don’t like being wrong, but I actually like it less that way. The cable coming from the bottom left of the image ended up coming from the top left, and that leading line consequently feels weaker. Somehow, the light on the right also feels weirder; I also like the pylon at the top more than at the bottom. All in all: I’m standing by my accidental choice 😉
This is the last picture I took in this hunt, and it is my favorite. I had a previous idea which had to do with some window reflection, and the concept was there, but the image was just not satisfying – so once I got my last shot out of the way to get the set of 10, I went back to the drawing board to get a proper mirror.
Mirrors are highly non trivial to shoot – especially if you don’t really want to be in the picture ! Playing with angles can be fun, but can also be very frustrating when you realize that what you want to do will Just Not Work – because Physics Said So.
I first remembered that we had a few old hard drive platters that make very decent mirrors; after looking for them for a little while, I found them in the cellar in a bag full of steampunky paraphernalia (which we got a few years ago to attend the steampunk-themed wedding of friends of ours). At that point, I hadn’t connected these dots yet – I started playing with the mirrors on the floor, trying to get interesting reflections of the board games shelves, that sort of things. It was not BAD, but it was somewhat underwhelming.
And then I started setting up the whole “let’s have mirrors reflecting the steampunky stuff – on top of that the mirrors are round, I have a lot of circular stuff in there, this may actually be interesting. It took a little while to arrive at a convincing setup of the whole thing – essentially it ended up looking like this, from another angle:
A lot of holding, and clamps, and chains – but these actually work with the theme, somehow, so that’s great! While working with the setup, there was also the question of being able to take a picture of it while not being on the picture myself. I ended up getting the telephoto lens – had a pretty hard time managing to focus it with the low-ish distance I was able to put between the setup scene and the wall, but it eventually worked out. This is the original picture, with only minor RAW development operations:
Camera
Pentax K-1 II
Lens
Sigma 70-300mm F4-5.6 Macro
Focal length
190mm
F-Number
F/25
Exposure time
1/15 s
ISO
1600
The processing was slightly more heavy-handed than usual on the color side – I thought that the browner hue fitted fairly well with the subject of the image.
For the Meal theme, I had PLENTY of backups – a friend of mine started a “so, what are y’all eating in this times of lockdown and quarantine?” group, so I had a ton of pictures to choose from, if necessary.
I went for the slightly less obvious theme of “meal preparation” – we made some version of chicken parmigiana, and since this requires quite a bit of setup, I thought it was a good idea. I like taking pictures of that sort of things from above – it gives information, and there’s no “out of focus” issue. Here, the preparation took enough space that getting everything in the picture was a bit of a challenge with my widest lens (which is… not that wide), but I managed still without too much acrobatics. This is the original picture, with only minor RAW development operations:
Camera
Pentax K-1 II
Lens
Pentax D FA 24-70mm F2.8
Focal length
24mm
F-Number
F/9.0
Exposure time
1/60 s
ISO
320
There was a surprisingly high amount of edition on that picture: as you can see, the setup is pretty cramped, and I ended up having a part of my sink and a part of the yellow surface part of the pictures, which I didn’t want. Fixing that was not hard, but it was somewhat time-intensive.
Other than that, I don’t have many opinions about this picture. I like that the bottom shows a bit of story-telling by giving the coating sequence, but the picture itself feels fairly banal.
Cozy was tough for me, because my mood during this Hunt was far from cozy. So I’ll admit that this is a case of “finding something that can remotely fit the theme and ship it”. The first “post-soft-lockdown” outing we did was to go see a pond with frogs, so we saw the pond with frogs and I decided that this particular frog DID look fairly cozy.
Then… I’m not a telephoto shooter, essentially – I have one, but it’s a cheap one (advantage: it’s lighter than my main lens; drawback: it kind of lacks light and it’s very fiddly), and I didn’t have it with me on that day. I find telephoto lenses to be generally heavy (well. Physics accounts for that, mostly), to have way too long of a minimum focusing distance for my use case, and to be tough to use with any kind of sharpness without a tripod (especially when the damn thing is not opening :P) – hence, mine is definitely not my “walk-around” lens. Maybe I should give it more shots, though (pun intended) – because for this kind of thing, it would definitely have been beneficial.
This is the original picture, with only minor RAW development operations:
Camera
Pentax K-1 II
Lens
HD PENTAX-D FA 24-70mm F2.8 ED SDM WR
Focal length
70mm
F-Number
F/10.0
Exposure time
1/100 s
ISO
400
Again, very straighforward edit. Hi, it’s a frog. It looks cozy.
For more interpretations of the theme, see the Cozy Scavenger album! (Spoiler: it has A LOT of cats.)
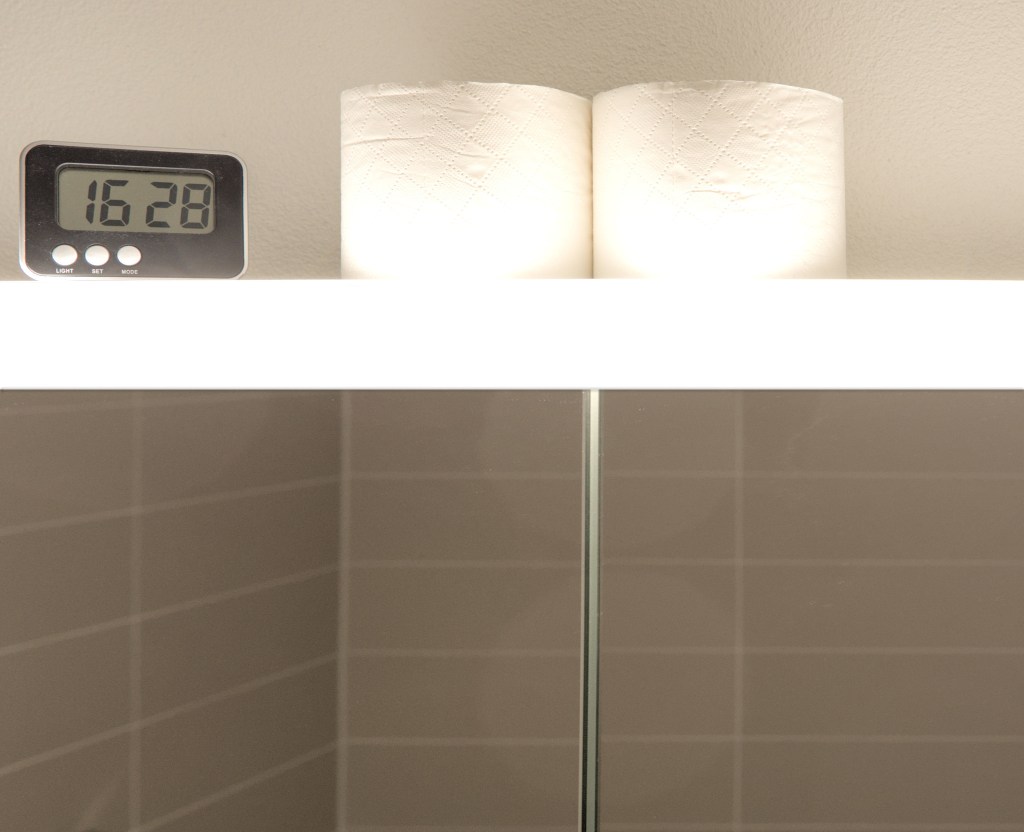
The “Toilet Paper” theme was from the start fairly uninspiring for me. As I’m writing this before the reveals, I’m sure a lot of my Scavenger crew will have wonderfully creative, silly and hilarious takes on the word (And, after publication: can confirm 🙂 ). But that’s just… not me 🙂 However, early in the Hunt, our cleaning lady had store a couple of rolls on top of the bathroom mirror (because the usual station under the sink was overflowing a bit). And that setup caught my eye for a reason in the morning shower, I went “huh”, and I knew what I wanted to do there – play the simplicity, the symmetry, the geometry – these are elements of aesthetics that speak to me, and for which that specific image could work.
Now, it so happens that the bathroom in which we have a shower (and hence the one we mostly use) has very messy reflections in the mirror – said shower, a wall in the middle, and the washing machine/tumble dryer tower. Luckily, the other bathroom is essentially a symmetrical of that one, with only a bathtub – so the mirror reflects the wall. Which works out, kind of.
Because obviously, the challenge there – getting a “clean” reflection in the mirror AND a “clean” geometry…. hrm. So as “boring” as this image may seem initially, it’s actually a composite 😉 And it is the only composite I submitted to this hunt!
These are the two “original” images (minor RAW development applied only – and exposed VERY to the left):
Camera
Pentax K-1 II
Lens
HD PENTAX-D FA 24-70mm F2.8 ED SDM WR
Focal length
40mm
F-Number
F/5.6
Exposure time
1/40 s
ISO
200
(same settings block for both pictures.)
And these are the two images that ended up as layers in my GIMP window:
You’ll notice the disappearance of the shower holder and the geometry distortion to get the middle line of the mirror line up with the rolls in the final picture 😉 All in all, I’m quite happy with this picture, because I managed to do what I wanted to do, despite non-trivial challenges. I’m not entirely happy with the visible lens flare (… probably lens flare?) in the middle of the image, but I didn’t manage to correct it cleanly, sooooo it stayed there 🙂
The reveals for the 27th Photography Scavenger Hunt are done… which means I get to post my Behind the Scenes blog post, with all that I did for this round!
It’s been a tough round – I didn’t manage to do anything in December – December tends to always be a silly month, and December 2019 was a VERY silly month.
My January went a bit better – well enough that I found SOME inspiration for at least SOME of the words, and I even got a few pictures that I really like. A few of these started as “backup shots” – but generally speaking I’m not ashamed of anything I submitted this month (although I’m not necessarily HAPPY with everything I submitted.) And more importantly, I learnt a ton of things in the image processing/photo editing domain, and I gained some experience in “how to do things so that I avoid painting myself in a corner”.
Anyway, without further ado: my set of pictures for the Round 27 of the Photography Scavenger Hunt – roughly in the order where I decided I’d submit them.
Car
For the “car” theme, I was wholly out of ideas until I remembered that trams were also called street cars – and that I live in a city with a lot of trams. So I first went out with a camera around tram lines, and didn’t really get anything fun there. But then I also remembered we have a funicular, and that this funicular happens to run near a few tram lines too – so I went to a place where I could get both in the picture, spent some time for a (street) car and a (cable) car to synchronize (That actually happened fairly early, and not as well later on…!), and got a few shots, including this one, right out of darktable with essentially nothing done on it – it’s exposed on the left because I wanted to keep options for the sky there.
The first image processing was in darktable – exposure, straightening, cropping. For the cropping I considered cropping more in the bottom of the picture and framing the tram below in a “cleaner” triangle, but I liked the picture less, because then I had a tendency to crop more sky as well to re-balance it, and I like that sky, even in B&W.
I was still not suuuuper convinced by the image itself, which is, in all fairness, pretty boring. So I decided to have a bit more fun with it, and pushed the cheesiness factor to 11 by getting my cars selectively colored – which is not something I had much experience with before, so that was a way to push my own boundaries when it comes to technique too. I wondered if I should also re-saturate the “regular” cars in the front; I decided against it because I think the image stands better “on its own” (i.e. without the reference to the theme) without them.
I did that operation in GIMP, and I will admit that I got suuuper lazy there – it’s probably ill-advised to pixel-peep on that picture, because the resaturation was definitely large-stroked. I decided I was happy enough with that and that I wouldn’t be much happier with a lot more time spent on that, so I decided to ship it that way 🙂
For Steps, I wasn’t very inspired – I have a few shots of stairs in front of Grossmünster (eh) that would have served as backup… until I remembered that there was PROBABLY some stairs going to the lake and that it might make an interesting picture. And indeed – there are a few stairs here and there; I consequently have a large amount of pictures with different lights and different handling of the polarizing factor, and this one ended up being my favorite raw one:
For the final picture, well, mostly basic edits in darktable for crop, exposure and so on – removing a bit of bird droppings on the steps too while I was at it, and there, picture!
I guess that goes for “another technical shot” for this one. My first idea of light trails was quite obviously getting some night long exposure somewhere – possibly around the train station, or to find a busy place, or possibly to go on top of the local mountain and try to get a long exposure of the city and hope for the best. Then I played around with the idea of doing some word light painting (because I’d never done that), and one thing led to another, and I ended up with playing with lights along a contour of my guitar.
There’s been a lot of shots for this one – for various reasons. First, as mentioned – never did that before, so I had to make things work with regards to the general exposure, the lights, etc. I ended up shooting in a dark room, with a fill light on the left of my camera, and moving another light along the guitar while the camera was exposing. Both lights, by the way, are Lume Cubes – the fill light was a white one with a diffuser, the “moving things around” had a red filter, a yellow filter, and a snoot. It took me quite a while to get a reasonably clean contour of the guitar in one pass (I kiiiind of didn’t want to assemble multiple shots, so this thing is a single shot), especially at the bottom of it, but I finally found ways to make it work (it did involve holding the cube on the guitar and moving it around, essentially – and not worry too much about being in the picture when I was passing in front of it for the bottom), and I ended up finally with this one:
Edits were all done in Darktable – cropping, cleaning the background and the final piece of light at the bottom, playing with the exposure of the guitar, and finally calling it a day. I’m not SUPER HAPPY about the sharpness of the guitar itself, and I think I could have made it better, among others by compositing with a shot where I don’t move in front of the guitar (which doesn’t help for sharpness) and/or a properly exposed one (here it’s vastly underexposed because the important thing was the light trail, for which I didn’t want to risk losing color). But hey, I made a new thing 😉
My “Time” picture may raise a couple of eyebrows in terms of “I… don’t get it”. I would probably need to rename it “Scales of time”. This is actually my favorite place in Zürich. The view over the lake is pretty, you can see the Alps in the background, and more importantly, this is “my” tree – I decided a few years ago that this tree was “mine”, and that’s it 😛 And, as the map of Zürich tells me, it’s an eastern cottonwood (some kind of poplar) that’s been planted in 1930 🙂
And as I was visiting “my” tree (while having the Scavenger list on my mind), I realized that there was a myriad of scales of time visible in that picture – the second, for the movement of water; the minute or the hour, for the people enjoying the view; the day, for the sunset; the season, for the winter in the naked tree; the span of a human life; the span of a tree life; the geological scale of the mountains.
So… maybe this picture will only make sense to me for this theme. I don’t really care 🙂
And as for the original picture, pre-edits:
(Yes. I seem to be underexposing in camera these days. It seems to work okay for me in post-proc 😉 ). I’m a bit annoyed that I’ve had to cut the top of the tree to be able to rotate the image so that the horizon is, indeed, horizontal – but it bothered me more to have a tilted horizon than missing a few branches at the top of the image. So… eh.
Profound lack of inspiration struck again for “Jam” – and I knew it was probably going to stay. So on a whim, I took what I thought would be a “backup shot” with my phone while shopping for groceries the other day:
And when I arrived in front of my computer, I had a moment of “Huh. This is actually… This would definitely not be the worst picture I submitted to a Scavenger Hunt”. So I did some minor edits to emphasize the geometry of the image, played a bit with the colors and sharpening, and called it a day. And indeed, this is NOT the image I like the least for this hunt 😉
The funny thing is that, during the reveals, people were mostly commenting on the amount of choice. Coming from France, this feels like the “lower standard end” of what I would expect to find in a large supermarket – there’s more quantity of each choice, but not necessarily more choice per se 🙂
This has been a tough one to choose. When told “row”, I have a fairly vivid image in my mind – this one, which I took two years ago. And, somehow, I didn’t manage to get beyond that for this submission to the Scavenger hunt. Except… the pictures I have for this hunt are actually weaker, in my opinion, than the “inspiration”! But oh well. Please have a row of birds and a row of boats 😛
The original picture was taken with a Sony NEX-7 (which I don’t know as well as my camera 😉 ), and in all fairness the B&W treatment has more to do with trying to “salvage” the image than a real artistic statement 🙂
And I usually do not have two fully processed pictures for my scavenger picture… except today I do. I did hesitate between both for the theme; the one I ended up submitting fits more clearly to the theme, I think. But since this is my blog and I do what I want, here’s the one I DIDN’T submit:
I guess this one is… me being a smartass, or something. Inspiration was, yet again, not my forte (I sense this is a theme for this Hunt, right?) – and I saw the bottles of syrup in the middle in the supermarket the other day. I went “OKAY, I’m getting a backup shot, because WE NEVER KNOW”, and next thing led to another, I started looking in shelves for all the lavender scented things I could find, and there’s actually quite a lot 😛 So I went for it, this is my “Lavender Scavenger Hunt”, I got nine of them in two supermarkets, can you do better? 😉
When walking in Zürich looking for Row and Steps and whatever I could find, I saw in the display of a jewelry store a pair of earrings that were ammonite shaped. I almost snagged a picture…. and remembered I had a small ammonite the my little mineral collection I started last year! From there, the “spiral” theme because pretty obvious.
It took me more time than I expected to get a “clean” picture – I’m not sure if I’m getting worse at this or if my standards are getting higher (I suspect more of the latter) (okay, I want to believe more of the latter 😛 ): I had sharpness issues, I had light issues, I had all the issues – until eventually I cranked the tripod and the remote, and switched to my macro lens, and made my life actually easier. (Surprising, eh?). And one of the 30-ish shots I took was finally satisfying and workable:
The edits were fairly basic – the most annoying part was to get a proper clean black background. I think next time I may consider shooting on green screen and make my life easier when it comes to cutting out the background.
And yes, I cheated a bit – because I also submitted this picture, in another form, as my 52Frames “Fill the frame” entry 🙂 And, in complete fairness, I think I do prefer the 52Frames version (I need to experiment more with tighter crops than I usually go for, I think), but it felt less “spiraly” than this one.
For quite some time, I had… 0 idea for touch. And then I went to Google Images, and, well, searched for touch. Which eventually led me to the concept of “Midas Touch” – the legend in which Midas, king of Greece, transformed everything he touched into gold. So I then looked for things in my house that I could POSSIBLY have in a picture of stuff turned to gold, and I settled quite rapidly on our water pot. I first got a quick picture, vaguely validated that it seemed POSSIBLE that I could do what I had in mind. Then I went for a “better” picture to work with. I had noted, in the initial attempts, that getting a yellow reflection from my tablecloth COULD be something I’d want, so I went for it. Took a few pictures, eventually settled for this one:
The basic edits were basic, but then I literally spent hours in GIMP to achieve the final result. And I went through three iterations of the image too. I’ve been told that I may have tried to do this picture in “hard mode” – starting from a reflecting material and trying to edit it into a metallic material may have, indeed, been…. optimistic, considering my general amount of photo editing skill.
Buuuuut I did learn a lot, including in how to manipulate my selections and my layers and my masks and everything, and in how to define my own brushes in GIMP, and so on and so forth. The final image IS a bit disappointing, but the experience and competence I built is invaluable 🙂
I guess that the inspiration for this image is obvious for anyone who’s done the Hunt for a while – hi Dave!
This is the last image I shot, and really the one I thought I’d didn’t get. I was simply out of ideas; and the weather around here as been mild enough all winter that the occasion to shoot some frozen vegetation have been rare… and I missed all of them.
I eventually remembered that I have a Metal Earth AT-AT, courtesy of a colleague who enjoyed assembling it but who thought I’d enjoy the end result more than he did, and what better prop for a “frozen” theme than a thing highly associated with a frozen planet? Well. There’s also obviously… well… Frozen, the animated movie(s). And in my mind came the idea of having Elsa fight said AT-AT on a frozen surface, because duh.
Which meant – I needed an Elsa. My first attempt to find one failed – the first toy shop I went to didn’t have what I wanted in terms of look, size, and general inspiration. Which again meant… the deadline day for the Hunt was there, and I didn’t have a Frozen picture. So I went to a second toy shop, thinking I wouldn’t find what I wanted, but still thinking that at least I would have tried. Aaaaand I found an Elsa I thought I could work with.
I went back home, I set things up in my soft box, and I started shooting. I wanted a blue-ish light, so I put a lume cube with a blue filter on top of my lightbox; I spread some flour on my surface (I did remember Dave mentioning that flour made surprisingly good snow for toy photography 😀 ), and I shot the base for the picture.
Okay. This is not entirely true. I wanted this picture in, because it shows better the scale of what I was starting with. But I knew that it would probably make my life much, MUCH easier to have two different pictures. So I took independent pictures too:
The important thing for it to work was to have consistent lighting, because I knew that Elsa would DEFINITELY not be to the correct scale with the AT-AT in the initial picture, and that I’d have to reintegrate her smaller somehow. So I was careful with my lighting and camera setup to get consistent shots I could work with. I then edited the RAW in darktable with literally the same stack of edits on both pictures, to keep consistency still, and I ended up with pictures I could work with.
Then I started playing with Gimp – took the Elsa picture, and started removing the background to get a pastable selection. I eventually got that (this is NOT work I particularly enjoy, I must admit…)… and I realized when pasting the image that I had made a mistake in my darktable process: I had applied a monochrome filter, because I was being lazy with the handling of the colors – it felt… complicated to get right. But it made the final image waaay too unreadable – Elsa needs to be smaller than the AT-AT, and in B&W she was just not very recognizable anymore – I think the blue dress and transparent cape help a lot.
Buuuut instead of despairing that I had done ALL THAT WORK FOR NOTHING, I re-exported the image from darktable without the B&W, and I managed to move my mask/selection from the B&W image to the color one – which worked perfectly fine 🙂 (So yay, I learnt how to unpaint myself from a corner!).
I went for image readability versus accurate scale – let’s say it’s a…. alternate universe AT-AT, which is super small compared to the ones we know? 😛 And all in all, I am super happy with the final image – it’s definitely in my favorites for this round, possibly even my favorite 🙂
The Round 26 of the Photography Scavenger Hunt took place in the past couple of months, and the reveals are all done. We had 10 words for this Hunt, all related to the Wizard of Oz… which I haven’t seen! But oh well, the words could be interpreted in any way, as usual, so that was not a big issue. I only submitted 4 this round – lack of inspiration conspired with lack of time… or more precisely with time used in other ways. To compensate, someone in the Scavenger community gave me the idea of doing a “behind the scenes” type of post, with “this is the original picture, this is the picture I submitted”, so here we go!
Selective Color
The first word that was revealed was the first one I shot, coincidentally 🙂 Here’s the picture I submitted:
The idea came by chance – Pierre made some chocolate meeples to start experimenting with making his own chocolate molds (with ComposiMold), and he had put a red plastic one in the bowl as a joke. I played with a lot different configurations and structures before settling on this – which I took quite some time setting up in my lightbox with a ruler and everything! And then I spent quite some time experimenting with the lights and the different angles and so on, until I ended up with this in camera (that’s the RAW exported in Darktable as JPG without any extra processing):
The physical setup was my lightbox with my seamless background paper and a couple of LumeCubes to illuminate the scene. Post-processing was essentially cropping, fixing the light levels, and quite a lot of detail clean-up (turns out, chocolate on paper tends to leave some traces…).
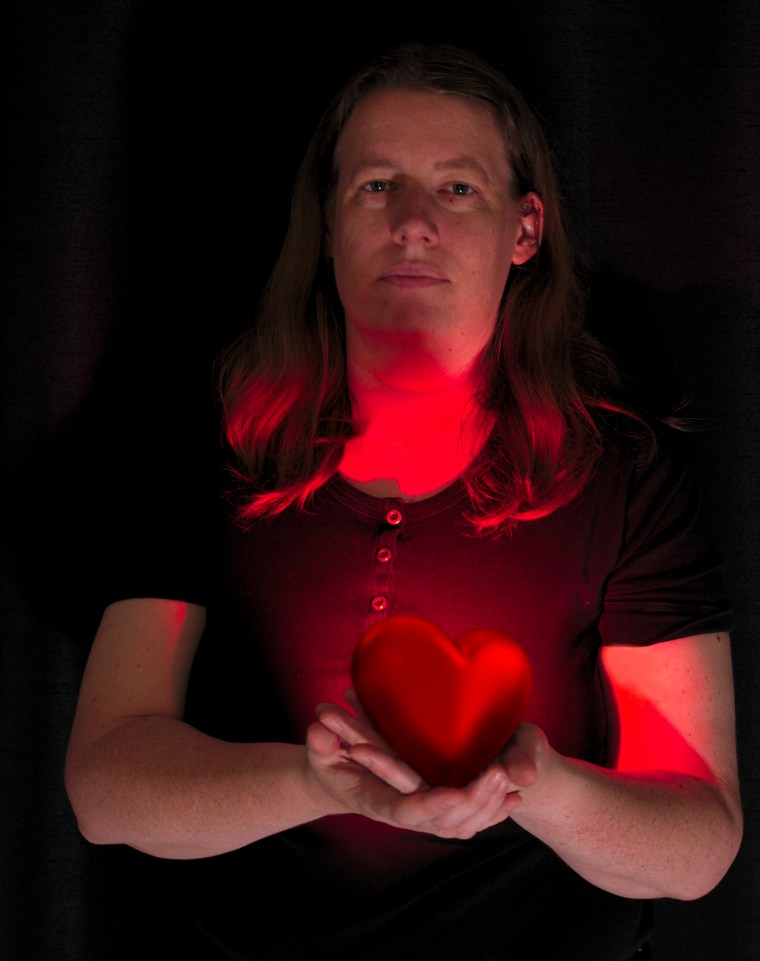
Courage
For this one, I had a very clear image in my head of what I wanted, which is VERY rare, and I actually managed to pull it off, which I’m very proud of. This is what I submitted:
This is one of the most personal images I ever made, especially associated to that word – I wanted to convey the courage that comes with showing vulnerability and offering/opening one’s heart to another person.
And this is the main part of the image:
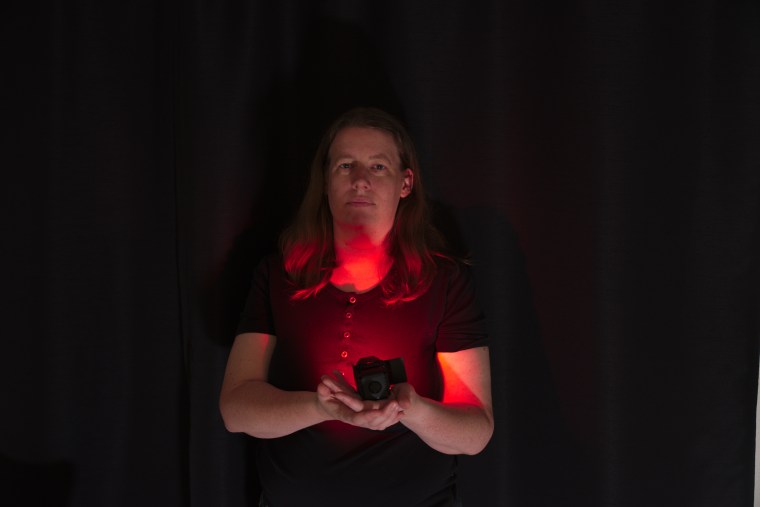
The photography setup was, well, me, a tripod, a remote (I don’t remember what I did there, I’m assuming I put a delay and put it back in my pocket before posing, or something), and a LumeCube with a red filter and a barn door to orient the light where I wanted it. One of my fellow Scavengers had made a talk during the Meetup about his Ghostrider image (you can see a speed edit here) and I definitely had that talk in mind when I got the idea of using the cube as a placeholder for the heart to give it a glowing aspect. I got the heart from PixelSquid, another resource I heard of during the Meetup. And then the final image was essentially finding the right image in the gazillion I took with that light, editing it to my liking in Darktable (crop, levels, that sort of things), adding the heart in GIMP, and adding a bit of shadows on the heart so that it looked reasonable – which is ALSO something I learnt about during the Meetup. All in all, I find it funny and kind of wonderful that I call this one of my most personal pictures ever, and it’s all assembling things that I learnt/saw during that meetup 😀 (Oh, the LumeCubes were also a post-meetup addition to my collection :D)
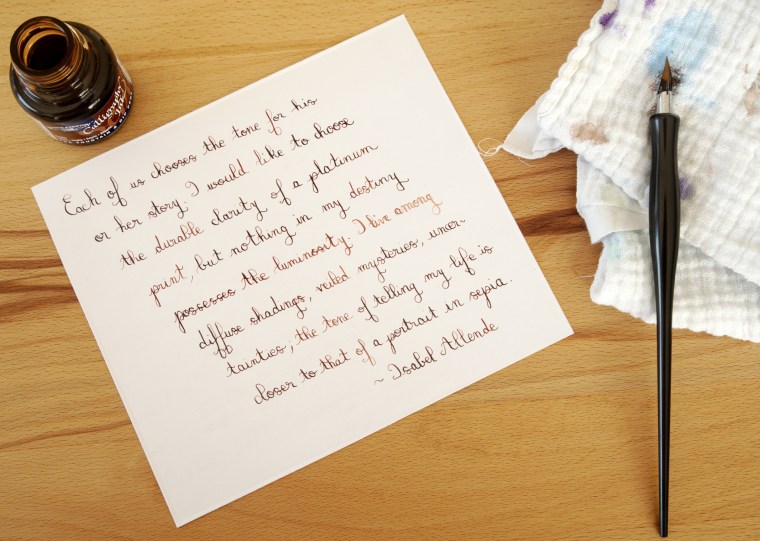
Sepia
I believe my Sepia submission is the weakest of the four I submitted, but eh, better a weak submission than no submission, so THERE.
I started playing around with calligraphy recently, and I do own a bottle of sepia ink, so that kind of felt like a natural fit (and it suited me better than trying to do a sepia post-processing of something else). And then I also looked for inspiration on what to write, I looked for quotes, and I quite liked this one (which also has the advantage of ending with the word sepia, which I liked for “making things obvious” reasons). The longest part of making this image was to write the quote – I made multiple drafts on lined paper before I felt confident on this one – and still ended up hyphenating a word, which I would have preferred avoiding, but oh well. I also ended up needing to thicken my ink before I was able to do something reasonable with it (note: arabic gum works really well 🙂 ). And it’s a Nikko G nib and Rhodia white paper, if you’re wondering. And that’s the picture out of camera:
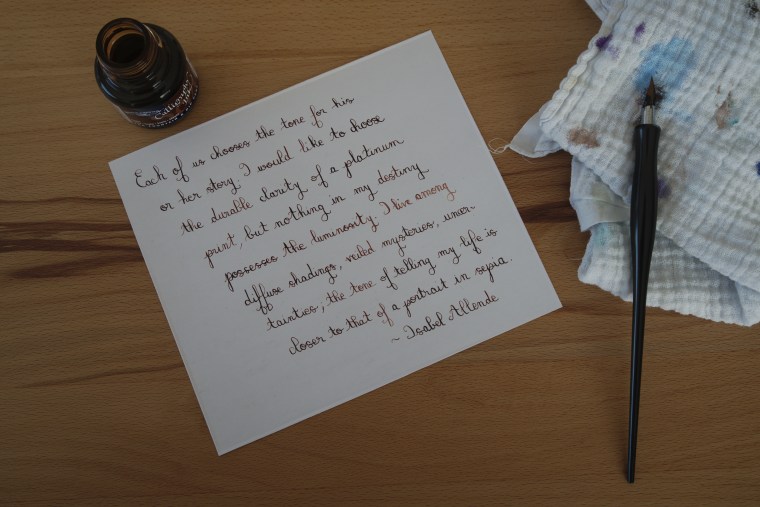
As you can see, pretty minimal edits on this.
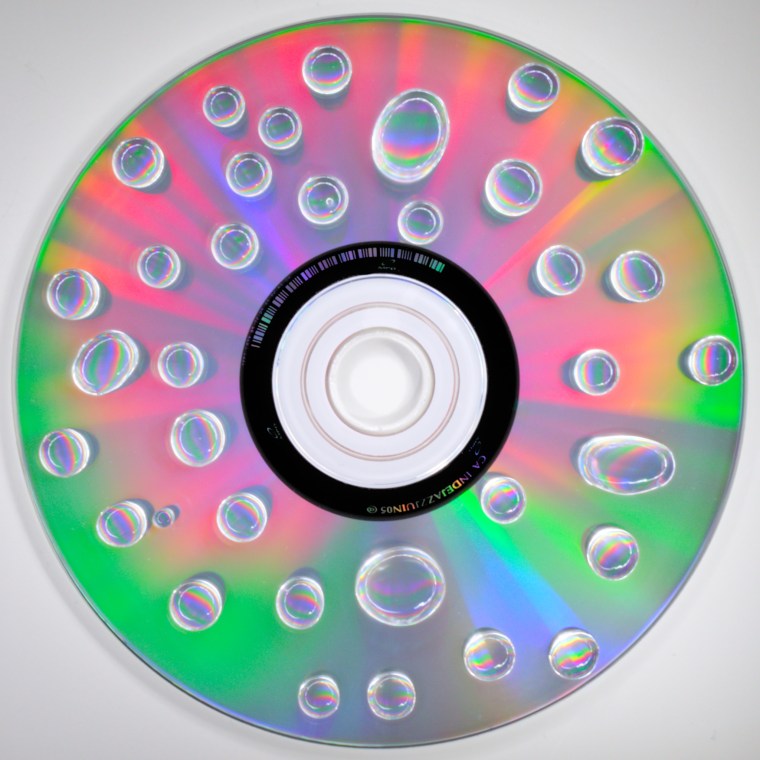
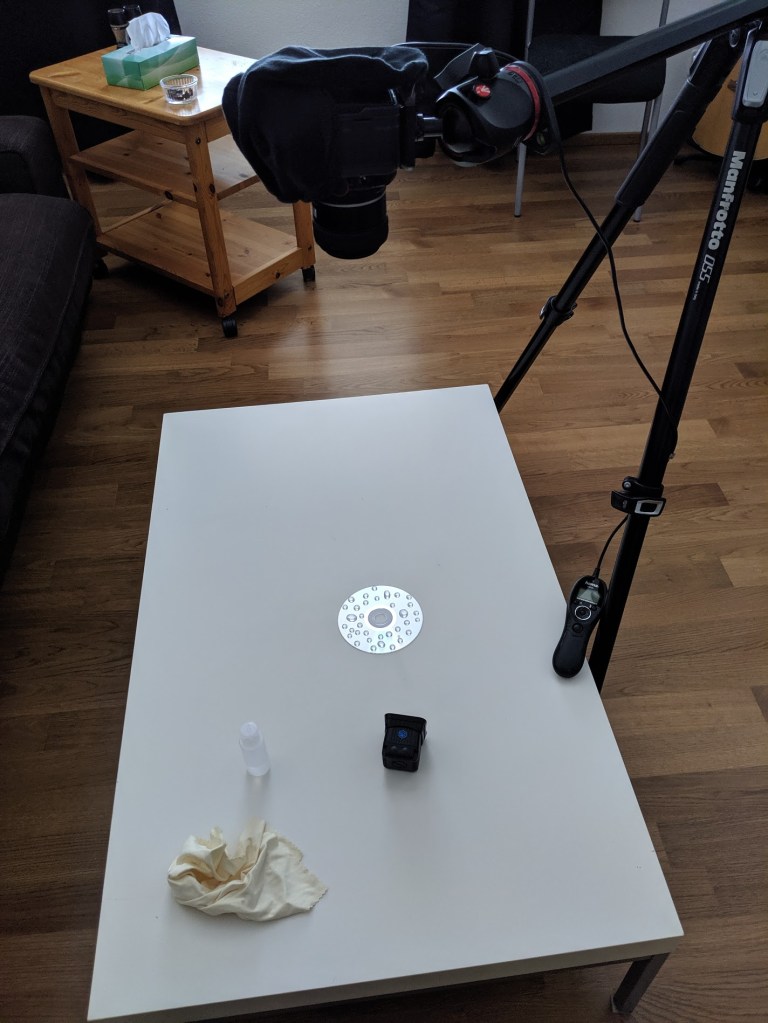
Rainbow
Rainbow is probably the picture that took me the most time for this Hunt. Here’s what I submitted:
I was first thinking along the lines of playing with a prism, or doing SOME variation of the well-known Pink Floyd album cover, until I got a flash of “ooooooh, I know how to get rainbows!”. I started playing around without much success, until I called The Internet to the rescue and read this: How to Make and Photograph Rainbow Water Droplets on a CD.
And here’s the “out of camera” RAW-to-JPG conversion:
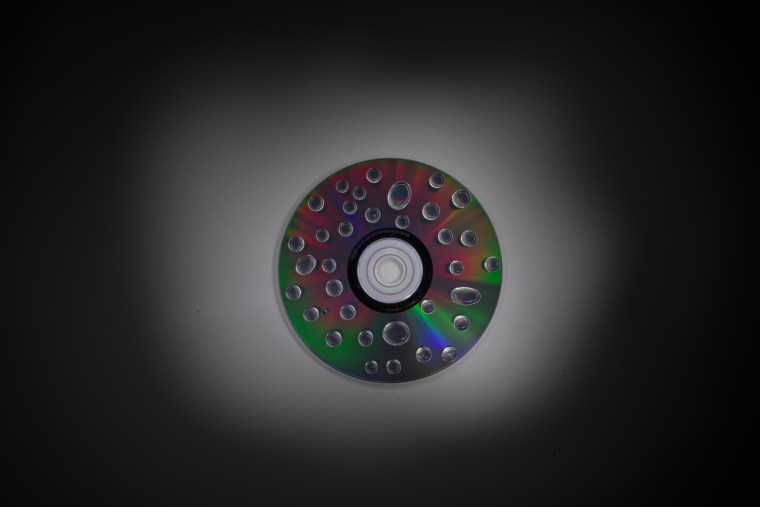
For this one, I have an extra picture, which is the “studio setup”:
So: CD, white table, room that can be darkened, tripod with a tilting center column (<3 Manfrotto), a way to make water drops and to remove dust, and a LumeCube. Also to be noted: there is a SOCK on top of my camera, because the very white PENTAX logo was reflecting in the CD on my first attempts (which sucked). The idea for the rainbow CD picture is to have a fairly long exposition (I had 20 seconds there), and to move around the CD with a light to create the rainbow effect. It took me A LOT of experimentation and A LOT of shots to get the one I finally decided for. And then it took me A LOT of time to get a clean image. It turns out that CDs tend to be slightly scratchy, slightly dusty, and even if you don’t see it on naked eye, that’s ALL YOU CAN SEE when you have an enlarged picture of them on your screen. So I spent a lot of time in Darktable to clean up the image.
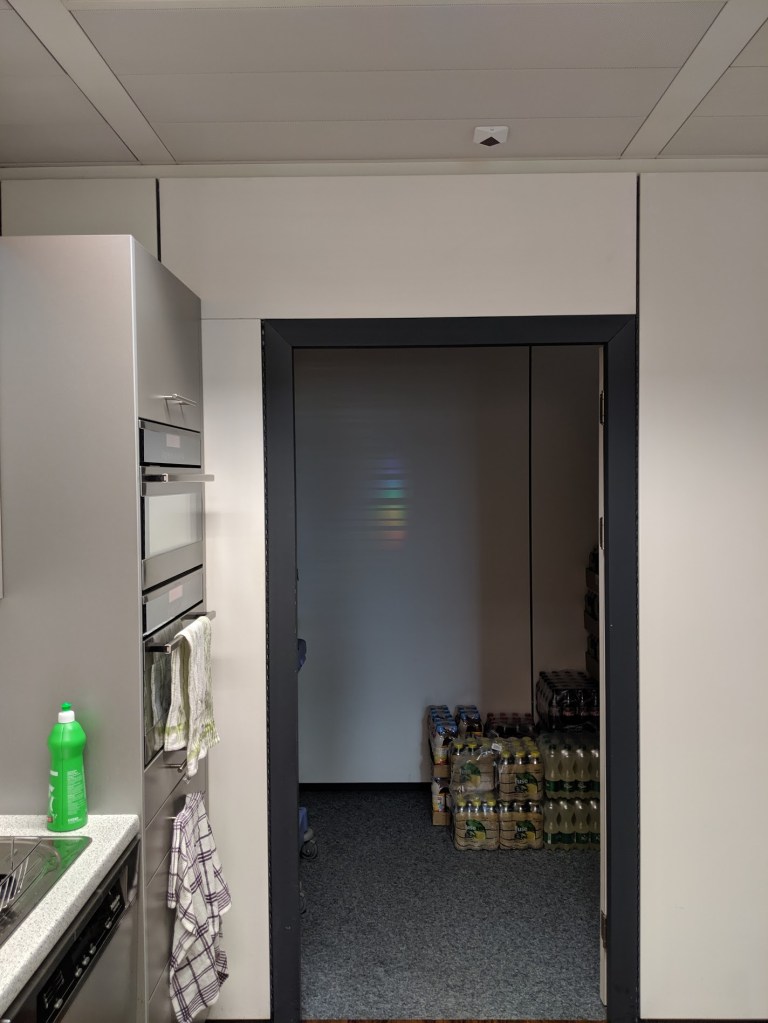
All in all, it’s nothing much more than a very “technical” image – I’m still quite happy with it, and I feel it was worth the effort, because I quite like it 🙂 Funny coincidence, though: the day after the deadline for the Hunt, I took a double take on that wall in the office:
I must admit it made me smile (and then hunt down HOW that rainbow actually appeared – I think the bottom of one of the glass doors was hit by the sun in just the right way at the right time 🙂
The other words!
As mentioned, we did have ten words, although I only submitted four – but here’s the full list, with links to the albums of pictures submitted by my fellow Scavengers!
My main reason to go to the US last month was to attend the Great Scavenger Meet-Up in Orlando. The Scavengers are a group of photographers that I’ve been interacting with for a few years – responsible in particular for that sort of things: Scavenger Hunt 24, Scavenger Hunt 25 Part 1, Part 2 and Part 3.
For those who know me, it may seem wildly out of character for me to go meet a large group of people that I don’t really know. And I’d tend to agree – I would lie if I said I didn’t have any reservations before actually making the trip. But still, it went very well, better than my wildest hopes, so… let’s talk a bit about that! Beware, this may be a slightly more personal blog post than usual 😉
Planting the seed
The Scavengers is a community I thoroughly enjoy being a part of. The group is made of people of all levels of skill (which helps not feeling too much of an imposteur) (not TOO MUCH, I said) and of general positivity and enthusiasm. Before the meet-up, I had met with two of them (and one of them twice 😉 ), who had happened to pass through my corner of the world, and I had a brilliant time every time.
I first met Sivani – and I believe she actually planted the seed of “you know, this may not be that crazy”. She told me about the first Vegas meet-up, I remember babbling something along the lines of “oh, I could never do that, because, you know, PEOPLE” – and she pointed out that a/ most of the people in the community are introverts and I wasn’t the only one there b/ actually seeing people with familiar name tags (because I’ve interacted with them, or at least seen their names before) actually helps a lot. And I guess that it stayed with me – along with her stories and enthusiasm.
Somewhat more recently, but before I made any kind of plan (possibly even before any kind of plan was made at all), I met Dave – we walked a bit with our cameras in the city, and we went for dinner, and everything went well. It also happens that I have the deepest fascination for Dave’s work, because I’m in awe of his toy universe and imagination, and I’m amazed (and possibly slightly jealous) with what he manages to pull off.
And then, I remember a couple of coincidences, but not their order. I remember wondering if there was a meet-up at some point in the plans, and seeing that indeed things were getting into motion there. I also remember having a fairly vivid dream that I was at a meet-up, I was having a pretty bad meltdown, but that someone was actually taking care of me. Now, I don’t believe in dreams being meaningful or predictive or anything, but it made me consider the situation and deem that it was actually plausible that, if something like a meltdown happened, someone would indeed take care of me. (I remember talking about it on the Scavenger community at that time, and that people confirmed 😉 ).
Making the plan
At that point, it felt like it was something I was considering, but not too sure about. One of the things that I was very hesitant about was the fact that the meet-up was in the US, which means a long flight, and more painfully… jet lag. And since my major concern was social-anxiety-related, and since fatigue (and ergo jet lag) really does not help with that, I was very hesitant. The flights to Orlando were also a fairly large pain from Zürich, which made me hesitate all the more.
When I talked to Pierre about that, he mentioned that the meet-up was roughly at a time where it would be good if he traveled to Boston, and so he suggested that I come with him to Boston, recover from jet lag, and fly to Orlando from there. I think that’s when things started to really click – that it was actually something that COULD happen.
Shortly afterwards, I told the Scavenger community “I’m in!”, and I booked the hotel in Orlando for the meet-up. It took us a little while to finish planning the rest of the trip (mostly because of procrastination), and at some point I said “folks, I do have plane tickets, I’m coming for sure, unless something super bad happens in the meantime.”
Uh-oh…
Well, the “something super-bad” was not that far. Two weeks before flying to Boston, I fell walking on a hiking path, and I sprained my ankle pretty badly. The following weeks were very stressful: I was in pain, I was super tired from walking with crutches, and it was generally speaking not fun. I had gone to the doctor and explained that I was hoping to fly; she gave me a prescription for blood thinners for the plane, which alleviated a very large fear of mine. I’d like to say that I didn’t waver, but it was a tough couple of weeks; just before leaving I told someone “well, see you in three weeks… assuming I’m actually making it to the flight, which I’m kind of doubting right now”. But in the end, I looked into “how do I fly with a crutch” (both in terms of security and luggage allowance), concluded it was not an issue, and off we went. I spent the first week in Boston, working a bit, getting over the jetlag, and getting slightly better every day; and when the time came to fly to Orlando, I was confident enough that I didn’t need my crutch and that I could walk enough… as long as there were not too many stairs going down on the way. Phew!
First evening in Orlando
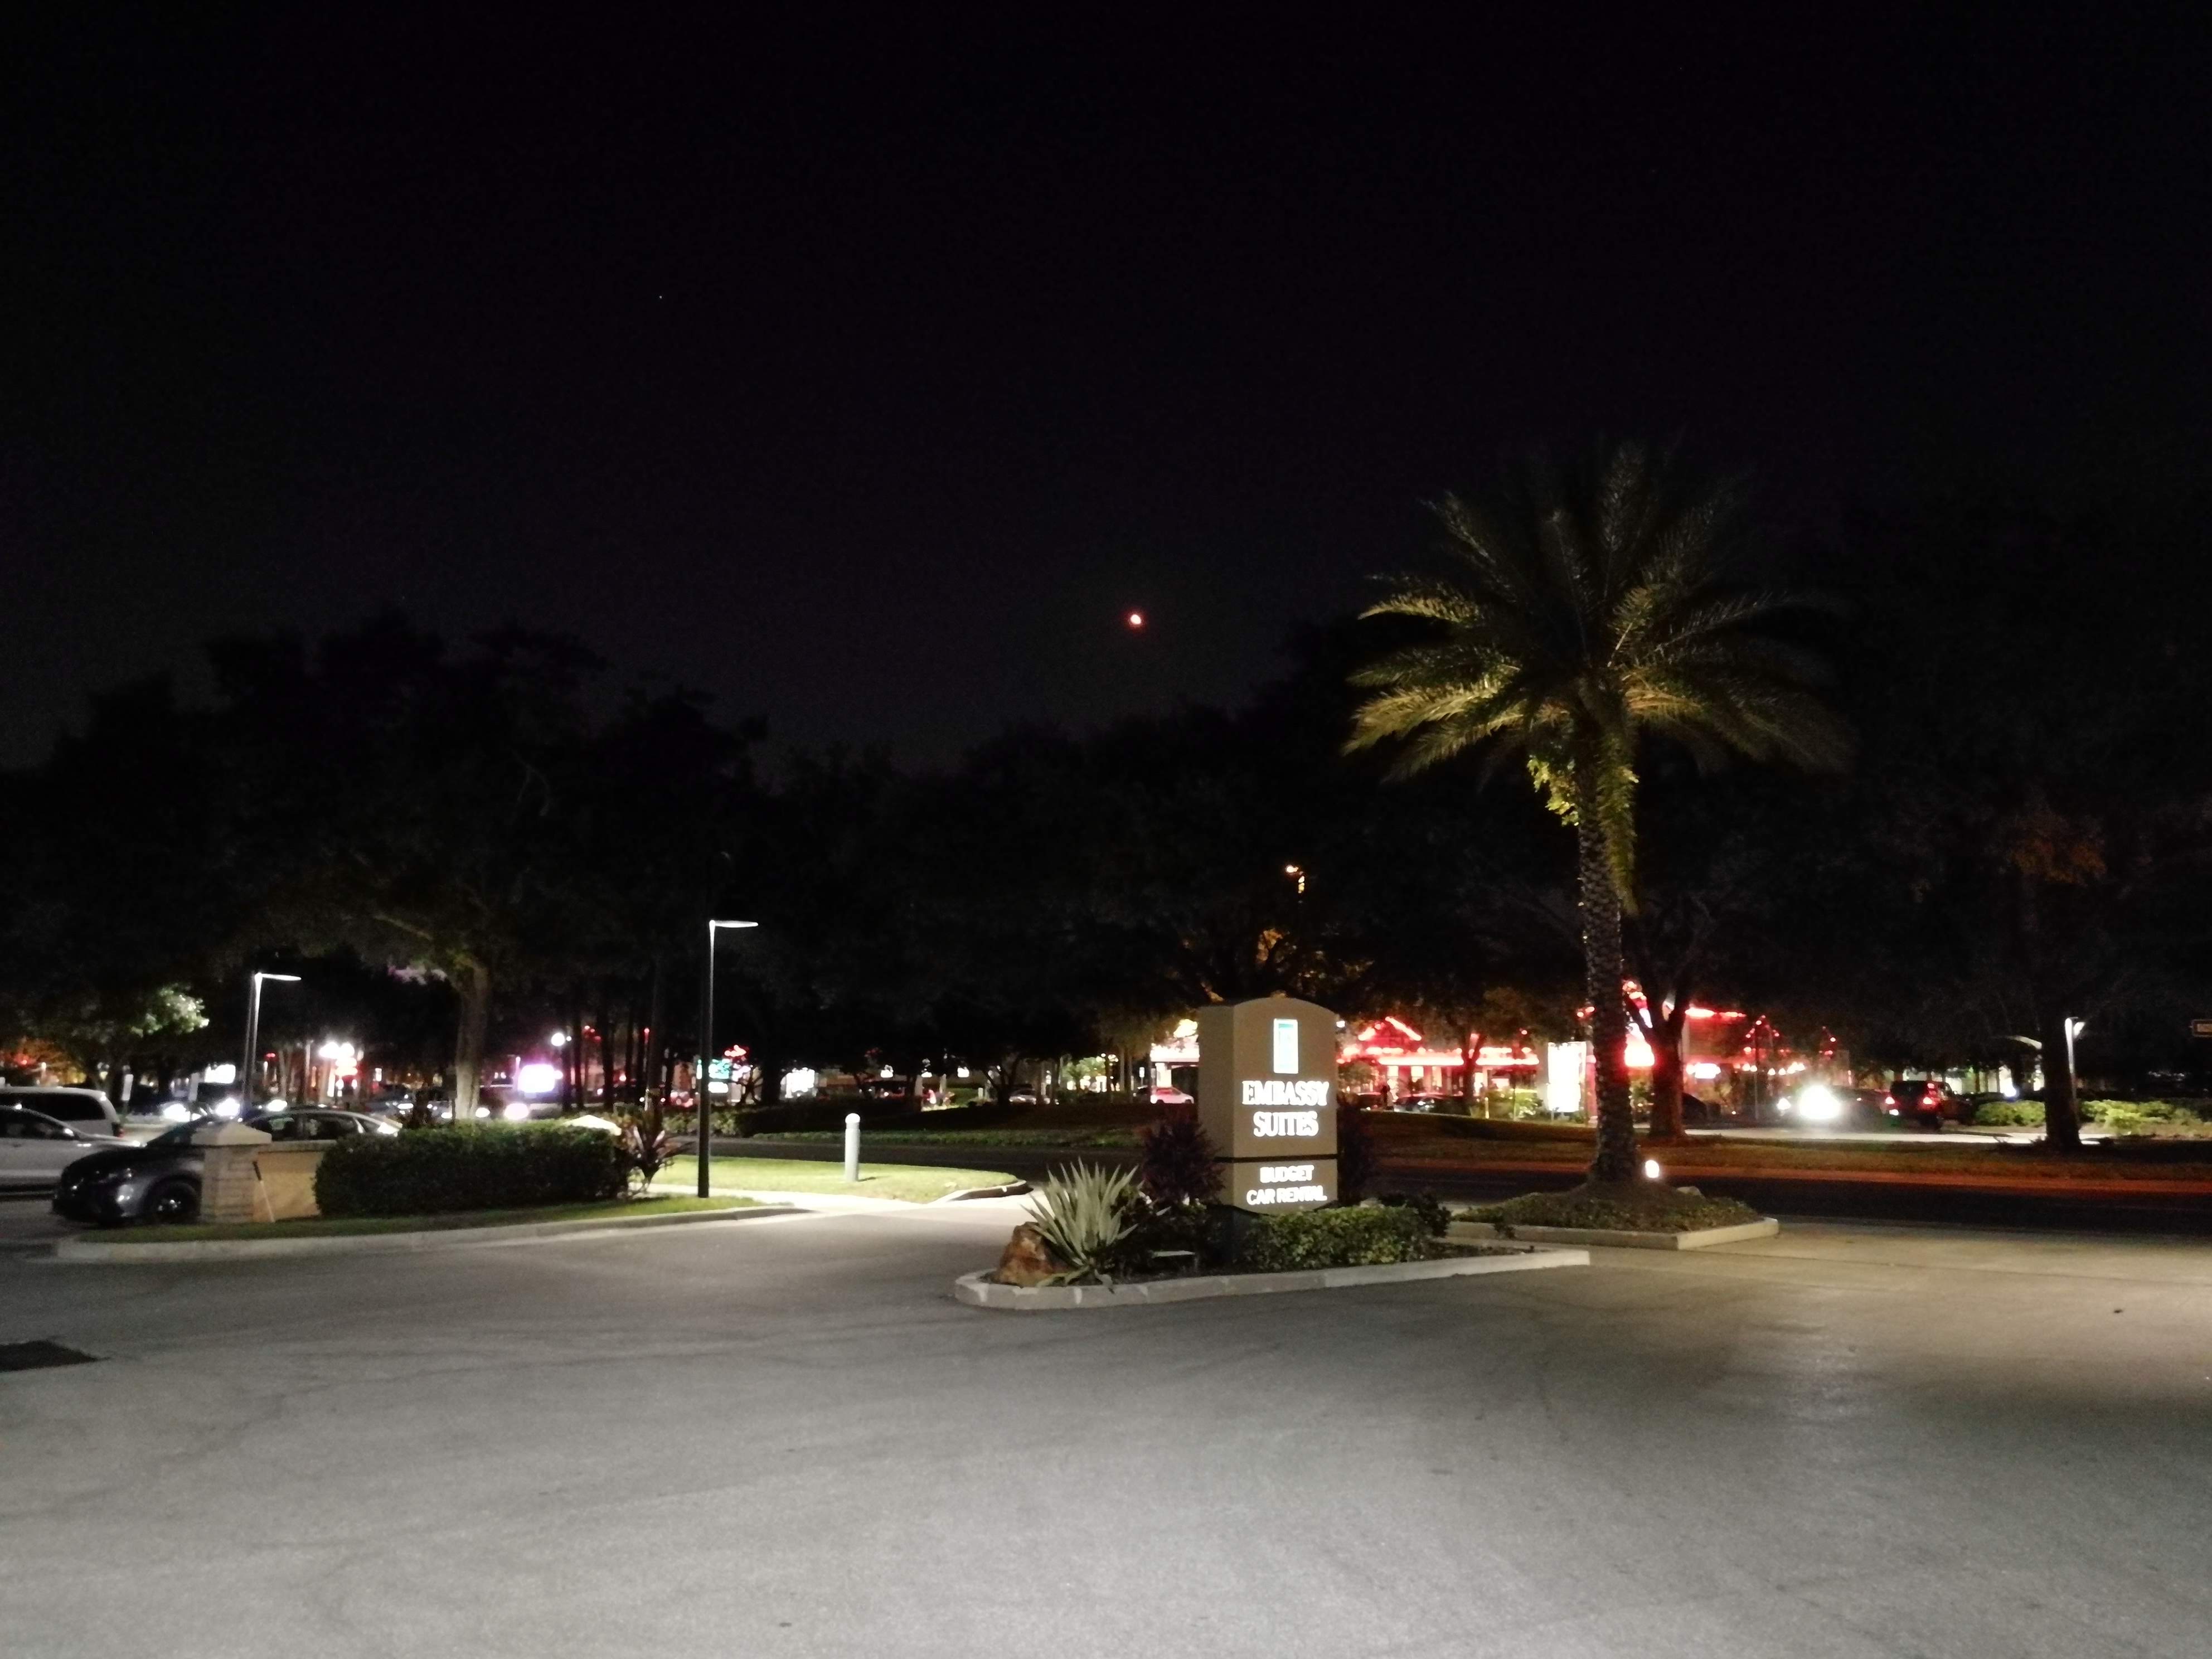
I landed in Orlando around 3PM – Dave and Debbie had synchronized with me to pick me up at the airport (thanks again 😉 ) and the adventure started for real! Most of us were staying at the Embassy Suites on International Drive – Angela had organized a group discount, and many people were sharing rooms – I had made the choice to not get any roommate because I knew I would probably need my space at one point or another, and I didn’t regret that choice. A bit of time to get acquainted with my surroundings, and I found a group of Scavengers around the hotel bar 😉 I admit I have a fairly fuzzy recollection of the events and of the people at this point. I was still very flustered, probably terribly awkward, and a tiny part of me was going “oh God why am I here already?”. I’m happy I was happy to keep that part reasonably quiet 🙂 I found something to eat at some point, probably; but then one of the major event of my stay was happening at 10.30PM: SpaceX launched the Falcon 9 on that day. Since I was not driving, and since I was not comfortable enough trying to organize SOMETHING to get closer from the launchpad, I didn’t have a plan for that. I had, however, looked outside of the hotel, looked at a compass, looked at a map, and secured what I deemed a “reasonable” point for seeing things, if things were to be seen. I had had the impression that I had been either annoying or super repetitive with my “and tonight there’s the rocket launch!” – but… I left the table where I was talking at around 10.25, announcing “okay, rocket launch time”… and I was outside of the hotel, in the fairly warm weather, hoping to see anything.
There was enough time between 10.30 and “something happening” that my heart sank a bit – “I should have tried harder to get closer” – but finally, a small bright dot appeared above the trees. The bright dot eventually grew a tail, making it really unmistakable, even at that distance. I was adamant I didn’t want to take any picture, so I didn’t have my camera with me, but I still had my phone – so there, I have a few pixels of rocket on a picture.
And even at that distance, it was still a profoundly emotional experience and, for what it’s worth, I’m still happy I didn’t have my camera with me. I fully intend to go and see a launch from closer up at some point in the future, and I also fully intend to not have a camera with me at that time.
I came back to the table with a very, very large grin, “I saw the rocket!” and that’s when I understood that nobody had actually understood/realized what I was talking about before 😀 I’ve then been told “okay, from now on, we’re following you, because you OBVIOUSLY have awesome plans”. So all in all – despite my initial wariness and awkwardness, it felt like I was starting to warm to the people around me, and to start to include myself in the group instead of staying on its outskirts. And since this was technically happening before the start of the meet-up, let’s call it a win!
Also: I SAW A FUCKING ROCKET LAUNCH. That counts.
Friday: workshop day!
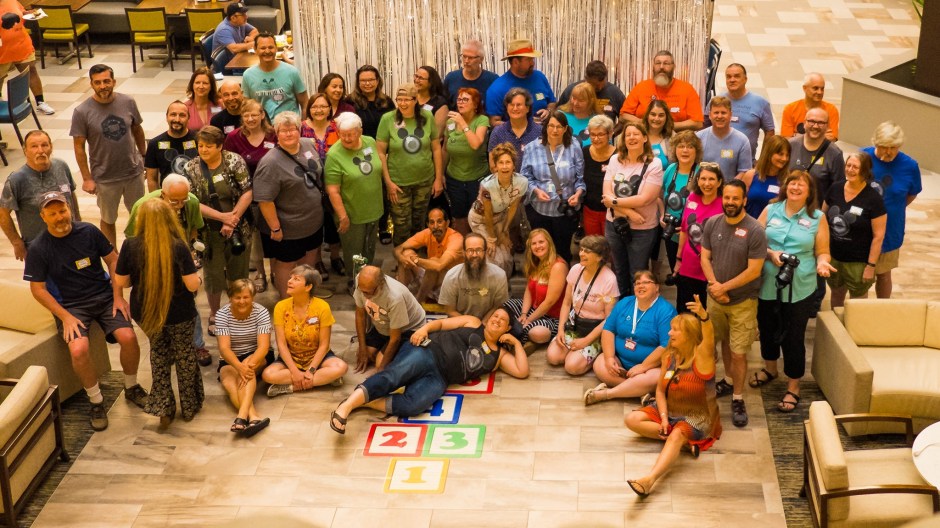
On Friday, we mostly stayed at the hotel, in one of the conference rooms, where we had a fairly packed day! But, first of all, group picture! Scavengers are easier to herd than cats, but barely – in the end, it did work out, and we have a group picture or 15.
Back in the conference room, Lauri started with the welcome speech; we were also treated with a few videos from people who couldn’t make it to Orlando but still wanted to say hi. These are people that I had never met, but I was still moved by their messages, and it was still fun to see these people whose name and sometimes profile picture I knew come to life on the screen.
Then, we had a talk by Dave, who had a talk with the subtitle “A rambling discussion of photography, toys, and toy photography”. And it was basically that, except that my own ramblings are usually far less structured 😉 He talked about how he came to the Scavenger Hunt and to toy photography, and he explained the process around a few pictures, including his Acorn for the latest Hunt. It was quite eye-opening for me – I really (really) like what Dave does, and I kind of “knew” that there was quite a lot of effort in his images, but it’s one thing to have SOME idea, and even to read about it, and one thing to actually see it explained. It made me feel both a bit better about my own efforts (there IS a huuuge gap in our level of post-processing skill, but I have some hope that the gap is far less than I thought on the “images straight out of the camera” level), and a bit worse (thinking that maybe I don’t put enough effort in this). But all in all, an inspiring talk – made me want to try some more stuff (and to up my post-processing game 😉 ). I also learnt about PixelSquid, and I’m definitely keeping that in a corner of my mind, it might become handy if I just need a 3D model of an Atari 2600 joystick or of a Piña Colada. You never know.
The second talk was Gilmar – whose work is also very recognizable, and very inspiring too – at the risk of sounding very obvious, I really like her handling of colors, that make her pictures really stand out. She first talked about creativity and getting ideas, as well as about her own journey and inspiration, with a few examples. Then she dug a bit more into the technical specificity of building composites, and I learnt a ton of stuff, even though I’m not using the same tools as she is – many things are transposable, and these were not things I was even aware of asking about (the unknown unknowns!), so this was brilliant!
We then split in groups for lunch – I ended up at the Bahama Breeze with a group that got split over two tables – I was a bit nervous during lunch, because the planned lunch break was an hour, and we for sure went over that 😉 but since one of the presenters for the afternoon was with us, well – I tried to relax and enjoy my food still 😉
In the afternoon, we split into groups. I first saw Mark‘s presentation about how he created his Fire entry for the Hunt – he released a speed edit video since then. This was also super interesting – I learnt about a number of tools and “but how do I do that”, and mostly, I learnt about the quantity of work that goes into that sort of things. One of the things that struck me is that I usually consider that if a given “final image” requires me to take, say, 60 shots, it’s… a lot of shots. Mark was showing his Lightroom catalog, and he literally had hundreds of shots… only for the “body” part of his picture. I also found very interesting when he was talking about his light setup and how he adjusted it and so on. Those are not processes that are even remotely on my radar, and that’s definitely something I want to explore more.
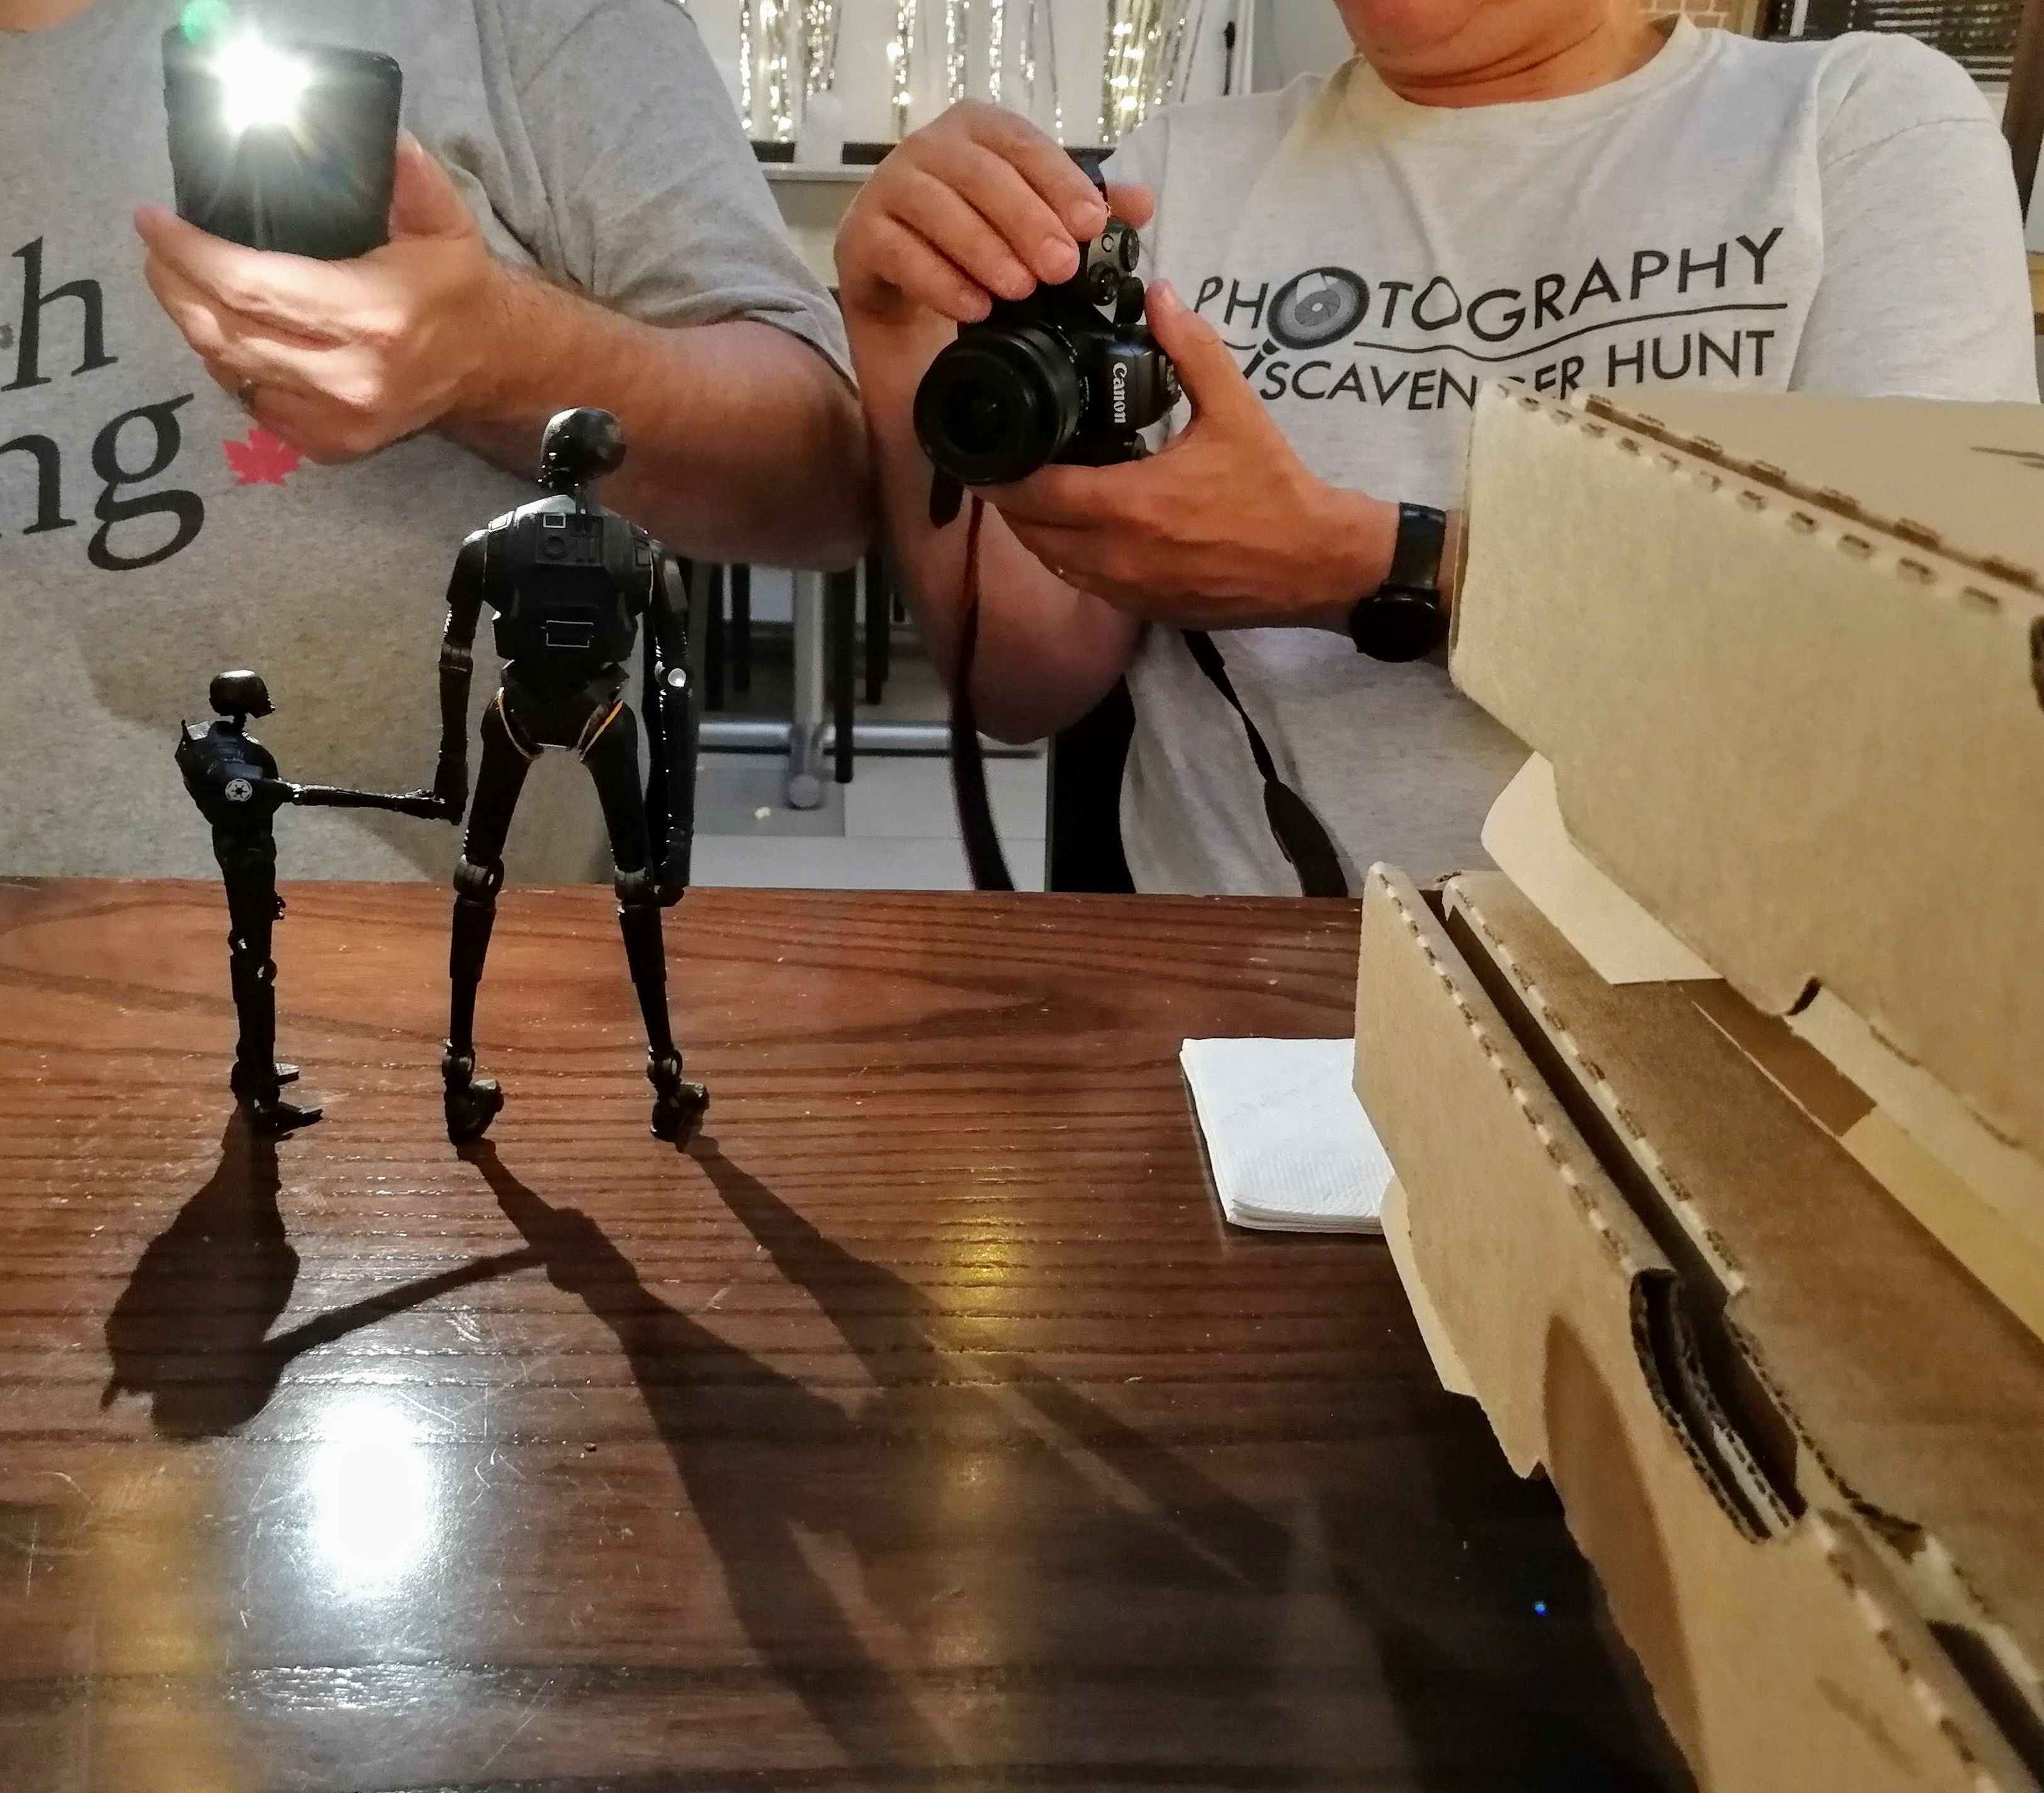
In the second part of the afternoon, I joined the toy photography part, provided by Dave again. He had setup a light box, and provided a LOT of toys and figures, as well as Lume cubes to play with, and a fair amount of advise about posing the figures and lighting them. This was a ton of fun – I did fall in love with the Lume cubes (I just ordered a couple yesterday), and I’ll probably splurge on a decent light box at some point (for now, my ad hoc tinkering with a box and a bunch of tracing paper to soften daylight is good enough for me… especially in the summer). And I do have a few shots with which I might make images at some point – we’ll see how that goes 🙂 Dave wrote something about the whole experience too: A Toy Photography Workshop.
There was also a third group doing portraits with Gilmar and her awesome-looking lights, but I got hit by a case of the shys and didn’t approach that group from less than a few meters away.
In the evening, we had dinner at Olive Garden (incidentally, we had one of the best waiters I’ve ever seen) and, as we came back to the hotel, I declared that I was going to go for a walk in the direction of the Ferris wheel that was visible from the hotel, because Ferris wheels are pretty cool picture topics 😉 We made way with a few other Scavengers, met another group on the way, and generally speaking had fun. And so, I have a first set of pictures here: Orlando – Icon Park. (Yeah, there was more than just a Ferris wheel there.)
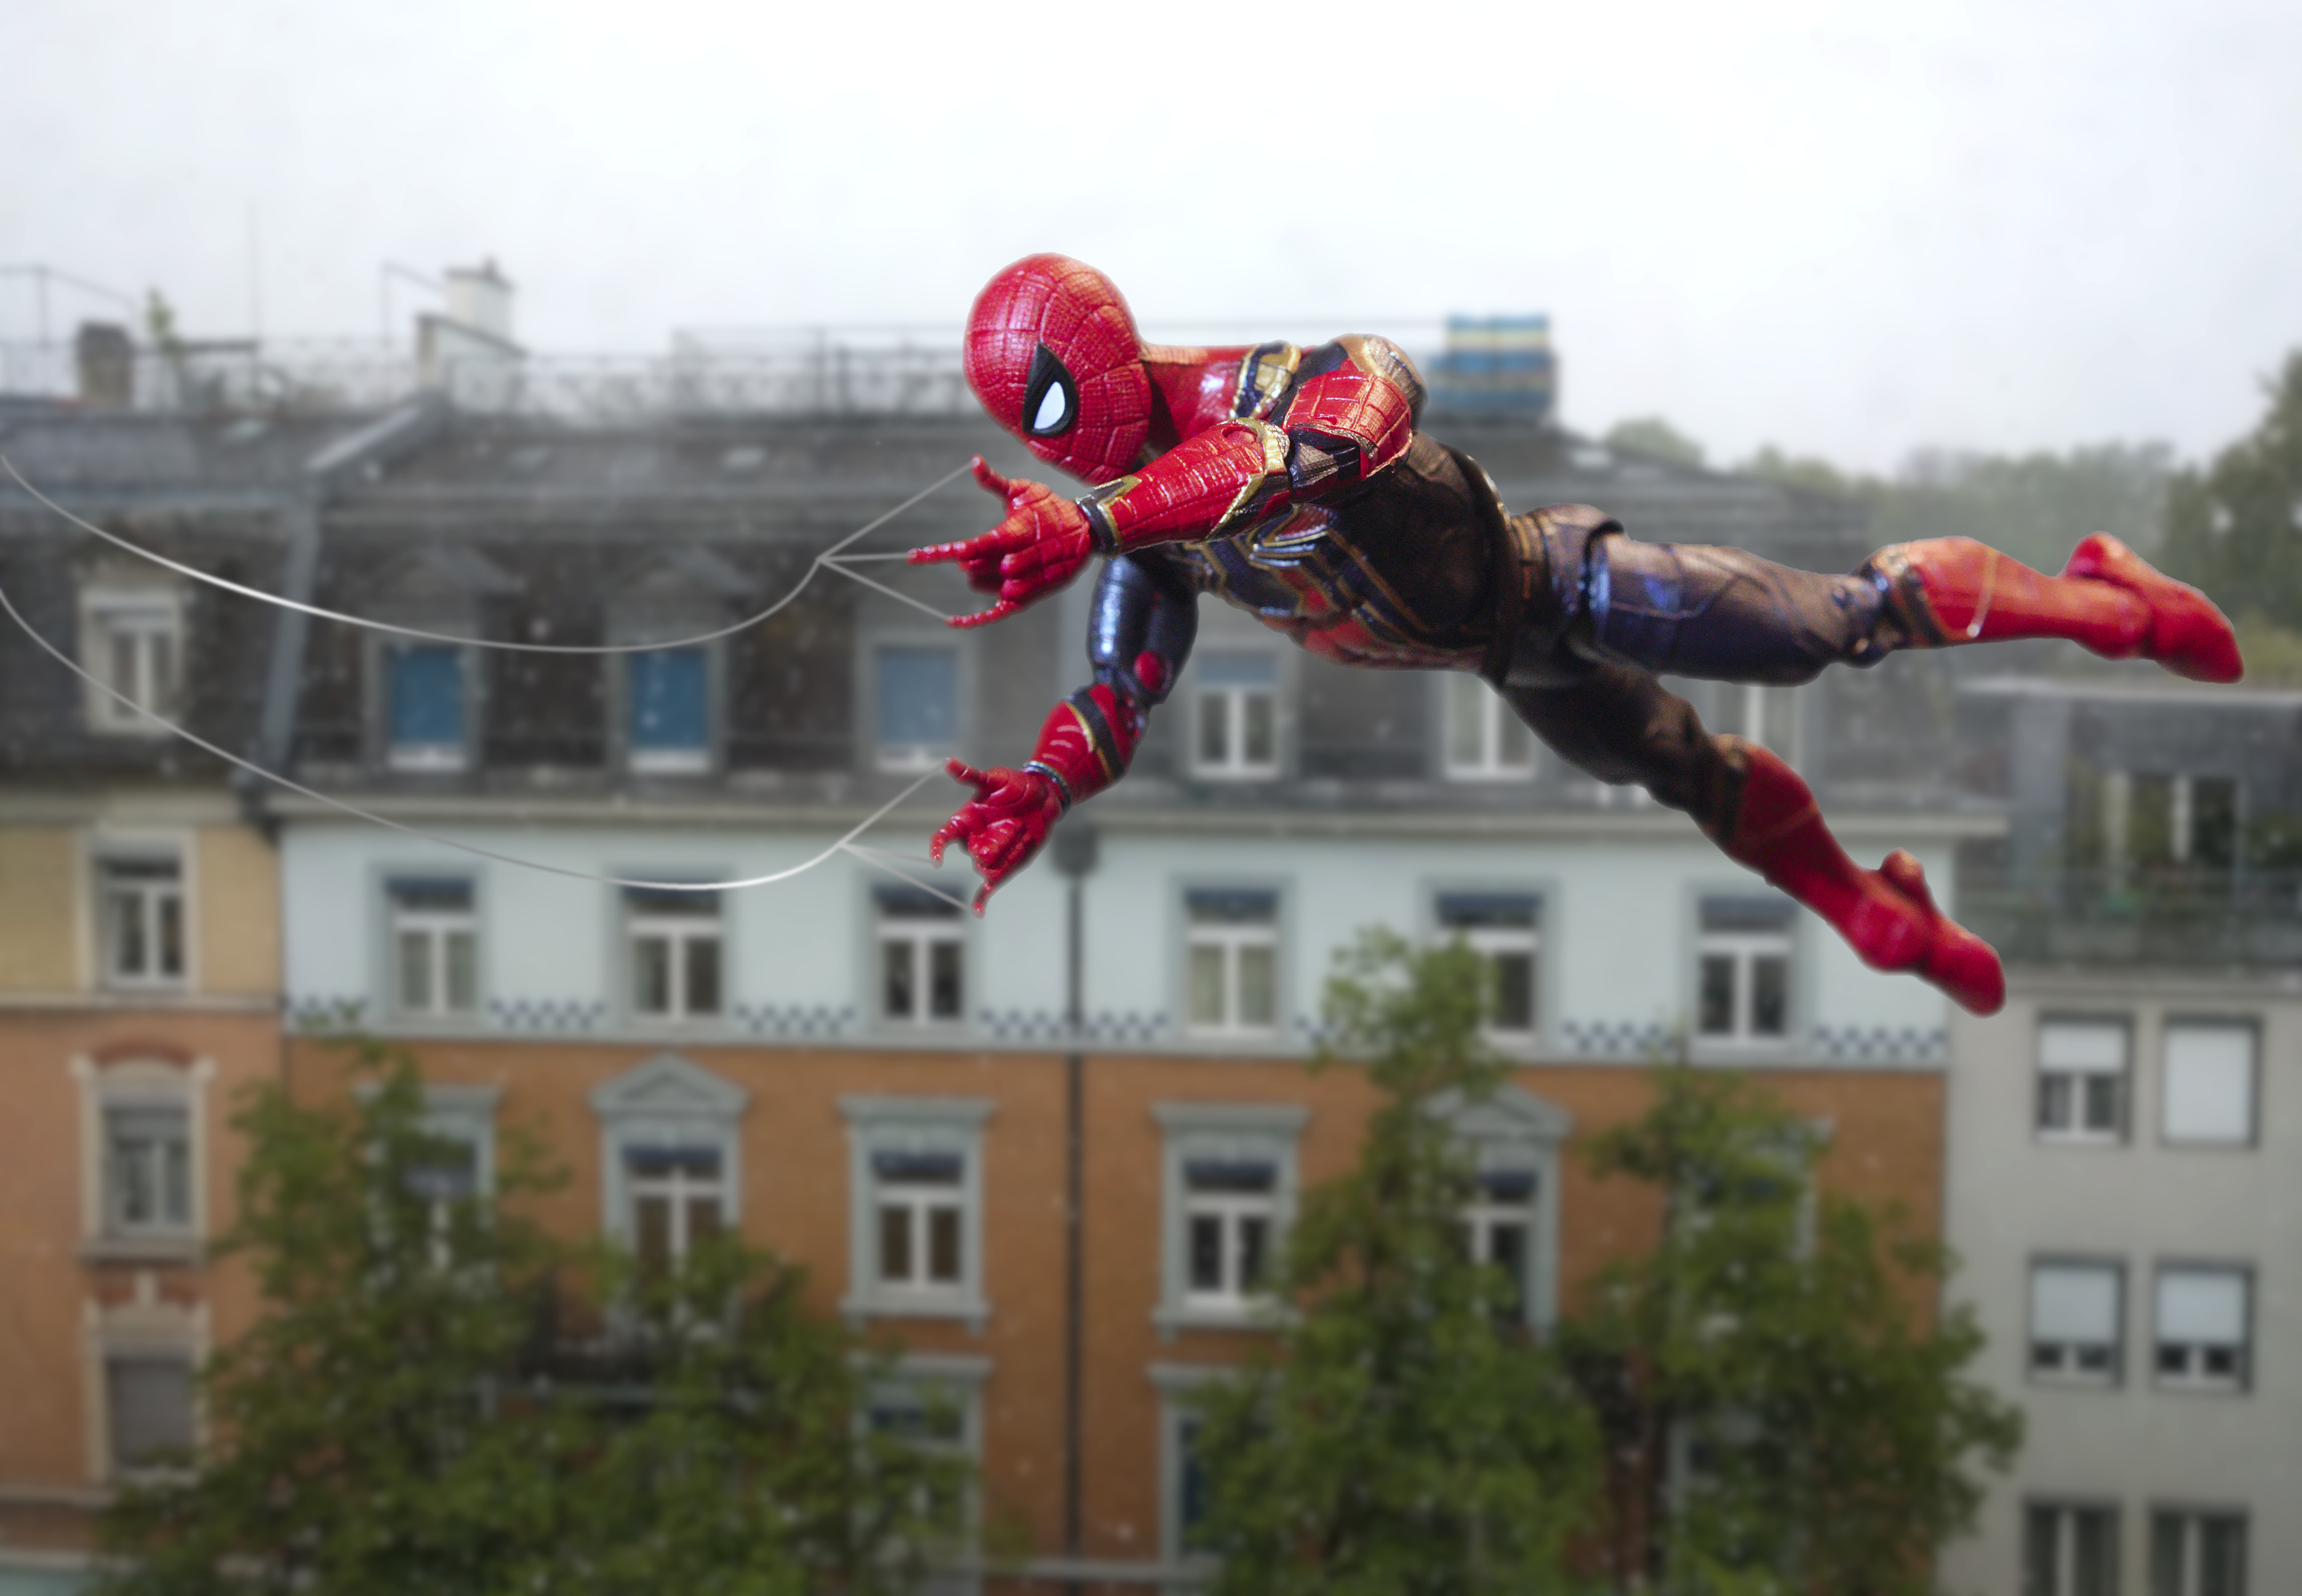
At the end of the day, I was bubbling with ideas and motivation and all this sort of things; I believe that Friday was the day that made the most contribution to the motivation that I still have today, and gave me the most ideas of things to explore. It’s also the direct cause the my “Spiderman” image that I built a couple of weeks ago when coming home (more details in Spiderman visited Zürich!)
Saturday – Bok Tower Gardens
On Saturday, we went for a field trip at the Bok Tower Gardens. The garden has a very pretty tower (the Bok Tower in question):
There was a Game of Thrones event in the garden that day, with a lot of cosplayers! It took me a while to connect the dots between “wait, this guy is REALLY reminding me of someone” and “ooooh, he’s cosplaying as George R.R. Martin! Well done!” before I had seen the rest of the people. I know that many Scavengers took the opportunity for some great shots, but I was, at that moment, both too shy and too flustered to even try to interact with them 😦 It’s a bit sad, it would have been cool – they were really looking fantastic! It must have been quite difficult, though, because they had a lot of layers on, and it was probably around 33-35°C at that time… The tower is also hosting a carillon, and it’s been playing for a long while – including, at some point, the GoT theme, which I found very cool 🙂
The garden also encloses the Pinewood Estate, which I could visit. It has, in particular, fantastic tile work and light fixtures 🙂 And a very cool sink.
And that yields a second album: Bok Tower Gardens. I kind of regret not having more pictures of the gardens themselves – it was very nice, but it was also very warm (limited me-compatibility) and sunny (limited photo-compatibility).
We were also very lucky to have Tatjana André with us, thanks to Angela and Jim – she modeled for us under the heat with a lot of patience and grace, and was generally speaking amazing 🙂 It was the first time ever that I worked with a model, and it was a very interesting experience, although not necessarily one that I would repeat any time soon. I do have a hard time taking pictures of people in general, and I have an ever harder time editing/processing pictures of people in general – and that’s something that came very clear during this session and its edition. It didn’t help that I made Bad Choices with camera settings, and that my pictures were often either unfocused or annoyingly noisy, and it didn’t help that my focal length was not nearly long enough. Despite all the awkwardness, I did get a few decent shots.
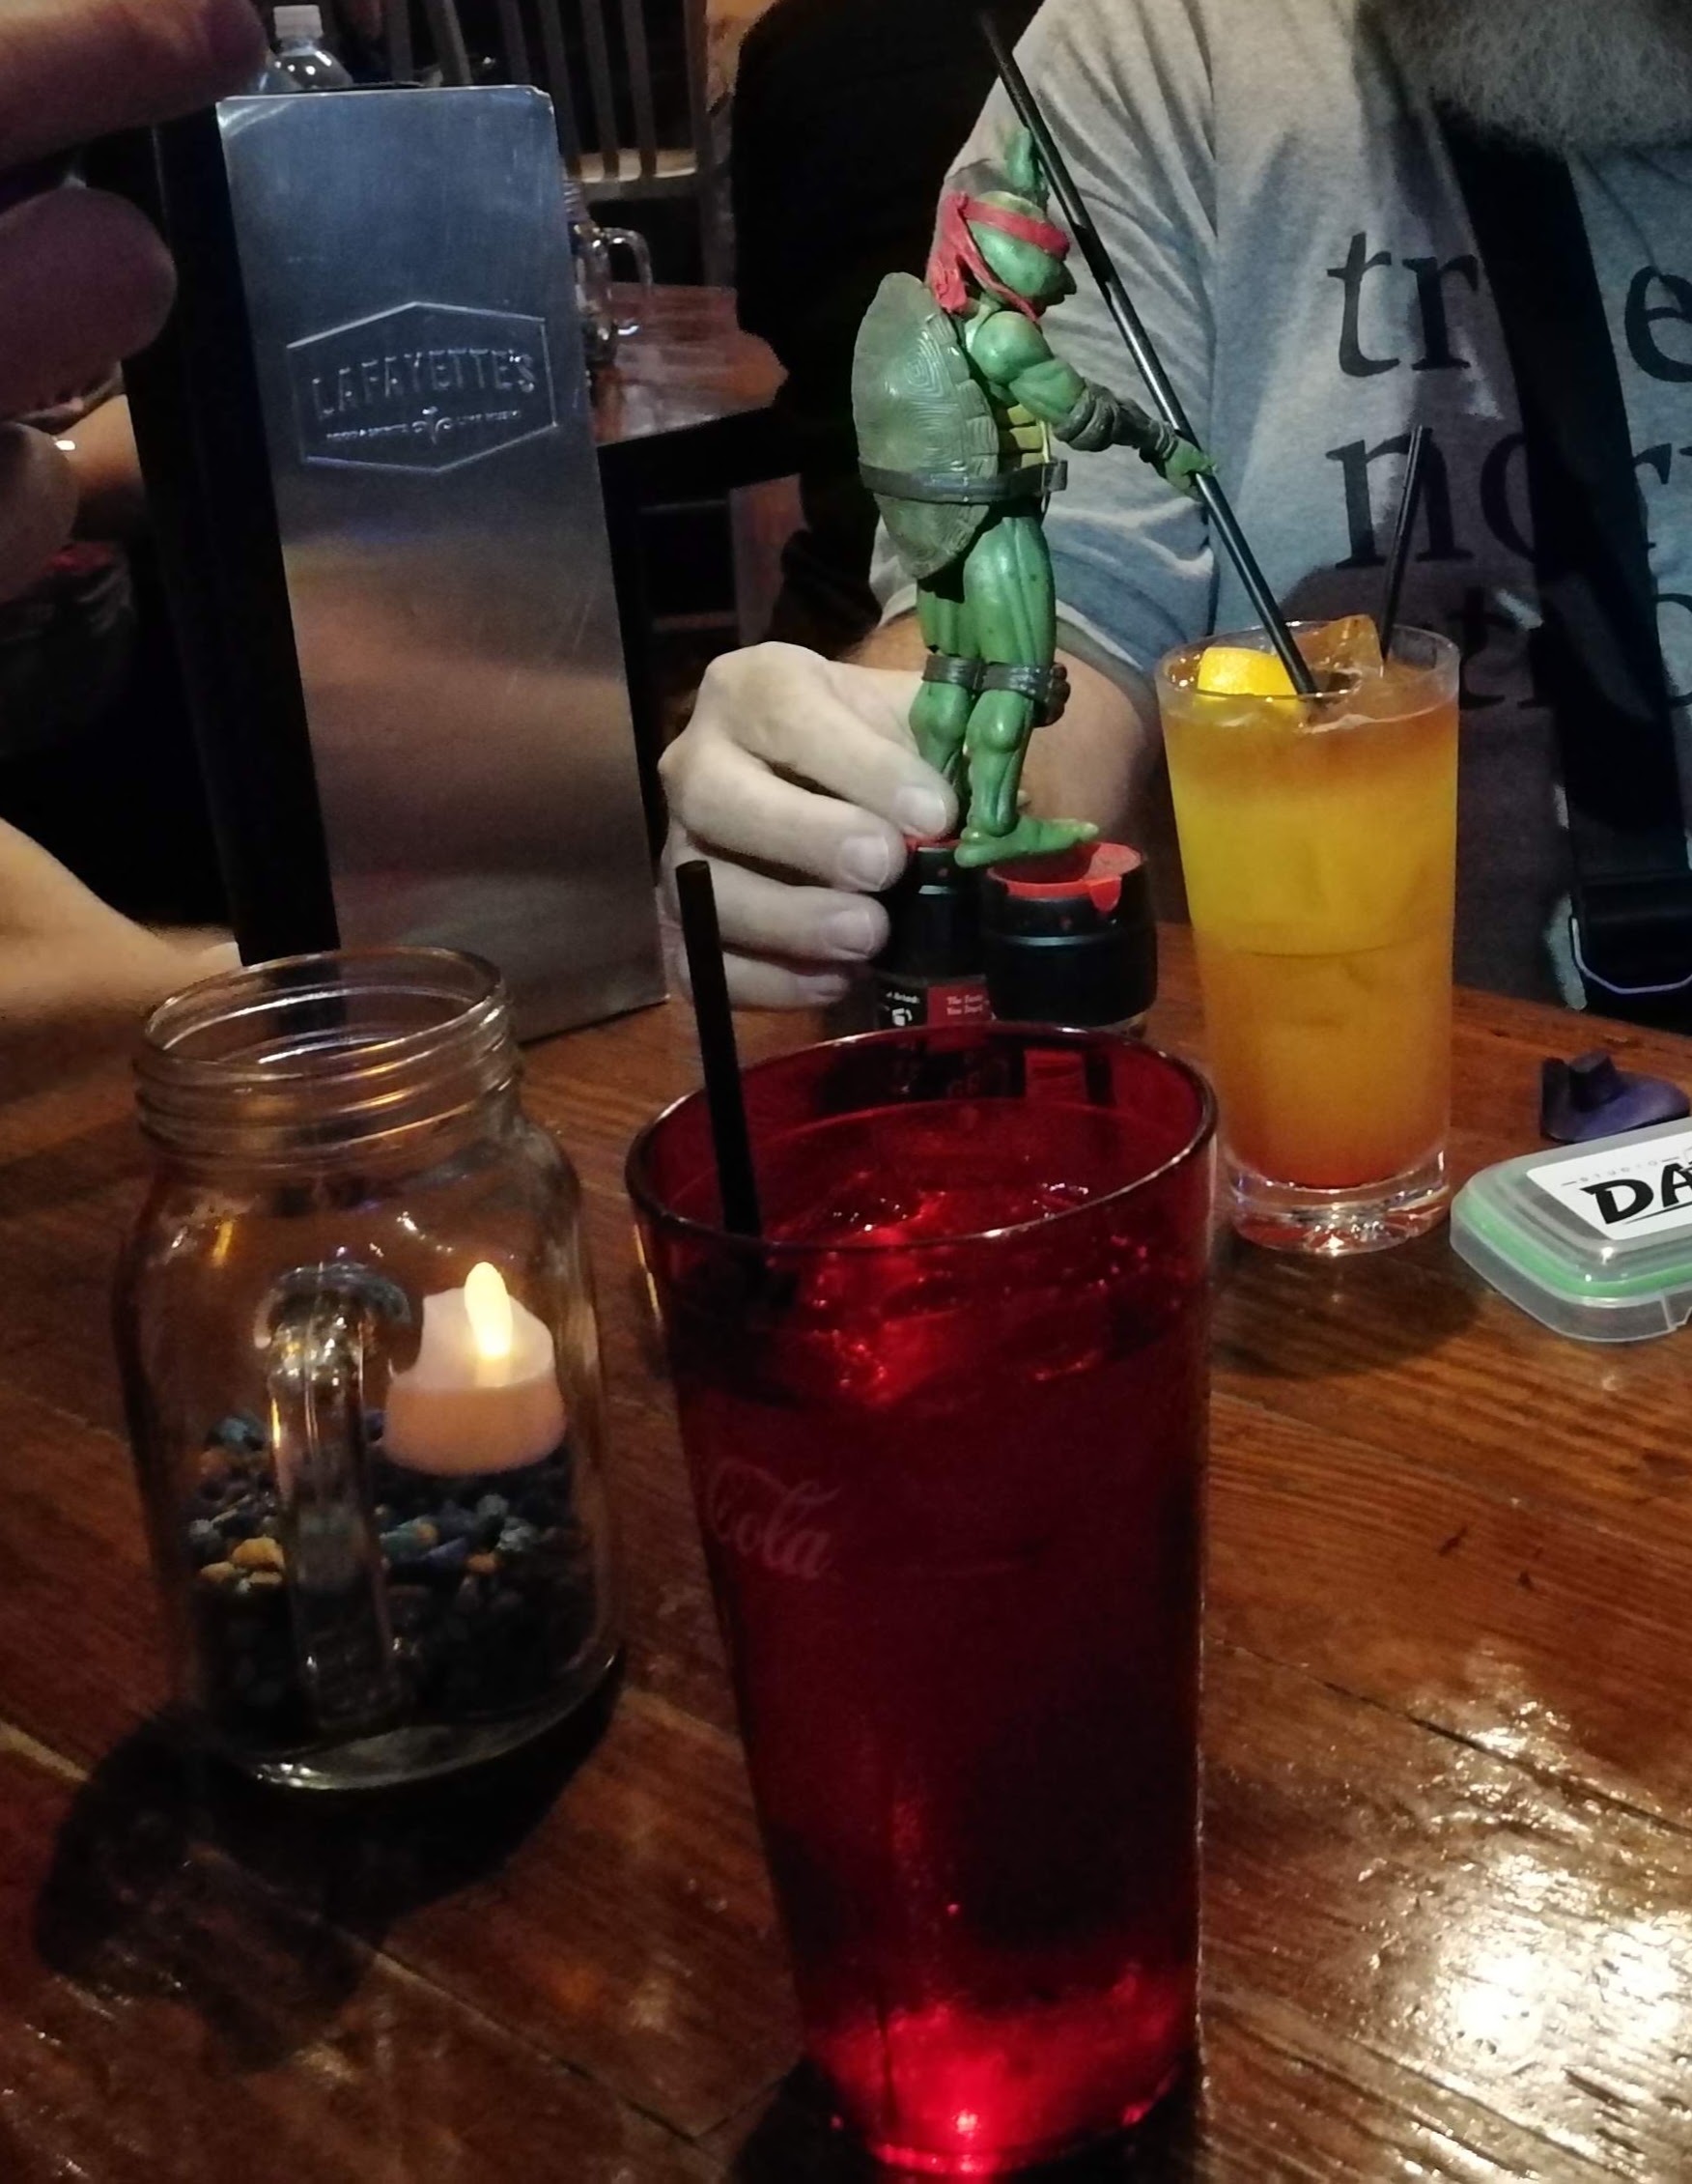
In the evening, we had pizza in the hotel lobby, and some toy photography shenanigans happened, lit with a mix of lume cubes and cellphone lamps 🙂
Later, we went for drinks to Lafayette’s – there was a cool band, Ancient Sun, and I enjoyed that a lot. I don’t know much about saxophones, but I particularly enjoyed the saxophonist’s performance 🙂 And I may have ended on the dance floor for a couple of songs – proof that my ankle was definitely getting better (A couple of songs was all that was reasonable, though!) And at the same time, there was more toy photography shenanigans happening 😉
Unfortunately, I had to bail pretty fast, because for all the fun that it was, it was also very loud. But as I walked back to the hotel, I felt an amount of joy I have only rarely experienced in the past few years. I think it was a mix of “everything is going great despite my initial fears”, “I’m learning a ton of stuff and I’m super motivated right now”, “I like literally everyone I talked with” and “I’m actually glad I bailed and kept the good memories instead of pushing through and ending up in a worse mood”. I arrived at the hotel, dropped a few lines of apologies on Facebook (which has been our major communication channel during the meet-up), and spent an hour or so editing some pictures from Boston. Someone nudged me to come back down in the lobby, which was much quieter, and after asking myself whether I was okay to do that and whether I wanted to do that, I spent a bit of time in the lobby, chatting and laughing, before eventually going to bed.
Sunday – last day! And after…
My Sunday was pretty quiet. I went to breakfast quite early, because I wanted the opportunity to see everyone who’d be there and to hopefully say goodbye to everyone – I don’t think I managed, but I still saw a lot of people. It was a bit sad, of course, but I think there’s still some certainty that we’ll see each other again, at least on the Hunt, and hopefully in a future meet-up.
I had arranged a ride to the airport with Gary and Wade, who had planes around the same time as mine (thanks Gary 🙂 ), which made me somewhat nervous (timing-wise) about joining other people’s activities (on top of being somewhat weary in general), so I stayed in the hotel lobby in the morning with my laptop, and continued my photo processing.
I posted my last “25th Scavenger Hunt” post from the airport in Orlando, which I thought was quite fun.
The whole thing ended three weeks ago, but there’s still pictures and memories trickling on the Facebook group, which makes the whole experience last just a little bit longer – which is amazing.
Since the meet-up, I’ve done the Spiderman thing, I started learning how to use GIMP for real (I’m watching videos and everything!), and I do have a concept for a couple of images that I want to make – and I typically don’t have images in my head before I start shooting, so I’m super curious about how this is going to turn out.
And, hopefully, for the next Scavenger meet-up, I’ll be less nervous beforehand 😉
It seems fitting to start writing this post at the airport while waiting from my flight back from the Scavenger meet-up, where I got to meet a great group of great people, learn stuff and get a lot of ideas of new things to try and to experiment. But, without further ado, here are the remaining pictures of my 25th Scavenger Hunt submission (the first two parts are in previous posts: 25th Scavenger Hunt – 1/3 and 25th Scavenger Hunt – 2/3).
Green
I’ve been wanting to experiment with photographing rocks and minerals for a while now (but lacking the proper subject to do so). And then, at some point, I remembered that there was a mineral shop that I wanted to visit in Zürich, and that it had been closed every time I had been there (it’s in a part of town where I like strolling, but mostly stroll on Sundays, for some reason!) I finally pushed their door one afternoon, and came home with a small haul of small stones, including this very pretty Green emerald stone. And no, emerald doesn’t break the bank when it’s in that form 😛
The picture is a composite of between 10 and 20 pictures, focus-stacked using Zerene. I shot the stone on my paper background, and was pretty surprised to see its texture appear below the stone – but I happened to really like the effect (not to mention being profoundly unable to edit it away :P), so I kept it that way.
Quarter
My shot for Quarter started as a backup “if I don’t get a better idea” shot – literally shooting my dinner, in fairly crappy evening light on top of that. And then, I started playing a bit with it, darkening the background, playing with the orientation, and it started to become a shot I didn’t hate, so it ended up being the final shot.
Knife
Knife is one of the last words I tackled, if I remember correctly. Inspiration had not struck there either, so I went for yet another easy kitchen shot as my husband was cutting onions.
Button
Something would be missing if I did a Scavenger Hunt without a single board game picture 😉 So for Button, here’s a picture of Patchwork, a very neat two-player game where players compete at building the best quilt, and where buttons are used as a currency and as victory points.
It hasn’t always been the case (I’m thinking of a Squash entry for a previous hunt), but now I’m trying to get a credible game state whenever I take board game pictures. And the easiest way to do that is to actually play the game, even by myself playing the different players (which is exactly what I did there).
And the picture itself was mostly a matter of finding a pleasant enough angle.
Ice
That’s the most accidental one of the whole set: I went to the aquarium to shoot Sponge, I came home, and I realized I could play the penguins for Ice. Not a great picture by any means, but it’s part of the full set, so I’ll be happy with that 🙂
Remote
Second self-portrait (over a set of 26 pictures, I would have expected more of them!) for Remote. Buying a remote trigger for my camera was one of the best decisions I made, because I really use it quite often, either for that kind of application or to avoid moving the camera when triggering the shutter manually. So for once, it’s very visible in the picture 🙂
I was also playing with the studio lights that my colleague had lent me – I’m not necessarily convinced by my work with them on this picture, but I like how my hand has more light than the rest of me. And it was generally speaking a good exercise for me to start playing with these things (although it gets warm very fast!). Also: probably should have brushed my hair before taking that picture 😛 (But hey, this is a photography thing, not a modelling thing 😀 )
I had a different set of pictures with a pose where I’m holding the remote as if it were a pistol; I liked the image more, but I was not comfortable sharing it publicly, so you get this one instead 🙂
Donut
My Donut was an unexpected find in the frozen goods aisle of a large supermarket – I took a couple of picture with my phone from above, and boom. The plan B was to have my husband make some donuts during the Hunt time – he probably wouldn’t have objected to the idea 😉
The picture is somewhat more processed than usual – for some reason, I was trying to get a “retro” look for this picture, because it felt like the right thing for it; I’m actually pretty happy with how it turned out.
Yellow
Yellow also benefited from my trip to the mineral shop that gave me Green at the top of this post. It was significantly more annoying to shoot, though, even if it’s a single image (not a composite). That stone is obviously much more interesting when you see the inclusions and the transparency, which meant backlighting, which meant struggling to find a way to hold that thing vertically – it doesn’t hold on its own, and it’s small enough that there’s no easy way to find a support that doesn’t hide it completely. I finally solved the problem by leaning the stone against my studio lamp, and putting it over a box covered with my faithful dark fabric.
The processing was mostly making the blacks black and the whites white (although I failed at that in the left corner and I’m grumpy now that I see it).
And there, those were all my entries for the 25th Scavenger Hunt… which makes me want to ask, do we have a list for 26th yet? 😀
Second post of my Scavenger Hunt pictures! The first part and a bit of context is here: 25th Scavenger Hunt – 1/3.
Leaf
My Leaf comes from… my balcony. I have a 5th floor balcony, all concrete and metal and everything, and that thing’s been growing in the drain 🙂 Life… finds a way, I suppose. The picture was mostly a matter of lying down on the balcony, arranging the offshoot to get the right angle over the drain grille (which I really like as a background here).
Olive
Olive was also a theme for last hunt, and I was super happy with my entry there, but completely out of ideas for a new one. Lukily, this pretty MG spawned in my neighborhood (and stayed long enough that I have multiple views of it, even if they’re all on my phone!)
Vase
My Vase entry is firmly on the “I’m happy with this one” side. It started with a bouquet of tulips, which I had initially bought for another word of this hunt (one that has not been revealed yet, shhh!), and ended up being used in yet another image (but not in the original theme) 🙂 I took a fair amount of pictures of that (by that time wilted) bouquet – this one was taken on the floor, in front of my dishes cabinet, and it worked really well in my opinion, with the white-blue-grey of the vase and the white of the cabinet behind. I’m also very happy with the crop, which happened almost by accident. Generally speaking, I like that picture 🙂
Earring
Earring also ended up being a favorite of mine, despite being somewhat in the “hmm, I don’t really have an idea there”. I actually searched Google Images for inspiration – that’s where I got the idea of setting up on the side of a glass. And then it kind of clicked – I went for a “after the wedding” theme, using my own wedding jewelry (and my husband’s cufflinks), adding the hair pins in one of the glass (there’s definitely a memory of removing a gazillion hair pins 😀 ), and finishing the image with a piece of ribbon, also coming from our “wedding memories” box. Setting up all of that in my softbox, and voilà !
Fire
Fire would probably have ended up with me playing with me playing with candles in one way or another, if my husband hadn’t decided to try his hand at crème brûlée during Hunt time (better: FANCY crème brûlée, with roquefort and pecans. It was delicious.) And I actually manage to react quickly enough for a “waaaait a minute, this is relevant to my interests” camera-grabbing. A thing of note on that image is that I flipped it on the vertical axis because it “felt” better that way, which is not something I often think of, and I’m definitely happy I did, because the image is better that way. Sometimes things are weird 🙂
Chocolate
For Chocolate, my husband is also to be credited 🙂 He made some chocolate (it’s a thing that happens from time to time – I started it, he took over 😉 ), I arranged it in a corner of the kitchen and snagged that shot. Easy-peasy!
I had a “backup shot” with some (delicious) hot chocolate in a café in Zürich, but I ended up going for this one that I liked more (for one thing, it’s pretty difficult to make the difference, on a photography, between a hot chocolate and an espresso… except by the size of the cup!)
Moon
There was a full Moon and clear skies a few days after the Scavenger Hunt start – perfect opportunity for some balcony shots! This image is a composite of two – the lines and halo are from my neighbor’s balcony (the moon was “trapped” in there for a while), and the moon on top was shot at a different exposure. I’m happy that I had previous experience with taking pictures of the moon, because it’s non-trivial at first glance, but it goes well with the the right technique (expose at f/11 – 1/250 – ISO as required, use tripod and remote, do NOT focus at infinity, use live view and zoom and peak focus to focus properly).
I was expecting to go for a more “natural” look of the composite, but I actually kind of liked the “quirky” effect that this one had (it’s like the moon’s a penny!). It was my first shot of the Hunt, and I’m still quite happy with it.
Jellybean
I had a lot of fun with Jellybean. I don’t eat much candy; I’d assume I could find an equivalent of jellybeans in Switzerland, but I didn’t find anything convincing when I browsed my supermarket aisle. Hence, time for some creative solutions: let’s have… jelly beans, I guess. I found a pack of red strawberry jelly, which I made with slightly less water than was written on the package to get something that would really hold together for the picture. And I took the prettiest dry beans I could find, sorted though the package for the best looking ones, assembled all of this, and tadaa! At first I wanted to just do a “food” shot, but I decided it’d be funnier to go for the “I don’t know what all these people are raving about, jellybeans are DISGUSTING!” approach 🙂
Pencil
My first idea for Pencil was to go for a bunch of pencil shavings – you can always get a pretty graphical shot with these, and I liked the idea of just “suggesting” the pencils by their absence. But in the end, the laziness prevailed and I went for a shot of my pencil box. It turns out that I broke my blue pencil, and it’s consequently significantly shorter than the other ones, which give a bit of interest to the picture. (But I do own the replacement of that pencil somewhere 😉 ). I spent a large amount of time sorting the pencils in an order that made sense to me, and then some time shooting them from different angles, before deciding for that one.