My AlphabeticalZürich project may not be very active when it comes to content, but it’s been an interesting source of tinkering lately. I’ve moved it out of WordPress to a statically-generated set of pages (that’s a story for another blog post, which I should write before I forget everything) and, in the past couple of days, I’ve added a progress map.
The idea of a progress map has been around since the early days of the project – I’m pretty sure Matthias was the one suggesting it in the first place, and it stayed in a corner of my brain. At the time, it felt somewhat overwhelming; I had explored stuff around the OpenStreetMap ecosystem, but had not dug that rabbit hole deep enough to get anywhere interesting.
And then, a few days ago, a few stars aligned in the form of “having a few days off”, seeing a Mastodon post about custom maps, remembering that the person in question DOES have custom maps on her website, digging around source code to see how that kind of things could possibly work, and finding the right resources at the right time.
First thing first: displaying map tiles
The data I want to display are lines representing streets of Zürich. And technically I could probably display a set of lines of different colors and be done with it, but a map is nicer with stuff like context and labels, so I needed a base map. The canonical way of displaying a map is to use tiles, so I knew this was one of the building bricks of my project.
The fact that I found Protomaps early in my “okay, how would I do this”-research was instrumental in the existence of this project, because the rest felt far more achievable on my own. Protomaps has a free tier that should be more than enough for the needs of my tiny website, and it looked easy enough to integrate. Its main feature is also to provide the tiles in a single file, so if I wanted to move that to my own storage, that’s a possibility. I went for the Leaflet integration because the doc promised me it was simple, and indeed it was.
Add centering coordinates, decide for a color scheme (I’m cheating, this came a bit later 🙂 ), and I have map tiles, which is one problem solved.
Adding progress data
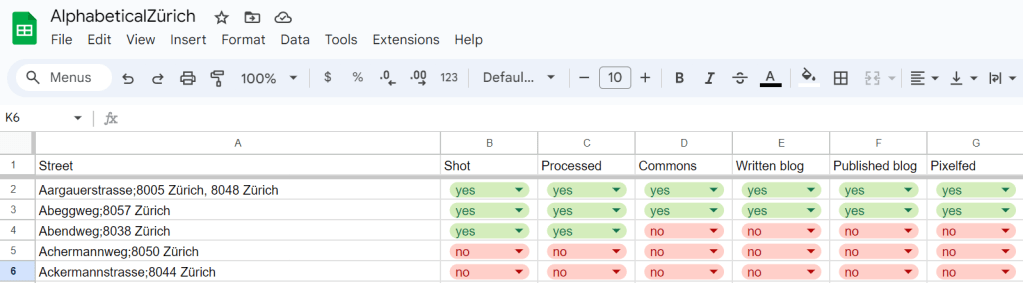
To my map tiles, I wanted to add colored lines for “streets that I have published”, “streets that I have visited but not yet published” and “streets that I have planned to visit next”. I have this information in a spreadsheet, so that’s easy enough to exploit; but to be able to add lines to the map, I needed coordinates. The one format I’m vaguely familiar with (because I have written some code for Kartographer, the map extension of MediaWiki) is GeoJSON, and Leaflet supports that, so GO, GO, GO! I first started playing with the idea of making my own geometries with geojson.io and promptly decided against it (“this is going to make my publication process more complicated, how about no”) and remembered that Zürich has a lot of open data, and in particular the Strassennamenverzeichnis (“street name directory”) that does have line geometries in there.
So I wrote a small script to merge my spreadsheet (exported to CSV) and the Zürich open data source into a custom GeoJSON, and added it as a layer to my map. As a first test, I copied the whole thing in geojson.io, and for the first time I had a map of “where did I go already”, which felt pretty good!
It required some tweaking to get it to work on Leaflet, because, as it turns out, while the geometry definition is well-specified by GeoJSON, there doesn’t seem to be a standard for their display. The styles are typically defined as properties stuffed along the geometry, and these properties do not have consistent naming or schema depending on the display software. Still, eventually, I did manage what I wanted, and so at that point I had, on my local machine, a map base enriched with progress information. Wonderful.
That said, I had colors, but no legend whatsoever, and a map without a legend isn’t very useful. Thankfully, Leaflet has a way to add a “control”, which can contain arbitrary DOM – so I added a small legend in a very ugly but hopefully still vaguely reasonable way. (I’ll need to fix that at some point.)
Interlude: limiting the access to the API
So I had all my stuff still on my local machine, and the goal was still to have that map somewhere on AlphabeticalZürich. And there came something that kind of bothered me: the access to Protomaps puts the API key in the URL, and provides a way to define CORS limitations (which are client-side, not server side – although in that case there is some validation on the server side too). I am reading this as “API keys are not secret”, and the usage policy made me believe that, if my key was used by someone else that would mess up with my free quota, I could recover from that, but I took it as a challenge to try to not leak that key. Turns out, it was a bad idea, as I realized when writing that post.
Additionally, I’m trying to be a good citizen, and to not hit my wonderful tiles API more than I should. In particular, if I can avoid accessing tiles from any other area than Zürich, it feels like a good idea.
Some reverse proxying fun (and learning some lessons)
Now for the “let’s avoid leaking the key” part. It was pretty obvious that anything client-side would leak, so my goal was to send requests to my own stuff, inject the key there, transfer the request and get the result back. That’s the job of a reverse proxy, so I played with my Apache config until it worked (and I didn’t mess up Apache restart once in the process, proud of myself there).
Now, obviously, I do have an open URL on my website (because client-side Javascript needs to be able to access it), which doesn’t have an API key, that gets transformed behind the scenes to an url with said API key. Which means that anything can use my public URL to hit the Protomaps API without a key. Somewhat counter-productive.
The following train of thought was to add a filtering on the HTTP referrer of the URL, which does work, but which is also trivial to bypass by injecting the same header. That kind of made the whole process useless overall, but it felt “well, not worse than having an API key on the page, because the potential abuse mechanism I can see also basically is “add a HTTP header and be happy”.
Except, it actually *is* worse, which I realized when writing this blog post and feeling uncomfortable writing this down. It is actually worse for two reasons:
- All the requests in the reverse proxy abuse scenario are eventually made from *my* machine – I’m basically running an open proxy for which I’d be responsible to shut down bad traffic (oops)
- More importantly: it makes “changing the API key in case something goes wrong” COMPLETELY useless (large oops).
So all in all, I was feeling very smart when I made Apache do what I wanted to do, and very stupid when I realized that what I wanted to do was utterly counterproductive and actually actively harmful. Lesson learnt: if your client is supposed to access the key, so be it, and don’t try to outsmart documentation to deal with imaginary dangers. And yes, I suppose I could have gone the route of making a proper back-end and running things server-side and be happy, but I really don’t want to have a back-end on this website. This thing is made to be integrated to a web page, this is the way.
I’m probably still going to want to avoid putting that key on a public git repository, because there’s a difference between “it’s in a JS somewhere on a low-traffic website” and “it’s on GitHub open to anyone searching for ‘key='”, but that’s a problem for future me, probably (and actually an easy enough problem, since I’m already adding menus to that page programmatically.)
Handling map boundaries
I still wanted to handle map boundaries correctly, because that just felt nicer. It was an interesting problem, because for a while I thought it just wasn’t working – but, in fact, it wasn’t working *as I expected*. What ended up working was a combination of three settings on Leaflet.
- Setting maxBounds to “area around Zürich” – this is what I expected to need to do, so far, so good.
- Setting maxBoundViscosity to 1 – that’s a setting on Leaflet that defines how much the maxBounds are actually enforced; by default it’s 0; 1 bounces the display back into the bounds if the user pans out of the map
- Setting minZoom to 12 – that’s the thing that required me to think most. I was very confused at the beginning, because I could zoom out to the world and then zoom back in to any place in the world outside of maxBounds, and I wasn’t sure why – until I noticed that the maxBounds documentation was explicitly talking about panning. Hence, setting a minZoom to “some value that will allow to see the whole map but would not allow to zoom in to something wildly outside of the chosen bounds” seems to work decently enough. I was happy to have a tiny bit of a sense of how tiles are structured, because it made me connect a few dots in my head quicker than it would have otherwise.
Bells and whistles: Zürich city boundary
For the finishing touch, I also wanted to add the Zürich city boundary to the map. It was somewhat more annoying to get the correct data – I didn’t find it on the Zürich-city level (because everything I had was defining multiple areas, for which I would have needed to get the outer polygon – feasible, but annoying), and finally found it on the Zürich-canton level. Note to self, as it took me a while to find how to do this (and a while to find AGAIN how to do this): click on the “Datenbezug” download arrow, and then on the first question instead of “OGD Produkte” choose “WFS-Datenquelle”, and then the rest is relatively straightforward.
RELATIVELY, because there’s a final trap: the default coordinate system is in the Swiss coordinate system, and it took me a bit of time to understand why I wouldn’t get a polygon on my map. Once that was fixed, I fought a bit with the styling definition, but I finally got the map I wanted to have.
Conclusion
I’m happy that I started with “okay, how would I do this” and managed to get through the whole project, which was not that large, but on which I had given up previously, and that connected quite a few points and a couple of rabbit holes. I’ve learnt stuff and I have something to show for it, so all in all that was very satisfying 🙂